
Photo by Markus Spiske on Unsplash
Here is my Log book
- See Day 32 for how I tested the Grow HAT and soil moisture sensors.
- See Day 33 for how I set up a test rig for the water pumps.
I have always had a love and interest in aquariums and kept tropical fish for many many years. This also made me dabble with aquatic plants and at some point I started getting an interest in Aquaponics and Hydroponics.
During the start of the pandemic last year I wanted to get more involved in learning how to grow my own herbs and vegetables and finally try my hand at Hydroponics. Unfortunately so did everybody else and supplies was near to non existent. By the time I did get supplies the season for growing plants already ended.
Now a year later and the growing bug is starting again.
Pimoroni is running an Easter sale where you can get 20% off items and their Grow kit really attracted my attention. So today I will start exploring setting this up.
I will be following Pimoroni’s guide on how to Getting Started with Grow and Auto-Watering with Grow.
TL;DR; At the moment I having issues with the Grow HAT Mini and will update this post once I have a resolution on it.
UPDATE: The Grow HAT Mini is faulty. I bought another one and did more testing on Day 32.
UPDATE: Pimoroni sent me a replacement Grow HAT Mini and I tested it on Day 36. It works as expected and shows none of the same glitches as the faulty one. They have excellent customer service and I highly recommend them.
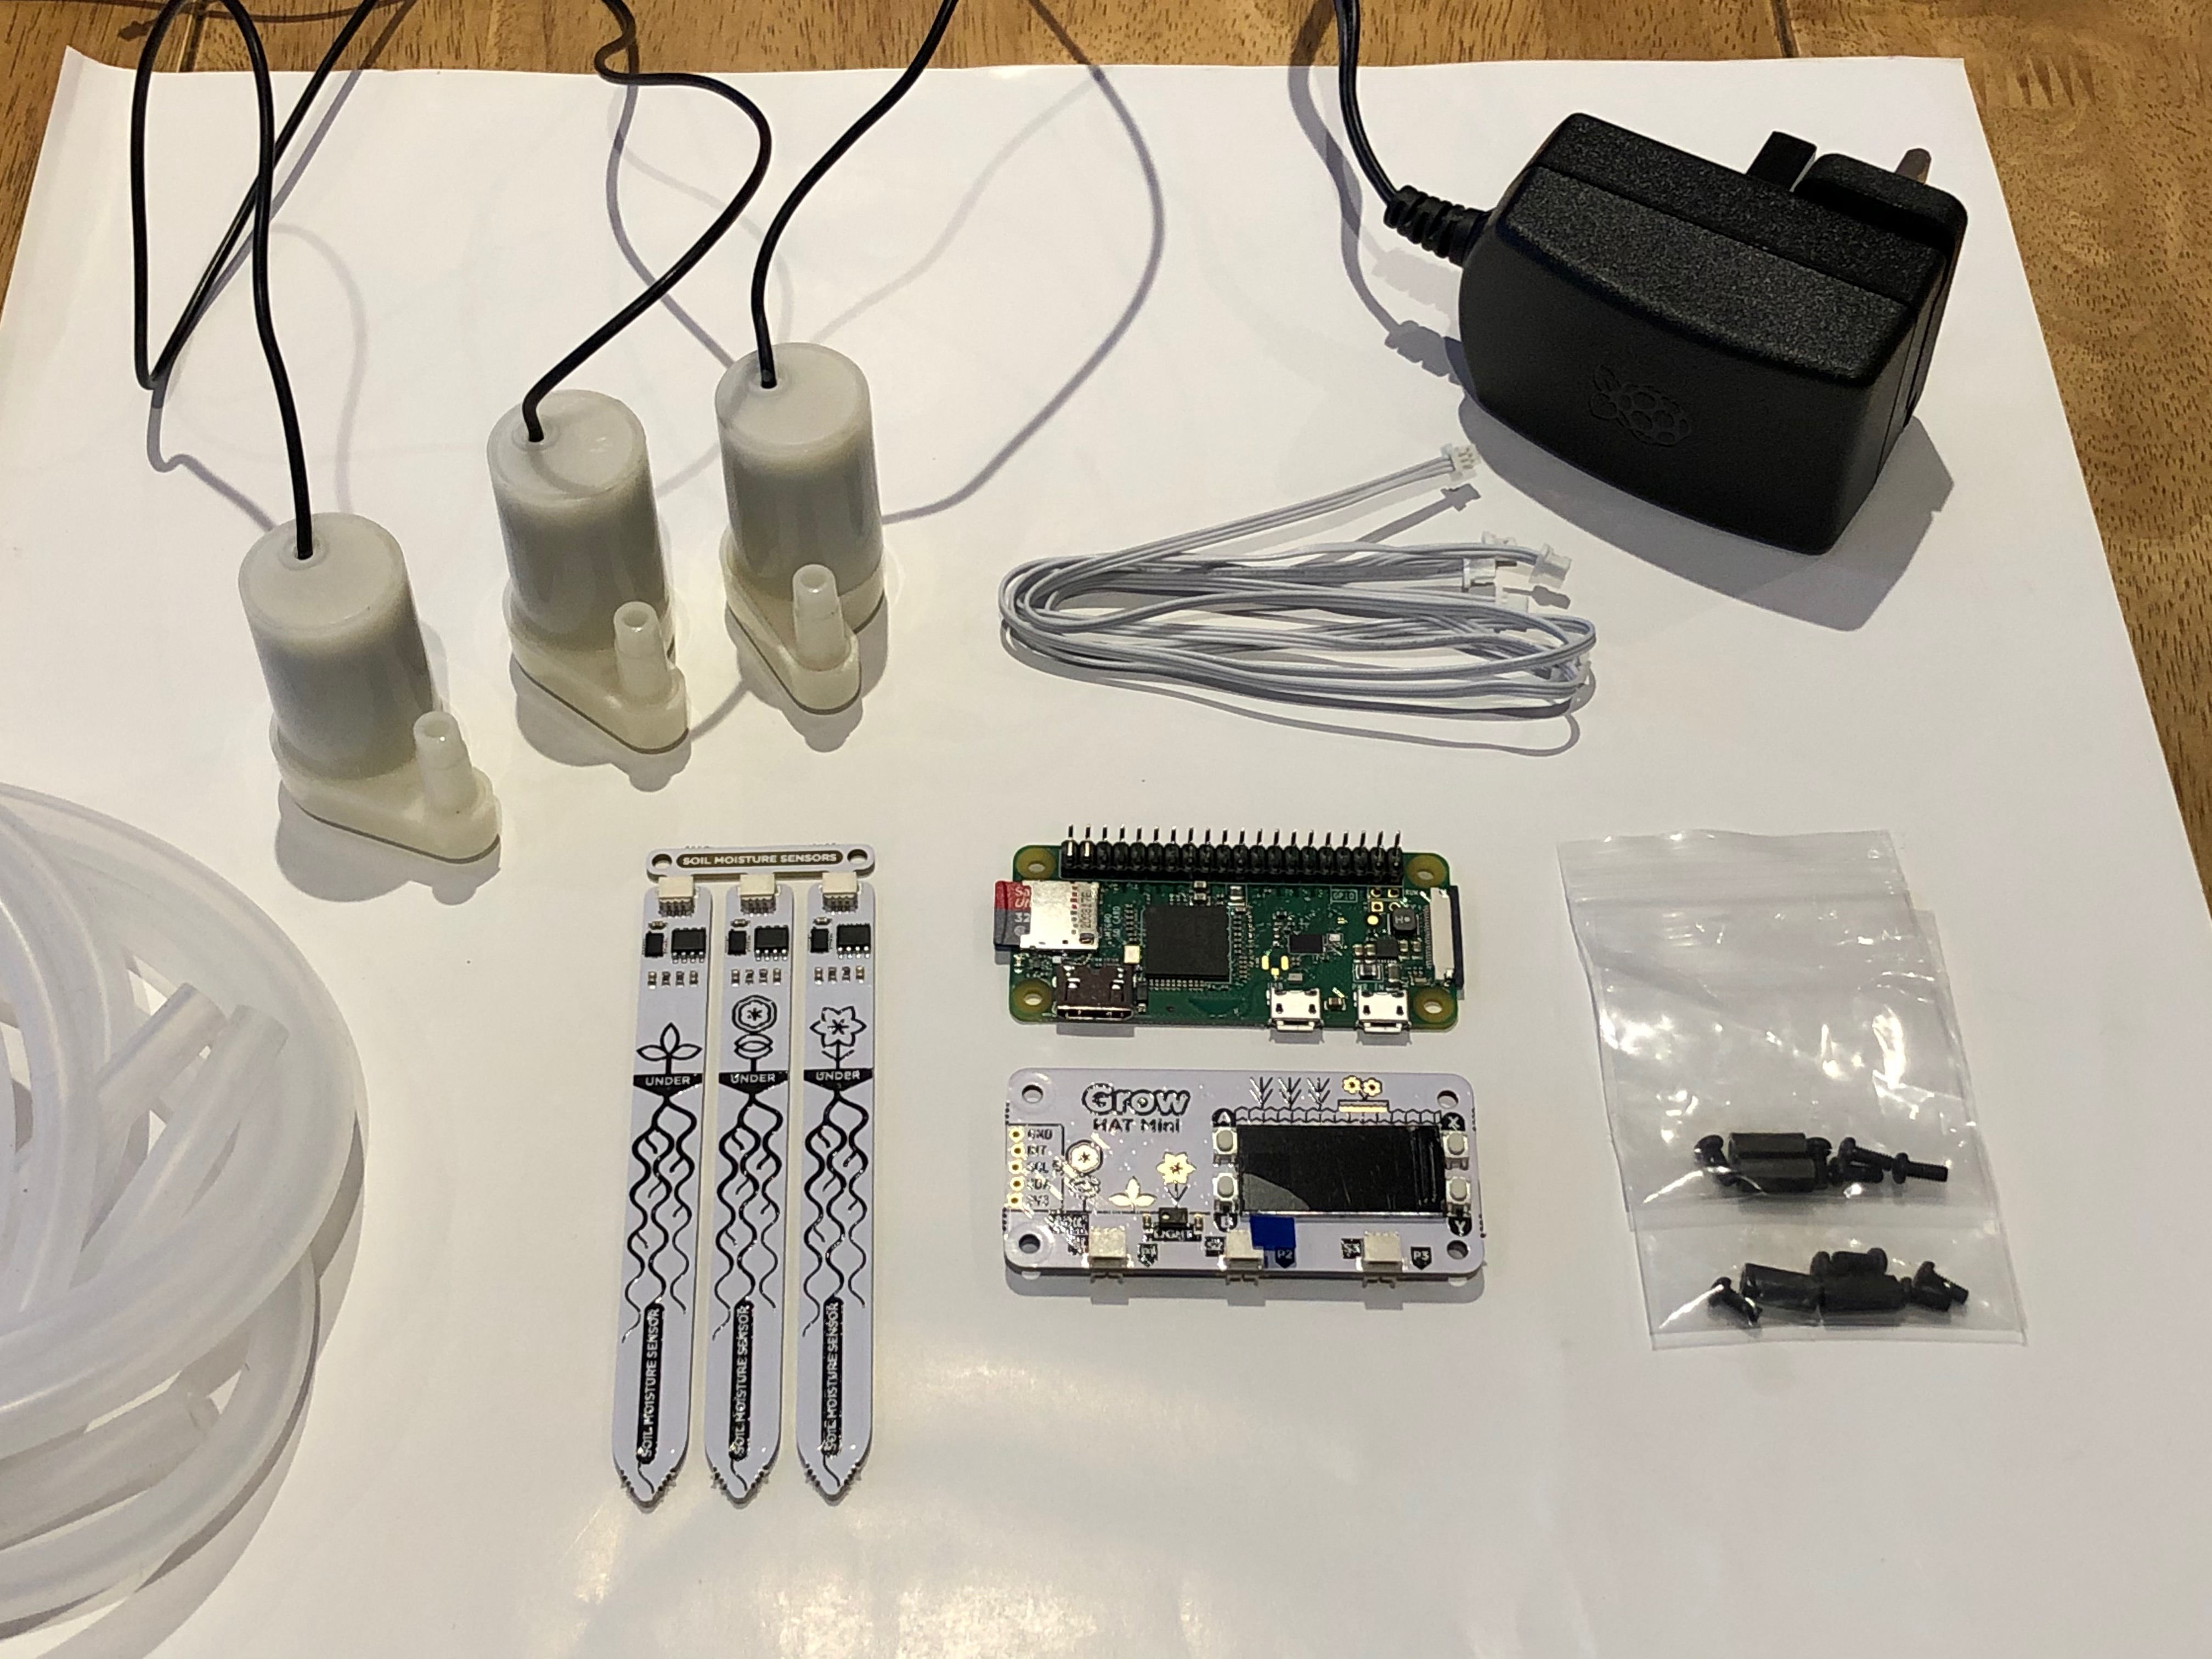
Hardware used
- Pimoroni Grow Kit which includes the Grow HAT Mini and 3x soil moisture sensors.
- Raspberry Pi Zero WH (H = with presoldered headers).
- Official Raspberry Pi Power supply.
- 2x M2.5 standoffs.
- 3x Mini Submersible Water Pump.
- Silicone tubing. I bought 3x 1meter but 1x would have been enough.
Setting up a Headless Raspberry Pi Zero W
Please see my guide on how I have setup a Raspberry Pi Zero W to run in headless mode.
Attaching Grow HAT Mini and soil moisture sensors
I attached the Grow HAT Mini to the Raspberry Pi Zero using the M2.5 standoffs.
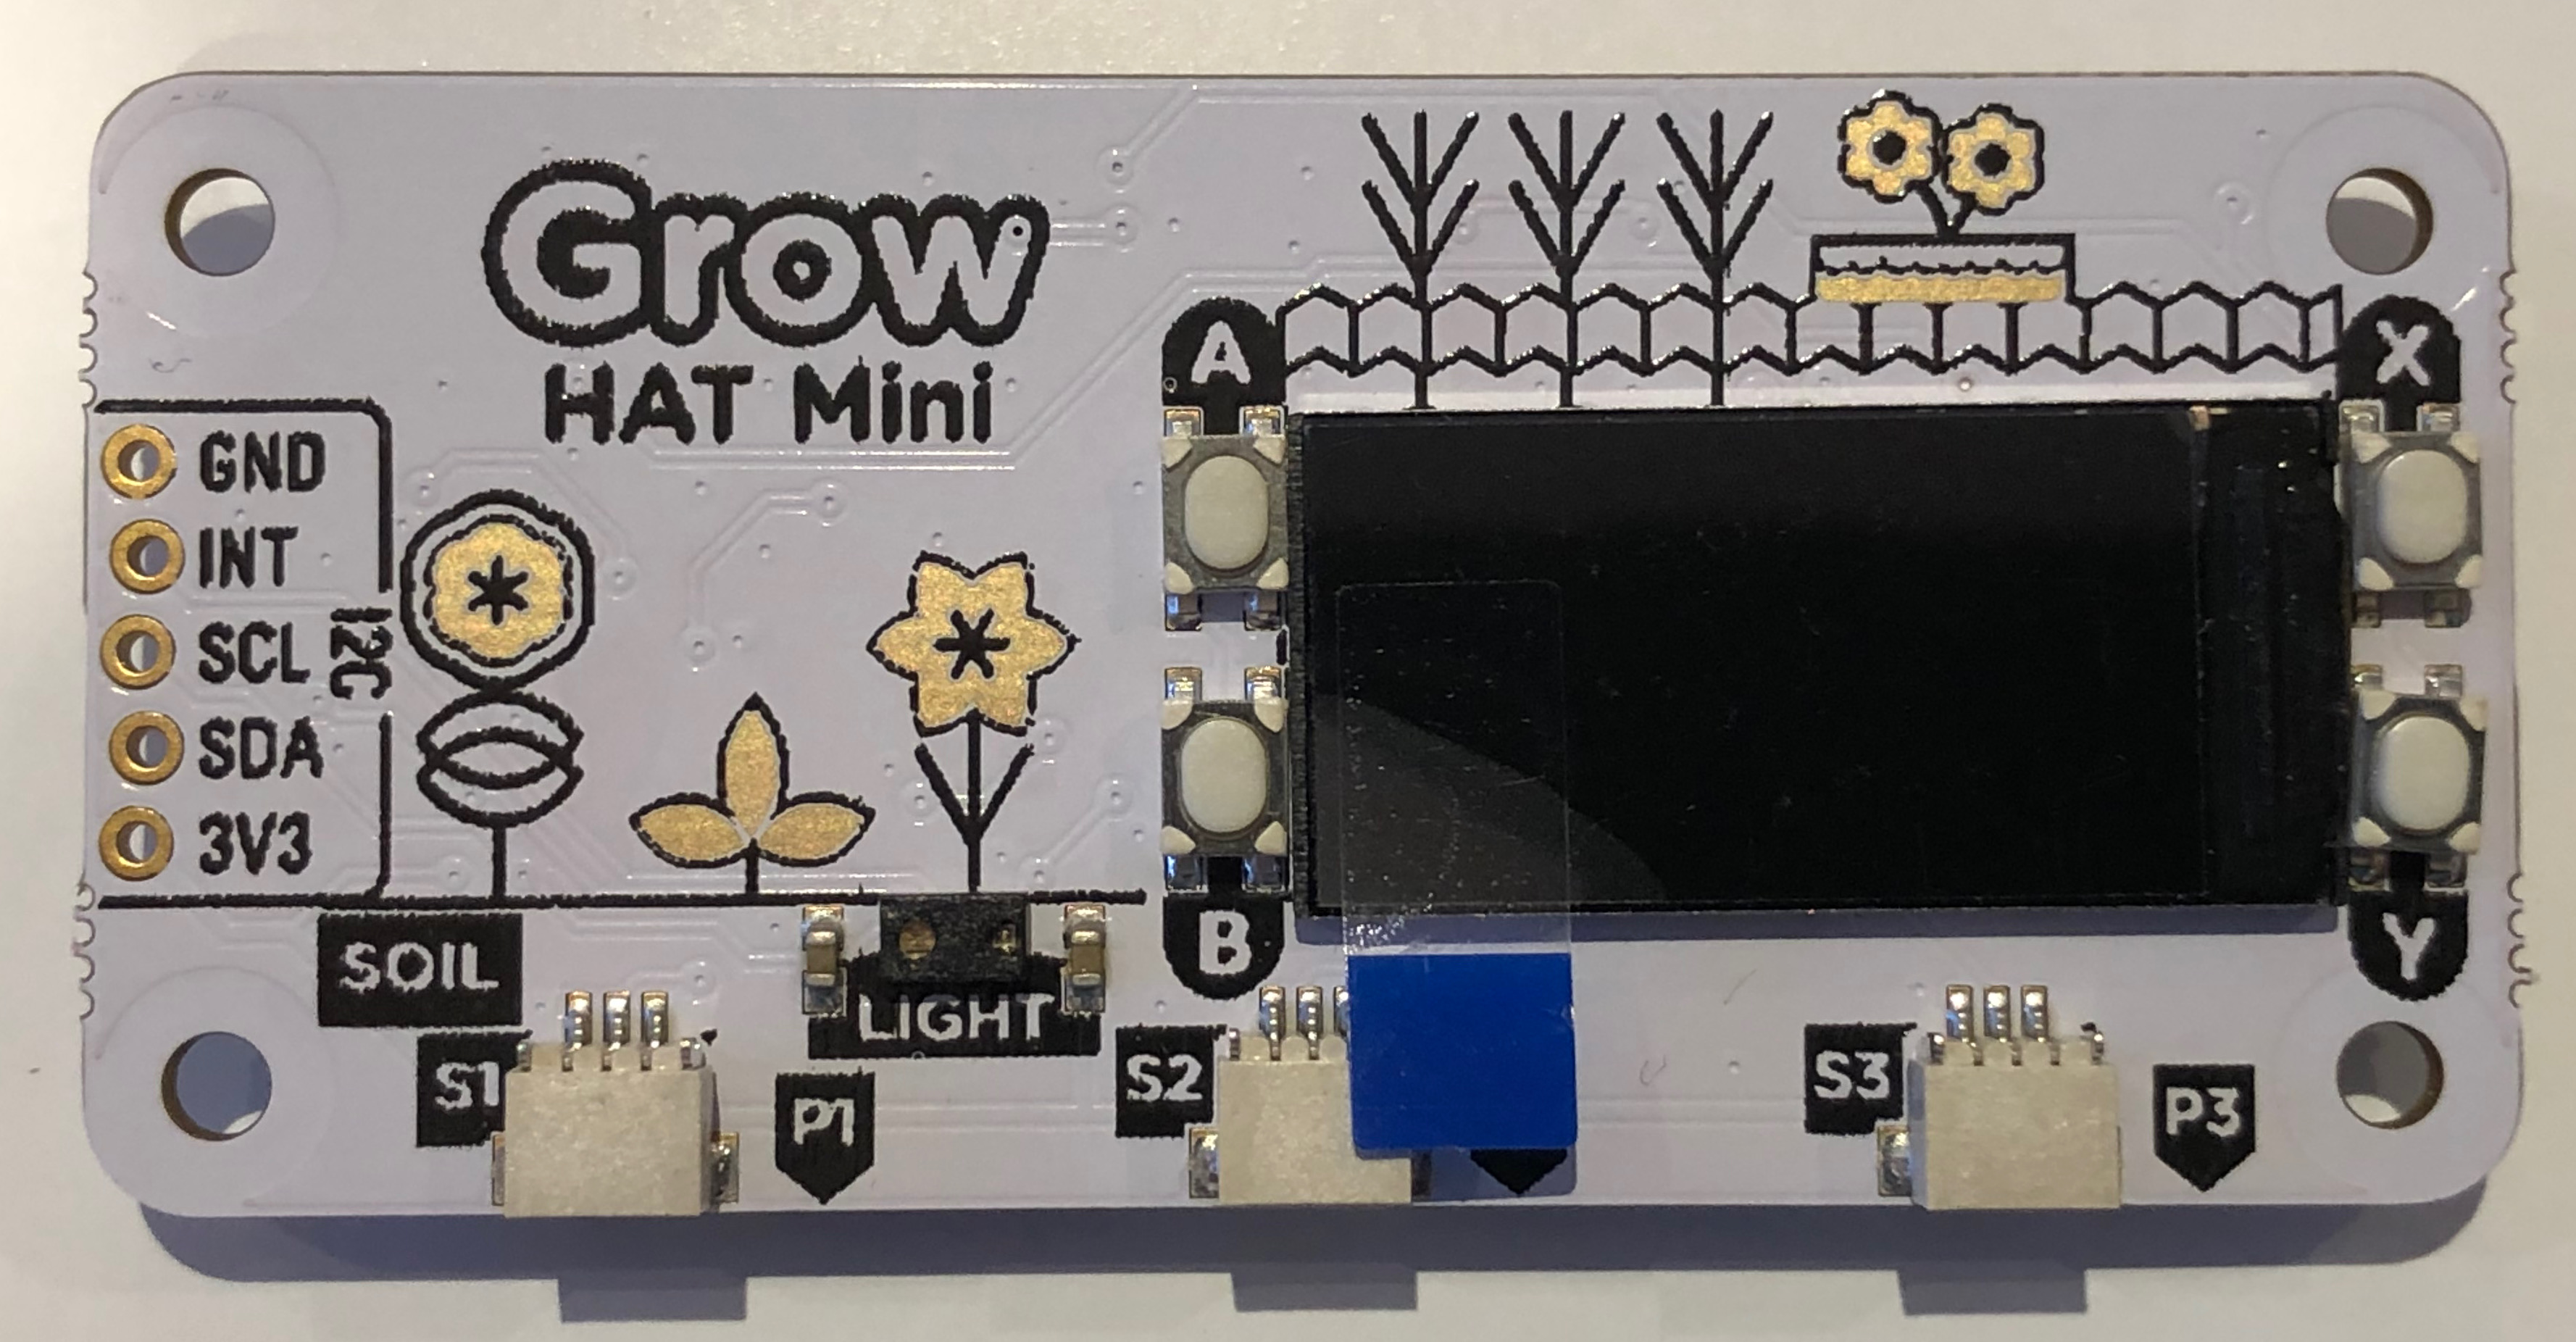

The soil moisture sensors need to be removed from each other using a side cutter. I then attached the JST cables to the sensors.
Setting up the software
SSH into the Raspberry Pi.
$ ssh -p 8204 pi@growpi.local
pi@growpi:~ $
The installer script is located at: https://get.pimoroni.com/grow.
First visit that URL (download) and read through the script. Never just download and run scripts because the instructions tell you to do so.
Run the Pimoroni installer.
pi@growpi:~ $ curl -sSL https://get.pimoroni.com/grow | bash
...
Do you wish to continue? [y/N]
# type y and enter

...
Setting up i2c and SPI..
Backing up /boot/config.txt to /boot/config.preinstall-growhat-2021-04-04-20-17-47.txt

Adding dtoverlay=spi0-cs,cs0_pin=14 # Re-assign CS0 from BCM 8 so that Grow can use it to /boot/config.txt

Would you like to copy examples to /home/pi/Pimoroni/growhat? [y/N]
# type y and enter
Copying examples to /home/pi/Pimoroni/growhat
Grow includes a service that runs on boot and monitors your plants.
Would you like to install the service? [y/N]
# type y and enter
...
...
Would you like to reboot now? [y/N]
# type y and enter

The Raspberry Pi will now be rebooting and the screen should come up and display the sensor levels etc.
Troubleshooting and Testing
However for me, the screen is powered (a slight sign of light to the LCD) but no rendering. Also the Piezo buzzer started sounding off.
So I stopped the service and will need to troubleshoot first what is going on.
pi@growpi:~ $ sudo systemctl stop grow-monitor.service

# Also switching off the Raspberry Pi
pi@growpi:~ $ sudo shutdown -h now
I carefully unplugged the moisture sensors from the Grow HAT Mini. Never pull on the cable but instead carefully jiggle and remove by the JST plug.
Everything looks good and the Grow HAT Mini is aligned correctly and pushed well enough onto the Pi’s GPIO pins.
Powered the Raspberry Pi back up without any of the sensors attached and the LCD is rendering now as well as no more alarm bells going off.
I plugged in a sensor on S1 port and the buzzer starts sounding (as expected). To get a sensor reading I placed the sensor in a closed hand and the reading start showing on the LCD. Open my hand and the buzzer starts sounding again.
Ok this is now working as expected. Time to plug the other 2 sensors in and test.
Note: You can mute the buzzer by pressing the B button (next to the bell icon).
I tested all three sensors and they worked.
Then I started pressing the buttons on the Grow HAT Mini and somehow got the LCD / Software glitching where the LCD never updates.
This persisted even through a sudo systemctl restart grow-monitor.service or stop/start.
So I rebooted the Pi.
pi@growpi:~ $ sudo reboot now
Nope LCD is still stuck on rendering the exact same thing.
Did you try switching it off and on again? sudo shutdown -h now.
P.S. You can view logs from the grow-monitor service.
pi@growpi:~ $ journalctl --no-pager --unit grow-monitor
Switching off the Pi did work … for a while and then the LCD got stuck again. I noticed that the sensor would still respond to my hand by letting the alarm go off when I hold the sensor and the alarm go back on when I let go. However the LCD rendering software is still stuck / crashed. After a minute or so the device stops responding completely.
I am going to dig a bit deeper but first need to disable the service from starting by itself when the Pi is booted up.
Stop and Disable the service
pi@growpi:~ $ sudo systemctl stop grow-monitor.service
pi@growpi:~ $ sudo systemctl disable grow-monitor.service
Running the example programs
After running the install script for grow-python it also stored files here: ~/Pimoroni/growhat
Inside is a directory called examples
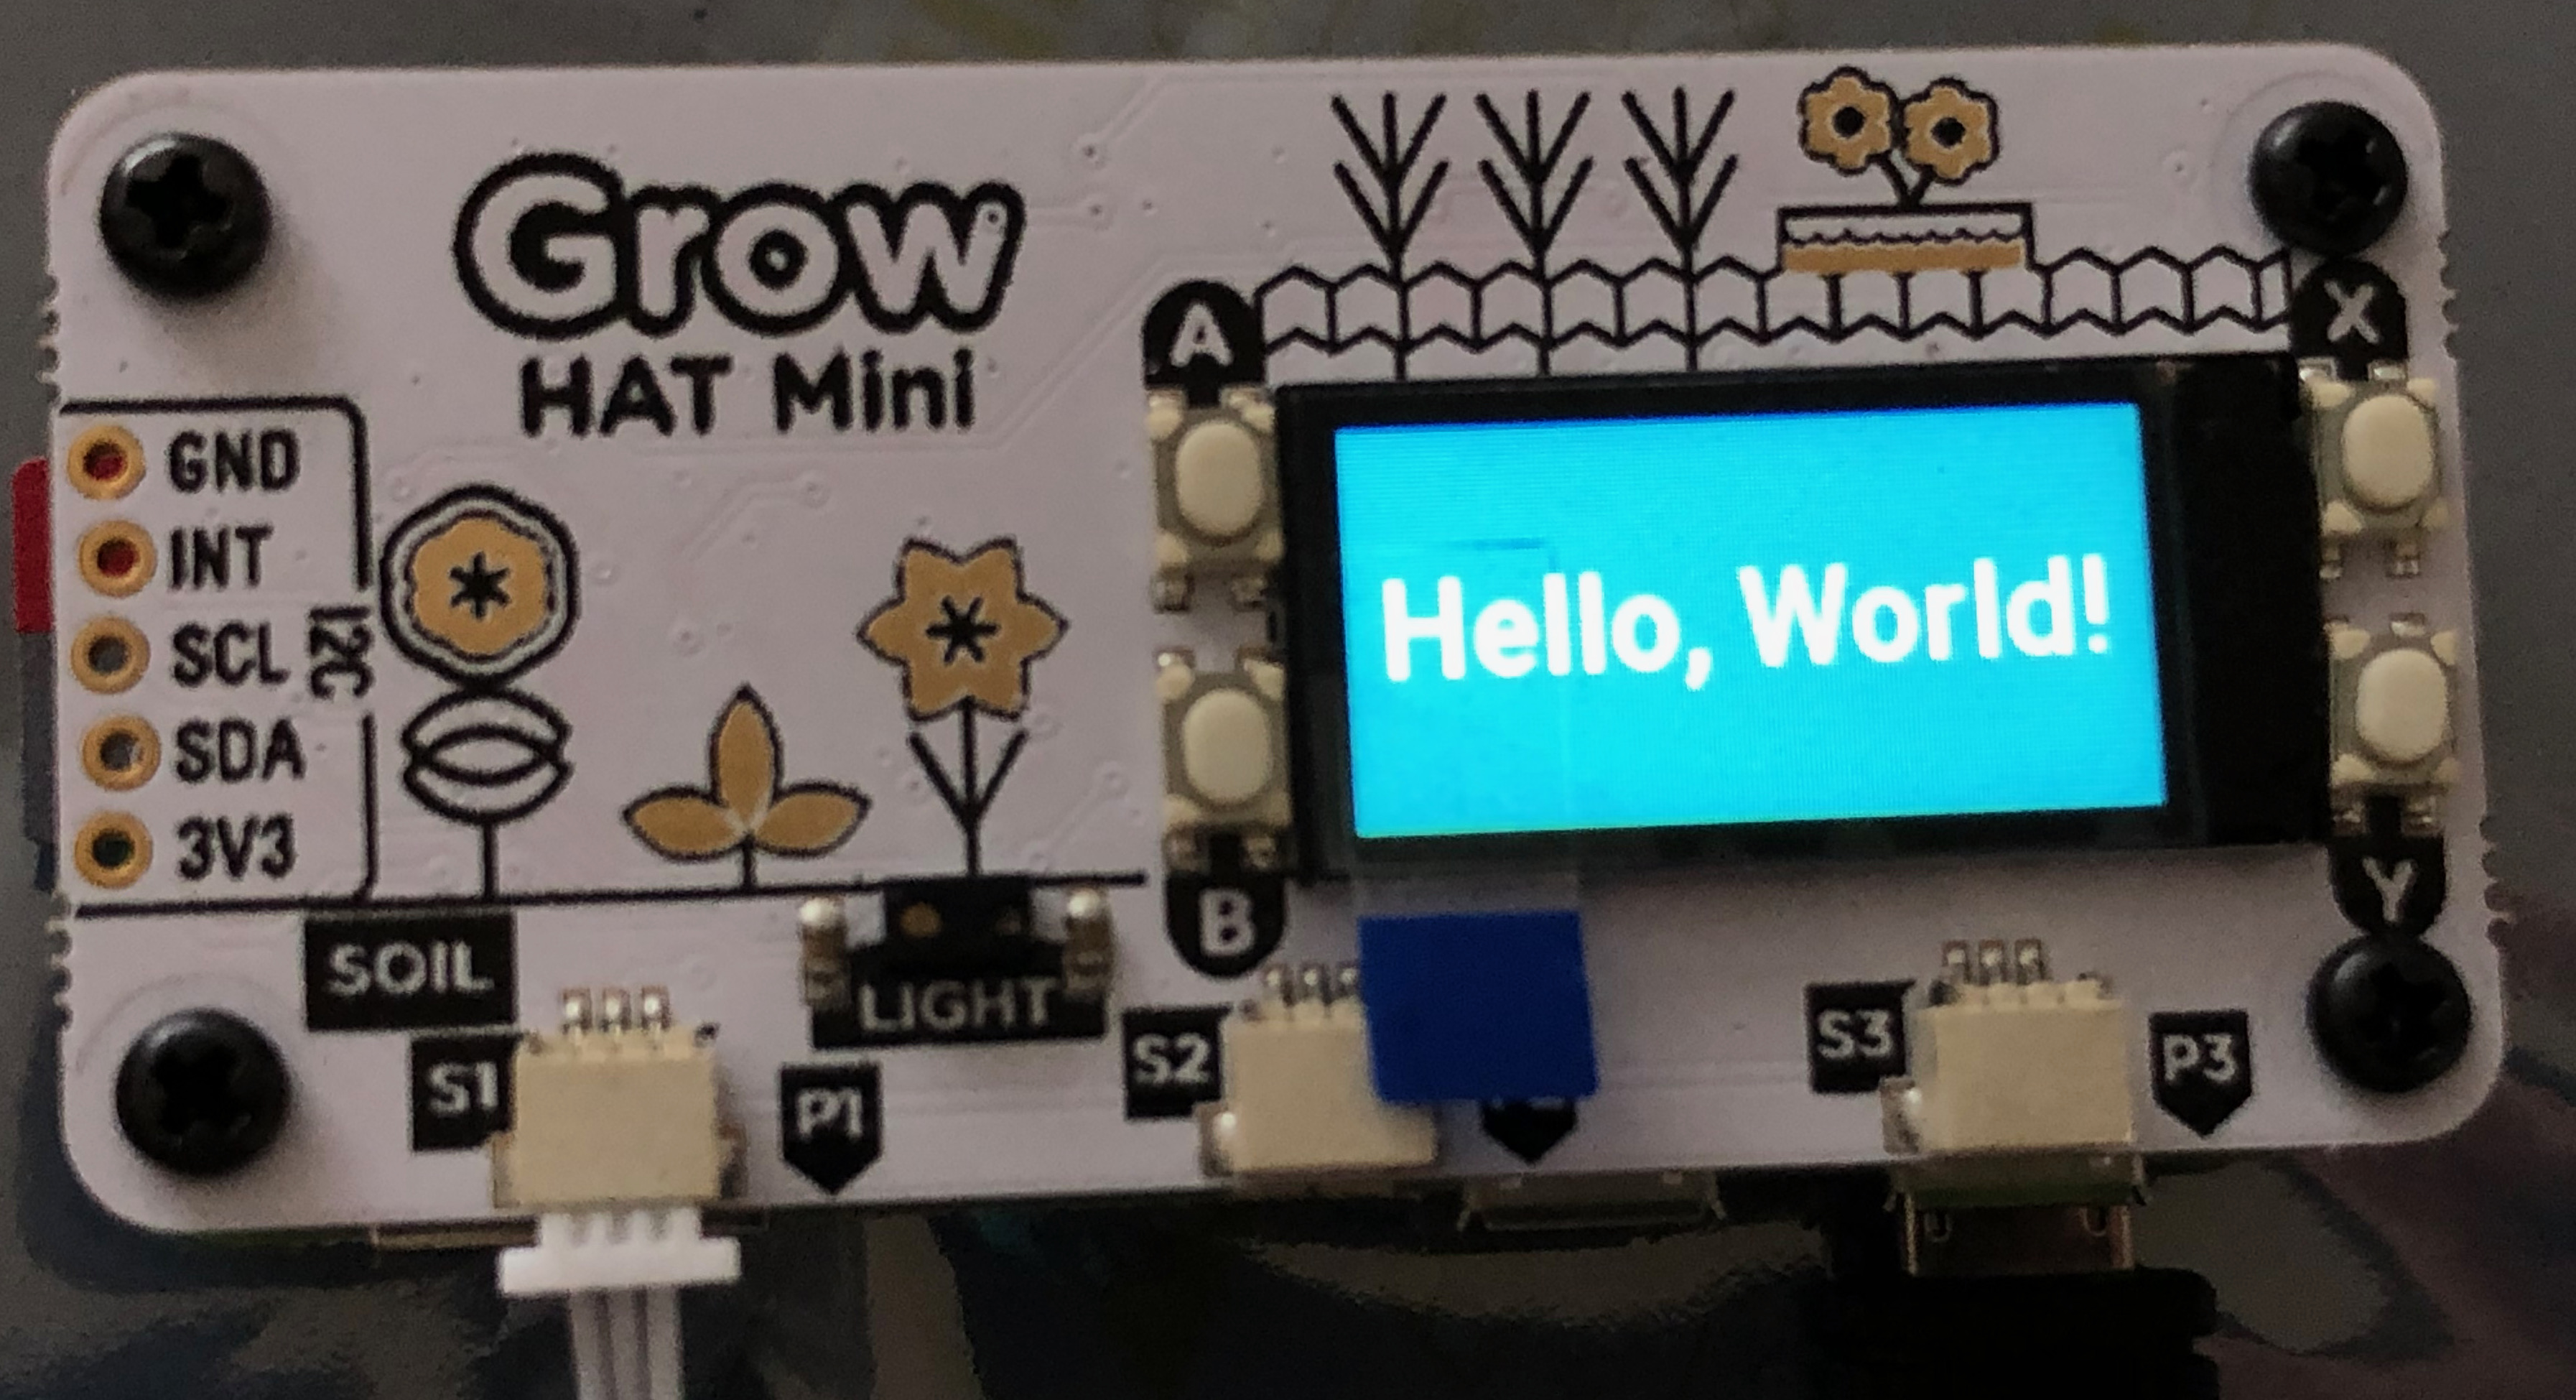
I ran the LCD demo a couple of times.
pi@growpi:~ $ cd ~/Pimoroni/growhat/examples/advanced

# Run the LCD test
pi@growpi:...$ sudo python3 lcd-demo.py

2021-04-05 12:24:09.851 INFO     lcd.py - Hello, World! example on the 0.96" LCD.

Press Ctrl+C to exit!
Followed by the moisture example.
pi@growpi:...$ sudo python3 moisture.py
moisture.py - Print out sensor reading in Hz

Press Ctrl+C to exit!

1: 0
2: 0
3: 0

1: 26.929605437750936
2: 0
3: 0

1: 27.29001016632101
2: 0
3: 0

1: 27.29001016632101
2: 0
3: 0
However when I run the growhat/examples/monitor.py it does output the sensor data to the terminal but the LCD will display the Hello World still.
I shut down the Pi again and switched it back on again with the goal of running only the monitor.py code from the start and see what the LCD outputs.
Running just the monitor.py still results in odd behaviour. For example the sensor will take readings and the LCD will update "correctly" but the alarm will be sounding when it should not etc.
There is an issue on the grow-python git repo to do something with a kernel change and pins conflicting.
pi@growpi: ~$ uname -a
Linux growpi 5.10.17+ #1403 Mon Feb 22 11:26:13 GMT 2021 armv6l GNU/Linux
Ok so I am running a newer Linux kernel.
Checking the config.txt file I can see that install script did indeed apply the fix.
# We expect to have this in our config.txt
dtoverlay=spi0-cs,cs0_pin=14 # Re-assign CS0 from BCM 8 so that Grow can use it

pi@growpi:/boot $ diff config.txt config.preinstall-growhat-2021-04-04-20-17-47.txt
46c46
< dtparam=i2c_arm=on
---
> #dtparam=i2c_arm=on
48c48
< dtparam=spi=on
---
> #dtparam=spi=on
67d66
< dtoverlay=spi0-cs,cs0_pin=14 # Re-assign CS0 from BCM 8 so that Grow can use it
Troubled Conclusion for now
After trying a number of things, it seems the one thing that is consistent is that after a while the LCD "code" will get stuck and won’t update unless you completely shutdown the Pi.
It is almost as if the LCD is running software on a chip / process that is unaffected by what ever you run from the grow-python code and thus when this glitches, your only option is to remove power and start again.
I am going to reach out to Pimoroni to see what they think.
1 comment on “100 Days of Learning: Day 28 – Growing Plants using the Pimoroni Grow HAT Mini and a Raspberry Pi Zero W”
Comments are closed.