Here is Week 5 of my log book.
- See Day 33 for how I set up a test rig to test the water pumps.
Time for Round 2 with Grow HAT Mini
I ordered another Grow Kit while waiting for Pimoroni’s support team to come back to me on the issues I am facing with the other unit. Also the Easter special discount of 20% off was still on at the time.
I also ordered another Raspberry Pi Zero WH (the one with pre-soldered headers) because you can never have too many of these awesome little guys.
Update: Pimoroni replied to me and said that they have not encountered this before and that it is worth trying the HAT on another Pi and even do a clean software install of the SD.
UPDATE: Pimoroni sent me a replacement Grow HAT Mini and I tested it on Day 36. It works as expected and shows none of the same glitches as the faulty one. They have excellent customer service and I highly recommend them.
Assembly
Attached the Grow HAT Mini directly onto the Raspberry Pi Zero W without the M2.5 stand offs. Again just like before I am being super careful and discharged myself from any potential anti-static build up. What can I say, I am paranoid.
I took the same SD card used in the other unit and inserted it into the Raspberry Pi.
Connected the same soil moisture sensor from the other unit and the power supply. Time to boot up.
Booting up and running a test
I can use the same SSH commands etc. as what was setup on Day 28 since the SD card stores all of the data used by the Raspberry Pi including WiFi details etc.
$ ssh -p 8204 pi@growpi.local
pi@growpi:~ $ cd ~/Pimoroni/growhat/examples
Run the monitor.py example.
pi@growpi:... $ python3 monitor.py
Channels:
Channel: 1
Enabled: True
Alarm level: 0.25
Auto water: False
Water level: 0.5
Pump speed: 0.5
Pump time: 0.5
Delay: 60
Wet point: 3
Dry point: 27
Channel: 2
Enabled: False
Alarm level: 0.5
Auto water: False
Water level: 0.5
Pump speed: 0.5
Pump time: 0.5
Delay: 60
Wet point: 3
Dry point: 27
Channel: 3
Enabled: False
Alarm level: 0.4
Auto water: False
Water level: 0.5
Pump speed: 0.5
Pump time: 0.5
Delay: 60
Wet point: 3
Dry point: 27
Settings:
Alarm Enabled: True
Alarm Interval: 2.00s
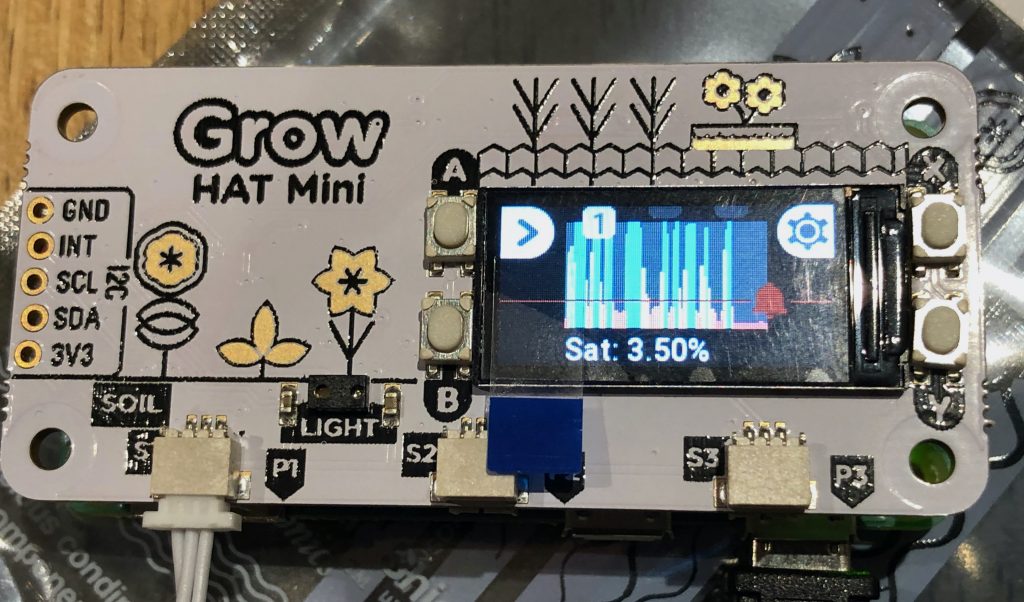
WARNING:root:Alarm on Channel: 1 - saturation is 4.50% (warn level 25.00%)
WARNING:root:Alarm on Channel: 1 - saturation is 17.90% (warn level 25.00%)
WARNING:root:Alarm on Channel: 1 - saturation is 10.20% (warn level 25.00%)
WARNING:root:Alarm on Channel: 1 - saturation is 11.10% (warn level 25.00%)
WARNING:root:Alarm on Channel: 1 - saturation is 18.10% (warn level 25.00%)
WARNING:root:Alarm on Channel: 1 - saturation is 16.30% (warn level 25.00%)
WARNING:root:Alarm on Channel: 1 - saturation is 7.40% (warn level 25.00%)
WARNING:root:Alarm on Channel: 1 - saturation is 6.40% (warn level 25.00%)
WARNING:root:Alarm on Channel: 1 - saturation is 16.90% (warn level 25.00%)
WARNING:root:Alarm on Channel: 1 - saturation is 17.60% (warn level 25.00%)
WARNING:root:Alarm on Channel: 1 - saturation is 20.50% (warn level 25.00%)
WARNING:root:Alarm on Channel: 1 - saturation is 8.50% (warn level 25.00%)
So far so good with this new unit. I have been running it now for a few minutes and the LCD and sensor responds as I would expect. Also the buzzer has not missed a beat and sounds consistent.
Just muted the buzzer and will let it sit in the "dry" state for 10 minutes before seeing if the buzzer still works and readings are taken and displayed as expected.
In the mean time I will watch some videos about hydroponics.
Interestingly after about 6 minutes the buzzer unmuted itself and started sounding the alarm. I tested the sensor and it does respond and the LCD does render as expected.
Time to re-enable the other 2 sensor ports and test that as well.
# Type Ctrl+C to stop the running monitor.py
pi@growpi:... $ sudo nano settings.yml

# Set channel2 & 3's enabled state to true
channel1: {auto_water: false, dry_point: 27, enabled: true, pump_speed: 0.5, pump_time: 0.5,
  warn_level: 0.25, watering_delay: 60, wet_point: 3}
channel2: {auto_water: false, dry_point: 27, enabled: true, pump_speed: 0.5, pump_time: 0.5,
  warn_level: 0.5, watering_delay: 60, wet_point: 3}
channel3: {auto_water: false, dry_point: 27, enabled: true, pump_speed: 0.5, pump_time: 0.5,
  warn_level: 0.4, watering_delay: 60, wet_point: 3}
general: {alarm_enable: true, alarm_interval: 2}

# Save and exit

pi@growpi:... $ python3 monitor.py

Channels:
Channel: 1
Enabled: True
Alarm level: 0.25
Auto water: False
Water level: 0.5
Pump speed: 0.5
Pump time: 0.5
Delay: 60
Wet point: 3
Dry point: 27

Channel: 2
Enabled: True
Alarm level: 0.5
Auto water: False
Water level: 0.5
Pump speed: 0.5
Pump time: 0.5
Delay: 60
Wet point: 3
Dry point: 27

Channel: 3
Enabled: True
Alarm level: 0.4
Auto water: False
Water level: 0.5
Pump speed: 0.5
Pump time: 0.5
Delay: 60
Wet point: 3
Dry point: 27

Settings:
Alarm Enabled: True
Alarm Interval: 2.00s

WARNING:root:Alarm on Channel: 1 - saturation is 3.40% (warn level 25.00%)
WARNING:root:Alarm on Channel: 2 - saturation is 2.70% (warn level 50.00%)
WARNING:root:Alarm on Channel: 3 - saturation is 4.70% (warn level 40.00%)
WARNING:root:Alarm on Channel: 1 - saturation is 18.70% (warn level 25.00%)
WARNING:root:Alarm on Channel: 3 - saturation is 13.70% (warn level 40.00%)
WARNING:root:Alarm on Channel: 2 - saturation is 44.10% (warn level 50.00%)
WARNING:root:Alarm on Channel: 1 - saturation is 17.60% (warn level 25.00%)
WARNING:root:Alarm on Channel: 3 - saturation is 5.50% (warn level 40.00%)
WARNING:root:Alarm on Channel: 2 - saturation is 43.30% (warn level 50.00%)
WARNING:root:Alarm on Channel: 1 - saturation is 8.00% (warn level 25.00%)
WARNING:root:Alarm on Channel: 3 - saturation is 2.70% (warn level 40.00%)
WARNING:root:Alarm on Channel: 2 - saturation is 24.20% (warn level 50.00%)
WARNING:root:Alarm on Channel: 2 - saturation is 27.90% (warn level 50.00%)
WARNING:root:Alarm on Channel: 1 - saturation is 1.70% (warn level 25.00%)
All three of the sensors are reporting and updating on the LCD as expected. Will let them sit in the dry state until the buzzer unmutes itself.
I also ran the other examples and they worked as expected.
Troubleshooting the other unit
Ok so I have established that the new Raspberry Pi Zero and the Grow HAT Mini work with the other unit’s power supply and sensors as well as the exact same SD card and software setup.
Now I need to establish what is faulty with the other unit.
First I think I am going to gently remove the Grow HAT Mini and re-attach to the exact same Raspberry Pi Zero and run the software. But before doing so I have marked the working Pi and HAT with a sharpie.
(Turned out to be a red herring—>) Ok this is very interesting. Same Raspberry Pi and Grow HAT Mini that was glitching a week ago is now seeming to be working as I would have first expected. The irony is, last week I did pull the HAT off and attached it to the GPIO pins but it resulted still in the same glitches. Fast forward a week and doing the same of detach and re-attach and now it is behaving like the working unit.
Am I testing the faulty unit? What are the chances that I swapped the two setups? Highly unlikely because I was super careful.
I am going to do the same "dry" level test with the buzzer muted until it comes back and unmutes it self. At this stage I will see if the LCD reads as expected.
After a few minutes the buzzer unmuted and I did some tests. The sound was responding as I would expect but at first I did not notice it and thought the unit is working. After a few tests I realised that the LCD did indeed stop rendering and is stuck on the last working reading.
Shutting down and will try again.
Ran the unit for a good 20 minutes and I noticed that the buzzer did not unmute as expected. Also the LCD did get stuck because it is not responding to new changes in the sensor readings. Ironically I can unmute and mute the buzzer and the reading are being logged on the console as expected.
Shutting down again and will try swapping the HAT over to the other Raspberry Pi.
Swapping the faulty HAT over to the working Raspberry Pi
I took the HAT off and attached it to the Pi that I knew was working with the other HAT.
Booted up and time for testing.
Nope exact same result. After a few minutes of just letting the unit sit muted. When the buzzer did unmute after about 6 minutes, the LCD is just not updating at all.
The other weird thing is that once I switch the Raspberry Pi off (sudo shutdown -h now) the LCD was still on. Also if just lightly touch the Pi anywhere (to pick it up or so) then the LCD blinks etc.
Being doubtful over the working unit
I think I am going to do a bit more exhaustive testing on the Raspberry Pi + Grow HAT Mini combo that was working before. To ensure that I don’t have 2 faulty units.
Did the same test of letting the software run and mute the buzzer while waiting for the buzzer to unmute and then I will touch the sensors until the buzzer stops as well as looking to see that the LCD updates as expected. I did about 6 of these tests in a row and the unit did work.
Last resort
I am going to do a fresh SD card setup and software install and do one more set of tests with the faulty unit.
- ✅ Format a different SD card.
- ✅ Installed Raspberry Pi OS Lite to run headless. See my guide on how I do it.
- ✅ Booted and can SSH into the Pi.
- ✅ For a variant, I am going to NOT apt update & upgrade. I am also skipping the hardening step.
- ✅ Shutdown and install the faulty Grow HAT Mini onto the GPIO pins.
- ✅ Booted and install the grow-python software. Examples = Y, Service = Y, Reboot = Y
- ✅ Rebooted, Did LCD turn on and start monitoring?
- ✅ Does it take readings and sound the buzzer?
- ❌ Does the LCD still update after a few minutes?
Conclusion
The first Grow HAT Mini I received is faulty. I will be in touch with Pimoroni again to relay what I have learned and ask that they replace the faulty unit.
1 comment on “100 Days of Learning: Day 32 – Testing a new Grow HAT Mini”
Comments are closed.