Here is my Log book
Setting up Python 3 on macOS
I recently clean installed my Mac to use Big Sur and with that I have not yet had a chance to install Python 3 and using virtual environments.
Python 2.x is no longer being maintained, however macOS Big Sur still ships 2.7.x.
$ python --version
Python 2.7.16
Homebrew
I like to use Homebrew as my package manager on macOS. See their website on the one line command to run to install brew.
Ensure brew is up to date
$ brew doctor
$ brew update
$ brew upgrade
Manage multiple versions of Python with pyenv
One of the things you learn as a developer on the job is that it does not take long for your development machine to become cluttered with programming languages and tools and at some point you will hit a snag where different projects will require different version of tool chains and dependencies.
Always use a version manager if you can. For example for Node.js I use nvm (for more details see this blog post)
For Python I like to use pyenv
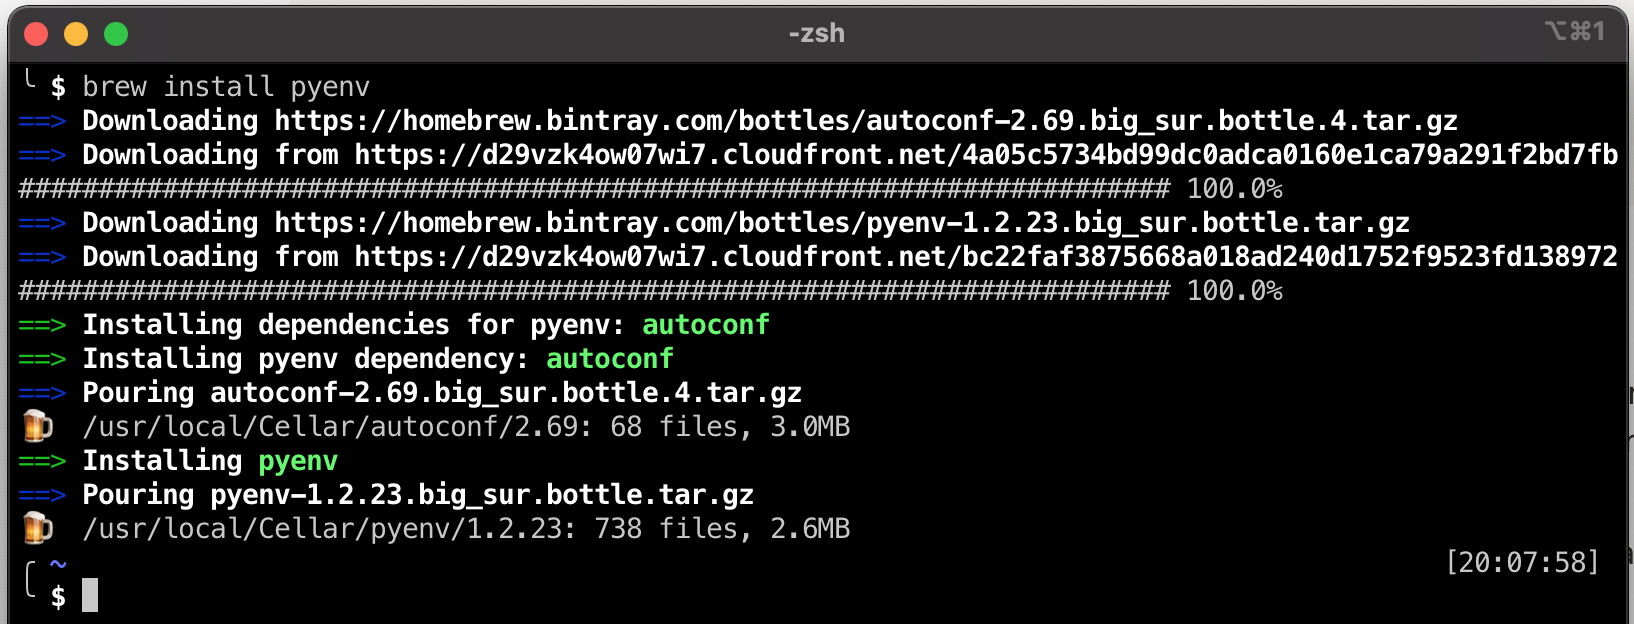
Install pyenv.
$ brew install pyenv
Add pyenv to your ~/.zshrc
$ echo -e 'if command -v pyenv 1>/dev/null 2>&1; then\n eval "$(pyenv init -)"\nfi' >> ~/.zshrc
(I will be adding mine to ~/.ajzsh/extras/zshrc.ajzsh because I am using my own ajzsh)
Install the latest version of Python 3
To get the latest version number of Python, visit the downloads page. At the time writing the latest version is 3.9.2 however pyenv is at 3.9.1
To get the list of available Pythons that can be installed from pyenv.
$ pyenv install --list
$ pyenv install 3.9.2
...
python-build: definition not found: 3.9.2
# Bummer! pyenv haven't added 3.9.2 yet. You could try
# brew update && brew upgrade pyenv
# but the latest pyenv has is 3.9.1

$ pyenv install 3.9.1
...
Installed Python-3.9.1 to /Users/andre/.pyenv/versions/3.9.1

$ pyenv version
system (set by /Users/andre/.pyenv/version)
Set the default global version of Python to the latest version
$ pyenv global 3.9.1
$ pyenv version
3.9.1 (set by /Users/andre/.pyenv/version)

# You might have to relaunch the terminal session
$ python --version
Python 3.9.1
Upgrade pip (pip is THE package installer for python, at least for now 😝)
$ pip install --upgrade pip
...
Successfully installed pip-21.0.1
Verify
$ which python
/Users/andre/.pyenv/shims/python

$ python --version
Python 3.9.1

$ pip --version
pip 21.0.1 from /Users/andre/.pyenv/versions/3.9.1/lib/python3.9/site-packages/pip (python 3.9)
Create a new Python based project
Along with being able to have multiple versions of toolchains installed it is also important not to litter your development machine with dependencies directly. Meaning if you install 3rd party packages directly to your machine then sooner or later you will run into different projects depending on different versions of the packages.
The solution is to use Virtual Environments.
I prefer to use the python build in venv.
# Create a new project
$ mkdir my-new-project
$ cd my-new-project

# Install a virtual environment
$ python3 -m venv ./venv
Activate the virtual environment
You will need to do this every time you start a new terminal session.
$ source venv/bin/activate
(venv) ~/.../my-new-project
Installing 3rd party packages
I like to use click when developing Python CLI apps. So in this example I will be installing click into the virtual environment.
(venv)$ pip install click
...
Successfully installed click-7.1.2
WARNING: You are using pip version 20.2.3; however, version 21.0.1 is available.
You should consider upgrading via the '/Users/andre/temp/my-new-project/venv/bin/python3 -m pip install --upgrade pip' command.
Notice the warning about the pip version. Earlier we updated the global pip to the latest version but the virtual environment is out of date. This shows the power behind using virtual environments.
What happens in the virtual environment stays in the virtual environment 🤫
# Upgrade virtual environment pip
(venv)$ python3 -m pip install --upgrade pip
Successfully installed pip-21.0.1
To see the list of installed packages
(venv)$ pip list
Package    Version
---------- -------
click      7.1.2
pip        21.0.1
setuptools 49.2.1
requirements.txt
The common convention is to "freeze" the list of packages that your project depends on into a file called requirements.txt that will then make it easier for anybody else (or yourself on a different machine or the CI/CD) to install all of the dependencies.
To freeze the required packages
(venv)$ pip freeze > requirements.txt
(venv)$ cat requirements.txt
click==7.1.2
To install the required packages you would run
(venv)$ python -m pip install -r requirements.txt
OpenFaaS and Python template
You will notice that when you used the Python template to create a new OpenFaaS function that it created an empty requirements.txt file. If my theory is correct then there will be some kind of command run during deployment / building that will do a similar install of requirements.txt as we did above.
I am going to explore this theory a bit.
╭ ~/Learning/faasd/helloworld/helloworld
╰ $ ls
__init__.py       handler.py        requirements.txt

$ cd ../
$ grep -R 'requirements.txt' ./
...
.//template/python3/Dockerfile:COPY requirements.txt   .
.//template/python3/Dockerfile:RUN pip install -r requirements.txt --target=/home/app/python
Right ok so the OpenFaaS template will indeed install any packages we use as long as we follow the convention of adding them to requirements.txt.
Next theory, I bet the Flask based template lists flask in the requirements.txt.
(I thought the flask template was part of the standard OpenFaaS templates, but reading that git repo suggest you need to pull it in a different way than what I have been using so far. Will explore more tomorrow)
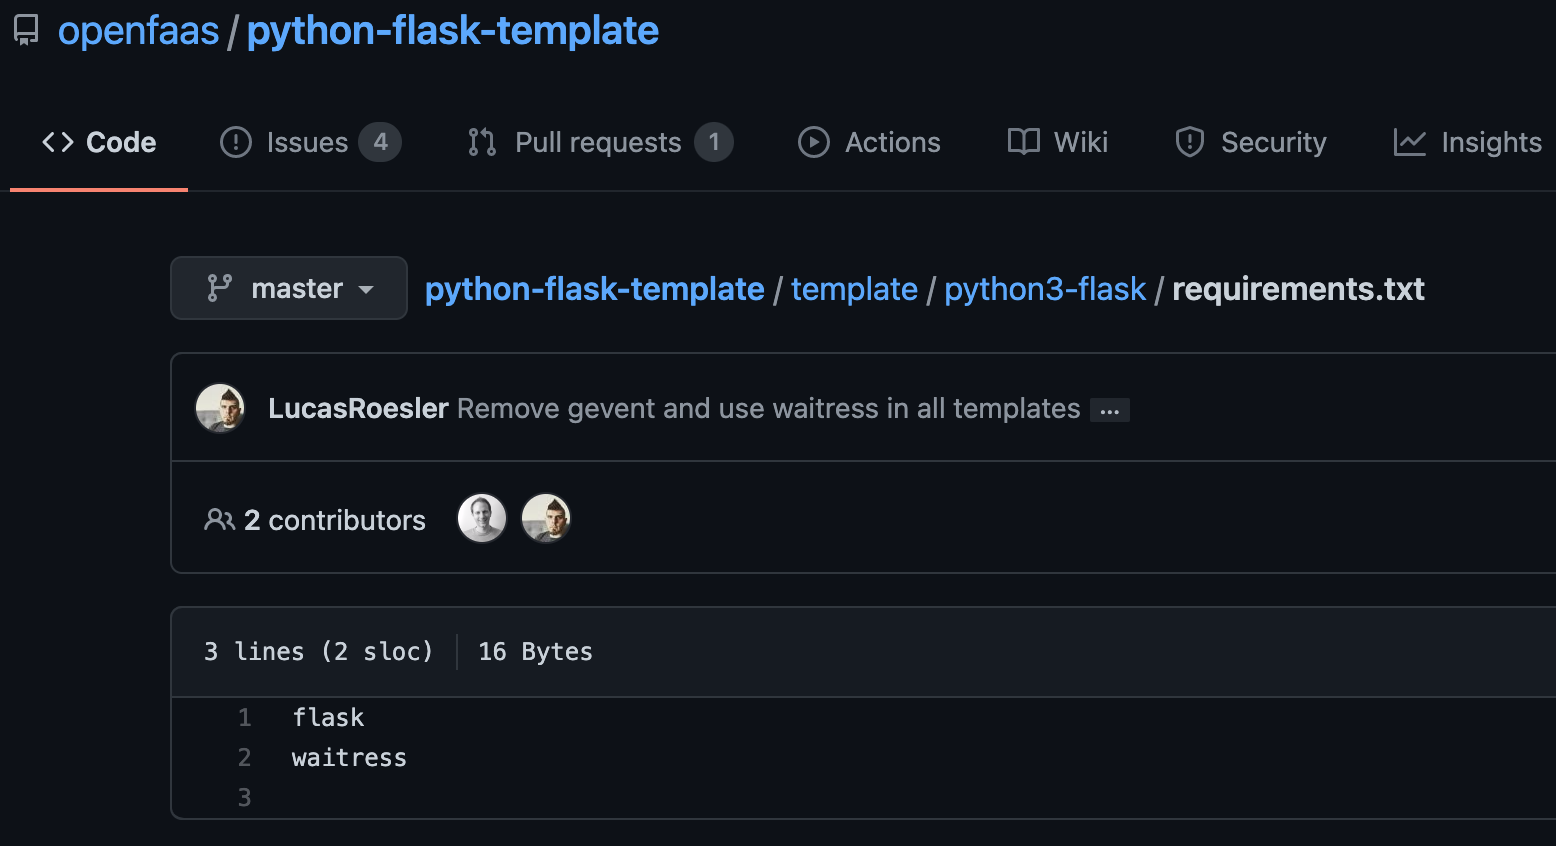
Voila! Theory checked out correctly.
Learning action point: What is waitress?
So I am guessing I will be using venv to develop 90% of the function locally first and test it works and then "move" it across to be an OpenFaaS function. I will probably start of with the flask template first, then turn it into a PyCharm project to ensure I can make it work locally first.
Time to go wrangle some snakes!