
Photo by Gabriel Heinzer on Unsplash
Overview
Following on from part 1 the plan for today is:
- Automatic update Ubuntu.
- Setup email delivery so I can receive notifications when things go wrong.
- Monitor CPU temperature and tune power usage.
- Security monitoring and intrusion detection with tools like: rkhunter, logwatch, tiger and fail2ban.
- Additional hardening.
Automatic updates
It is crucial that a server receives security updates and in this section I will install "automatic" updates for Ubuntu. For more information see Cyberciti.biz’s post.
- Update packages first.
$ sudo apt -y update && sudo apt -y upgrade
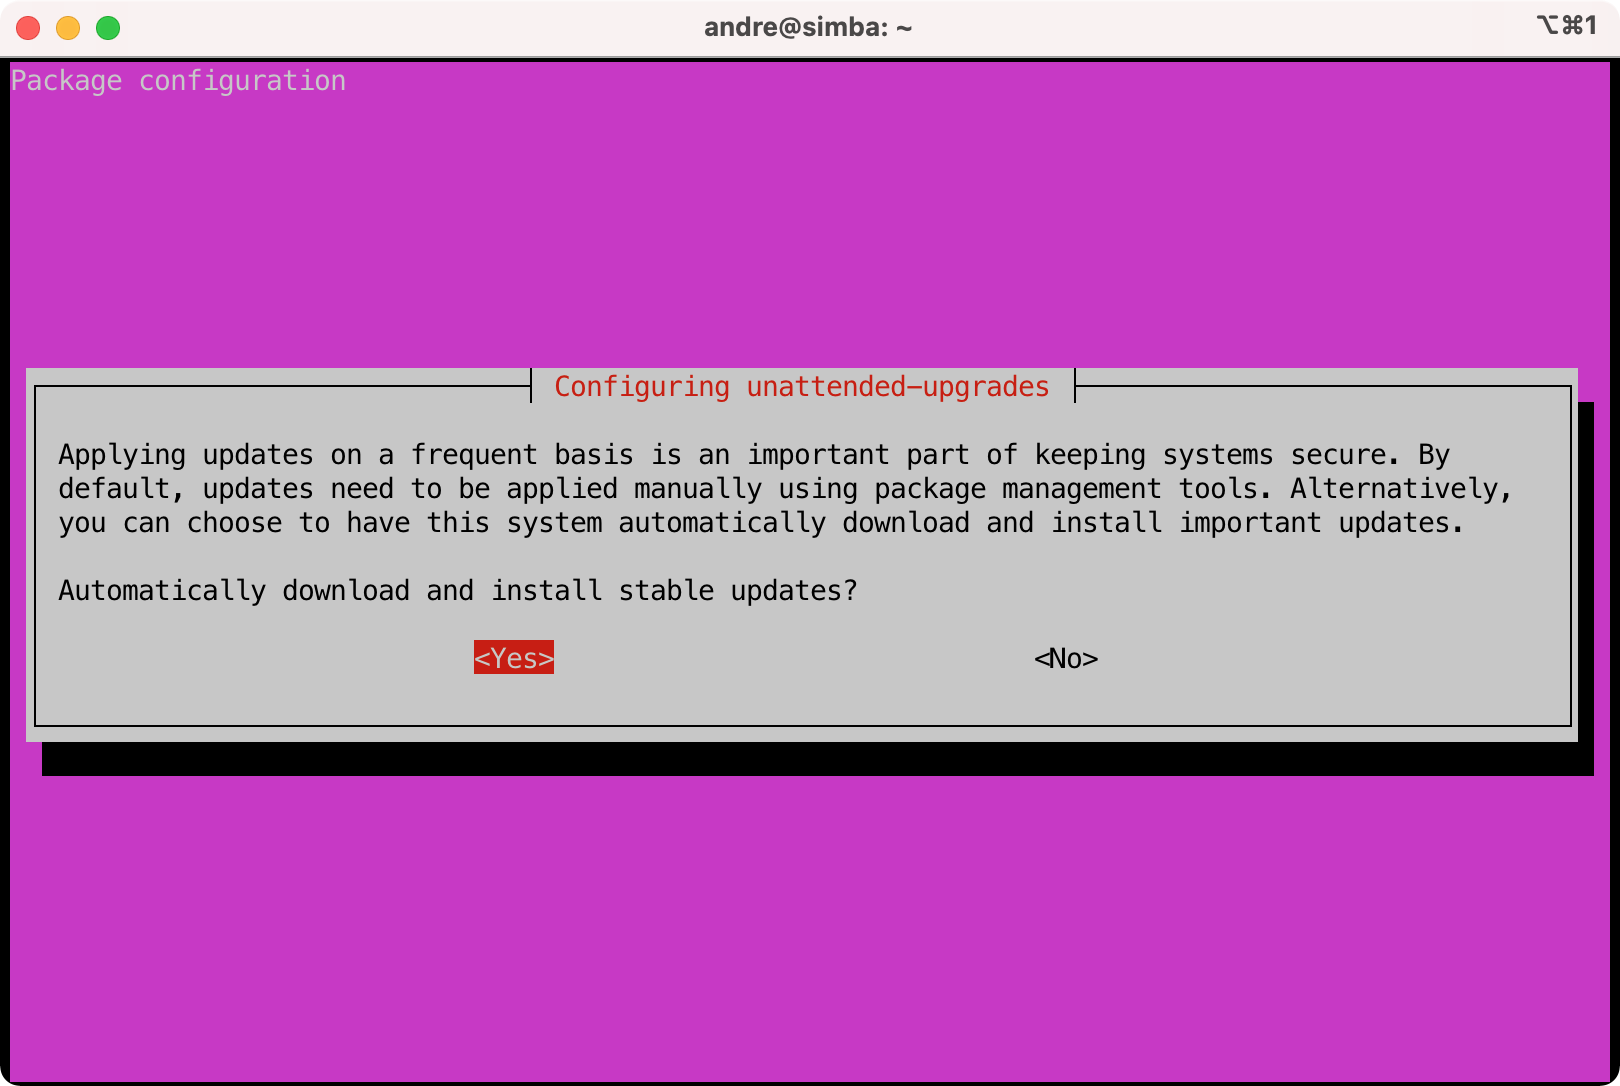
- Install unattended-upgrades that will automatically update for security packages.
$ sudo apt install unattended-upgrades apt-listchanges bsd-mailx

# Turn it on
$ sudo dpkg-reconfigure -plow unattended-upgrades
- Configure email notifications. NOTE: I recommend you setup the email delivery system first in the next session and then come back to this part.
$ sudo vi /etc/apt/apt.conf.d/50unattended-upgrades

Unattended-Upgrade::Mail "user@somewhere.com";

$ sudo vi /etc/apt/listchanges.conf

email_address=user@somewhere.com
- Verify by doing a dry run.
$ sudo unattended-upgrades --dry-run
- Commit changes to etckeeper.
$ sudo etckeeper commit "Configured automatic updates"
Email delivery
The server will not be receiving email but it still needs to be able to send email to me for alerts and notifications. I will setup the server to relay email via another mail server.
The objective is to relay email from the server to another mail server for example: smtp.server.org at port 465 and to use TLS.
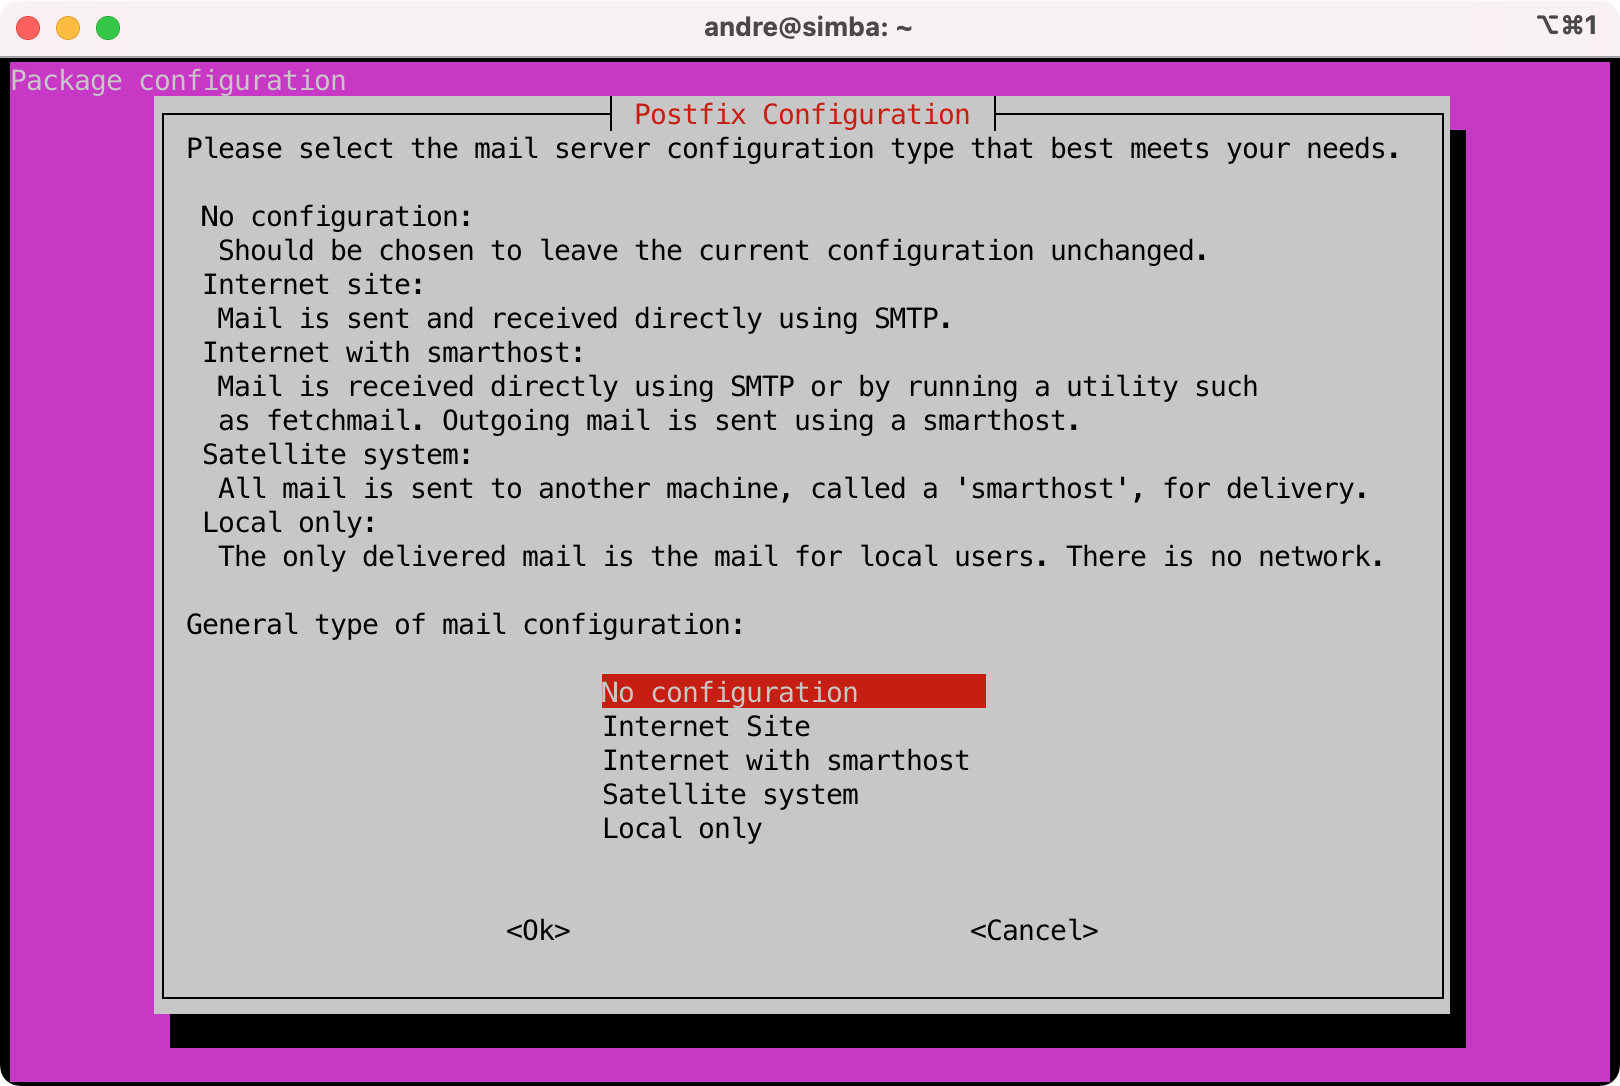
- Install postfix.
$ sudo apt install postfix
- Select "No configuration".
- Configure postfix.
$ sudo cp /usr/share/postfix/main.cf.debian /etc/postfix/main.cf
$ sudo vi /etc/postfix/main.cf

# Add this to the bottom of the file
# Replace SERVER with the mail server to use e.g. smtp.server.org
# Replace PORT with the tcp port e.g 465

relayhost = [SERVER]:PORT
smtp_use_tls=yes
smtp_sasl_auth_enable = yes
smtp_sasl_password_maps = hash:/etc/postfix/sasl_passwd
smtp_tls_CAfile = /etc/ssl/certs/ca-certificates.crt
smtp_sasl_security_options = noanonymous
smtp_tls_wrappermode = yes
smtp_tls_security_level = encrypt
# Uncomment the following lines to debug any issues
#debug_peer_list=SERVER
#debug_peer_level=4
- Create user credentials that will be used for delivering email. These are the credentials that the relay mail server requires.
$ sudo vi /etc/postfix/sasl_passwd

[SERVER]:PORT  username:password

$ sudo postmap /etc/postfix/sasl_passwd
# Ensure permissions are correct
$ sudo chown root /etc/postfix/sasl_passwd*
$ sudo chmod 0600 /etc/postfix/sasl_passwd*
$ ls -la /etc/postfix/

-rw-------   1 root root    66 Nov  2 19:52 sasl_passwd
-rw-------   1 root root 12288 Nov  2 19:54 sasl_passwd.db
- Restart postfix and check the logs.
# I will be monitoring the logs for a bit, so now is a good time to start
# a tmux session
$ tmux

# Split the window into two vertical panes: Ctrl + b %
# Switch to the left pane: Ctrl + b o
# Restart postfix
tmux$ sudo systemctl restart postfix

# Switch to the other pane: Ctrl + b o
# Start monitoring the log
tmux$ sudo tail -f /var/log/mail.log
- Send a test email.
# To install the mail program
tmux$ sudo apt install mailutils

# Back in the left hand tmux pane (not the one monitoring the log)
tmux$ echo "The quick brown fox" | mail -s "Testing mail setup" USER@MAIL.COM

# You should receive the email shortly
# Test that root can also send email
tmux$ sudo su
tmux$ echo "The quick brown fox" | mail -s "Testing mail setup" USER@MAIL.COM
- To troubleshoot any issues.
# Enable debugging
$ sudo vi /etc/postfix/main.cf

# Uncomment the lines you added previously

debug_peer_list=SERVER
debug_peer_level=4

# Restart postfix and monitor the logs (Follow the tmux steps from earlier)
$ sudo systemctl restart postfix
$ sudo tail -f /var/log/mail.log
- Last thing to do is to ensure that cron jobs run by root can send emails to an external email instead of the local root user.
$ sudo crontab -e

MAILTO=user@mail.com
- Commit changes to etckeeper
$ sudo etckeeper commit "Setup email delivery"
Monitor CPU temperature
Now that we have email delivery setup, it is a good time to setup a cron job that can monitor CPU temperature and send me an email when things get to hot.
- Install lm-sensors.
$ sudo apt install lm-sensors
- Run the following, and read very carefully and answers yes or no, generally the defaults are ok. This can screw up things if you are not careful!
$ sudo sensors-detect
$ sudo service kmod start

# I chose the default option for 99% of the questions, just press ENTER
# However this one, I answered yes so that the coretemp module can be loaded at reboots.
Do you want to add these lines automatically to /etc/modules? (yes/NO) yes
- Check that it works.
$ sudo sensors

acpitz-acpi-0
Adapter: ACPI interface
temp1:        +27.8°C  (crit = +119.0°C)
temp2:        +29.8°C  (crit = +119.0°C)

coretemp-isa-0000
Adapter: ISA adapter
Package id 0:  +28.0°C  (high = +80.0°C, crit = +100.0°C)
Core 0:        +26.0°C  (high = +80.0°C, crit = +100.0°C)
Core 1:        +28.0°C  (high = +80.0°C, crit = +100.0°C)
- Create a script that can be run as a cron job to monitor CPU temperature and send an email when things get hot. This script will also shutdown the server if it gets to a critical temperature. I have been using this script for donkey years now and you can download a copy from my git repo.
The script works on two temperature levels. If a CPU Core temperature goes above WARN_TEMP then an email will be sent out. If a temperature goes above CRIT_TEMP then an email will be sent out and the system be shutdown after 10 seconds.
$ sudo mkdir -p /root/scripts
$ sudo vi /root/scripts/cputempmon.sh
#!/bin/bash
# Monitor CPU temperature and take action if needed
# André Jacobs 14/05/2014
# note: running on cron every minute, * * * * * /..../cputempmon.sh

EMAIL=user@somewhere.com
WARN_TEMP=70
CRIT_TEMP=90

warn_flag=false
crit_flag=false

for line in `sensors | grep -oP "Core\s+\d:\s+\+?(\K\d+)"`; do
    if [ ${line} -ge ${WARN_TEMP} ]; then
        warn_flag=true
    fi

    if [ ${line} -ge ${CRIT_TEMP} ]; then
        crit_flag=true
    fi
done

if [ "${crit_flag}" = true ]; then
    /bin/echo "CRITICAL: CPU temperature >= ${CRIT_TEMP}" | /usr/bin/mail -s "[Server] CRITICAL CPU Temperature!" ${EMAIL}
    sleep 10
    /sbin/shutdown -h now
    exit
fi

if [ "${warn_flag}" = true ]; then
    /bin/echo "WARNING: CPU temperature >= ${WARN_TEMP}" | /usr/bin/mail -s "[Server] WARNING CPU Temperature" ${EMAIL}
fi
- Ensure only root can read and execute the script.
$ sudo chmod 700 /root/scripts/cputempmon.sh
$ sudo chmod 700 /root/scripts/
$ sudo chown -R root:root /root/scripts
- Schedule a cron job to run every minute and run the script.
$ sudo crontab -e

# Monitor CPU temperature every minute
* * * * * /root/scripts/cputempmon.sh
- You can verify this works by lowering the WARN_TEMP and CRIT_TEMP values then run some intensive CPU task like sysbench.
$ sysbench --test=cpu --cpu-max-prime=1000000000 --threads=4 run
Tuning power usage
In a later section I will cover how to tune the power down for hard disk idle times.
- Install powertop.
$ sudo apt install powertop
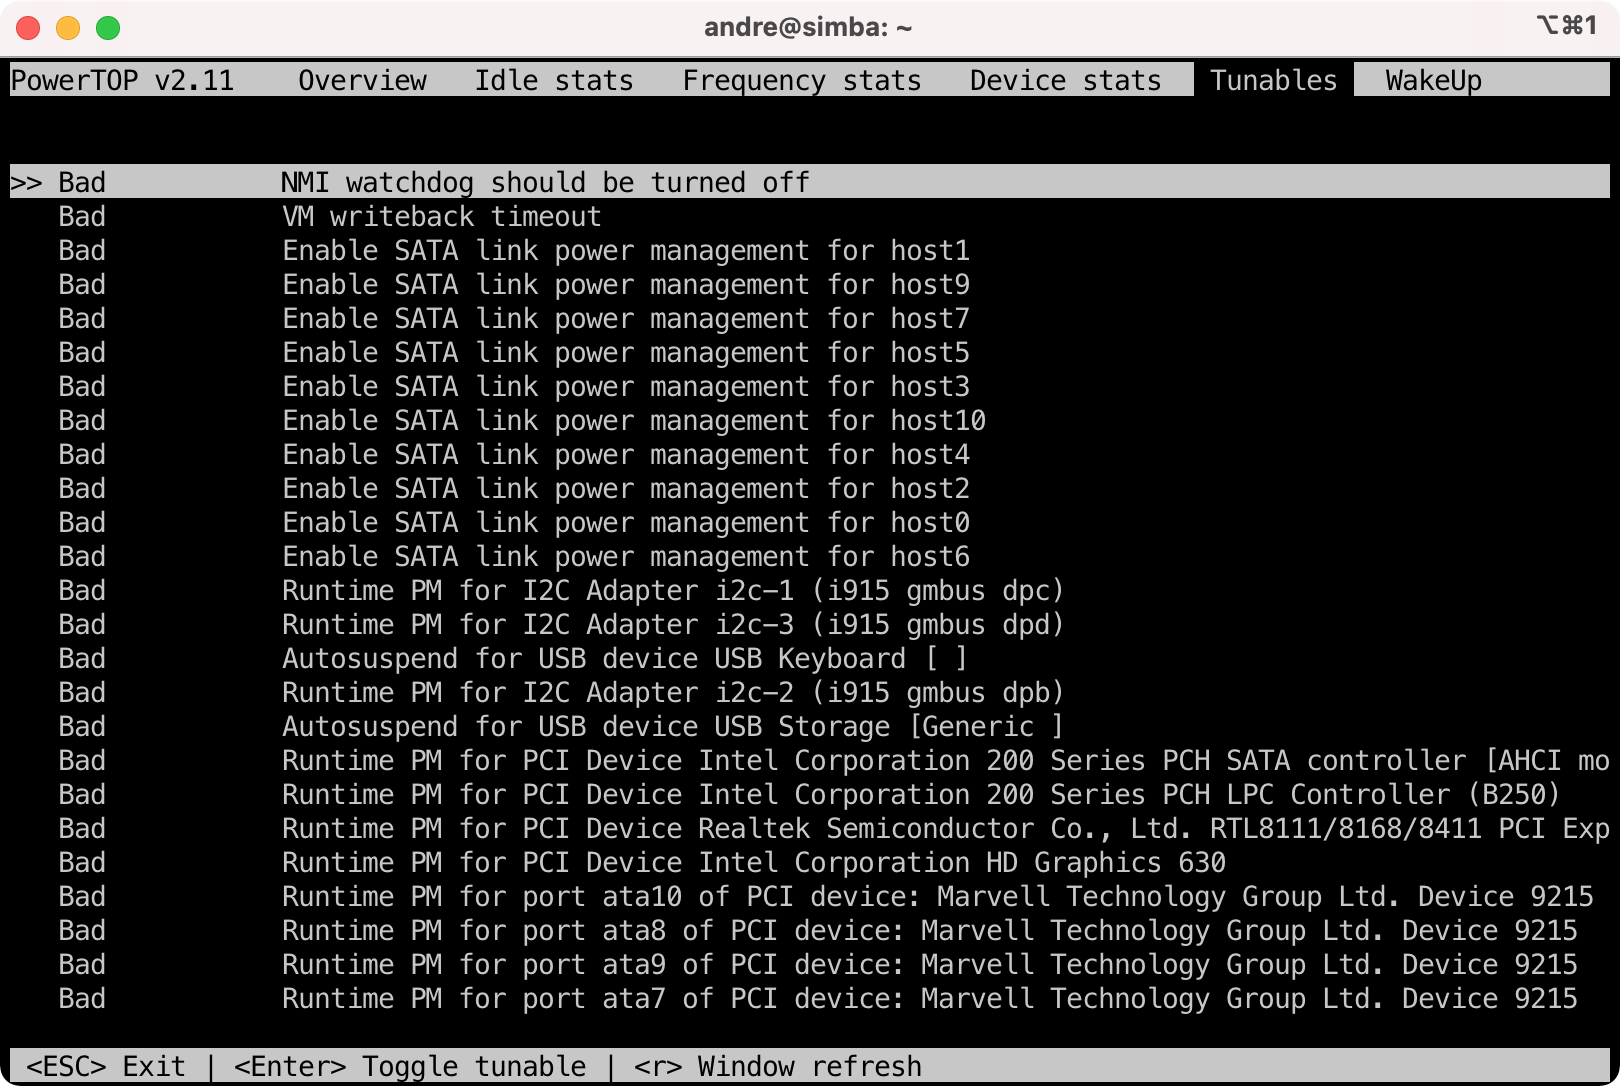
- Run and tune as needed. You can use
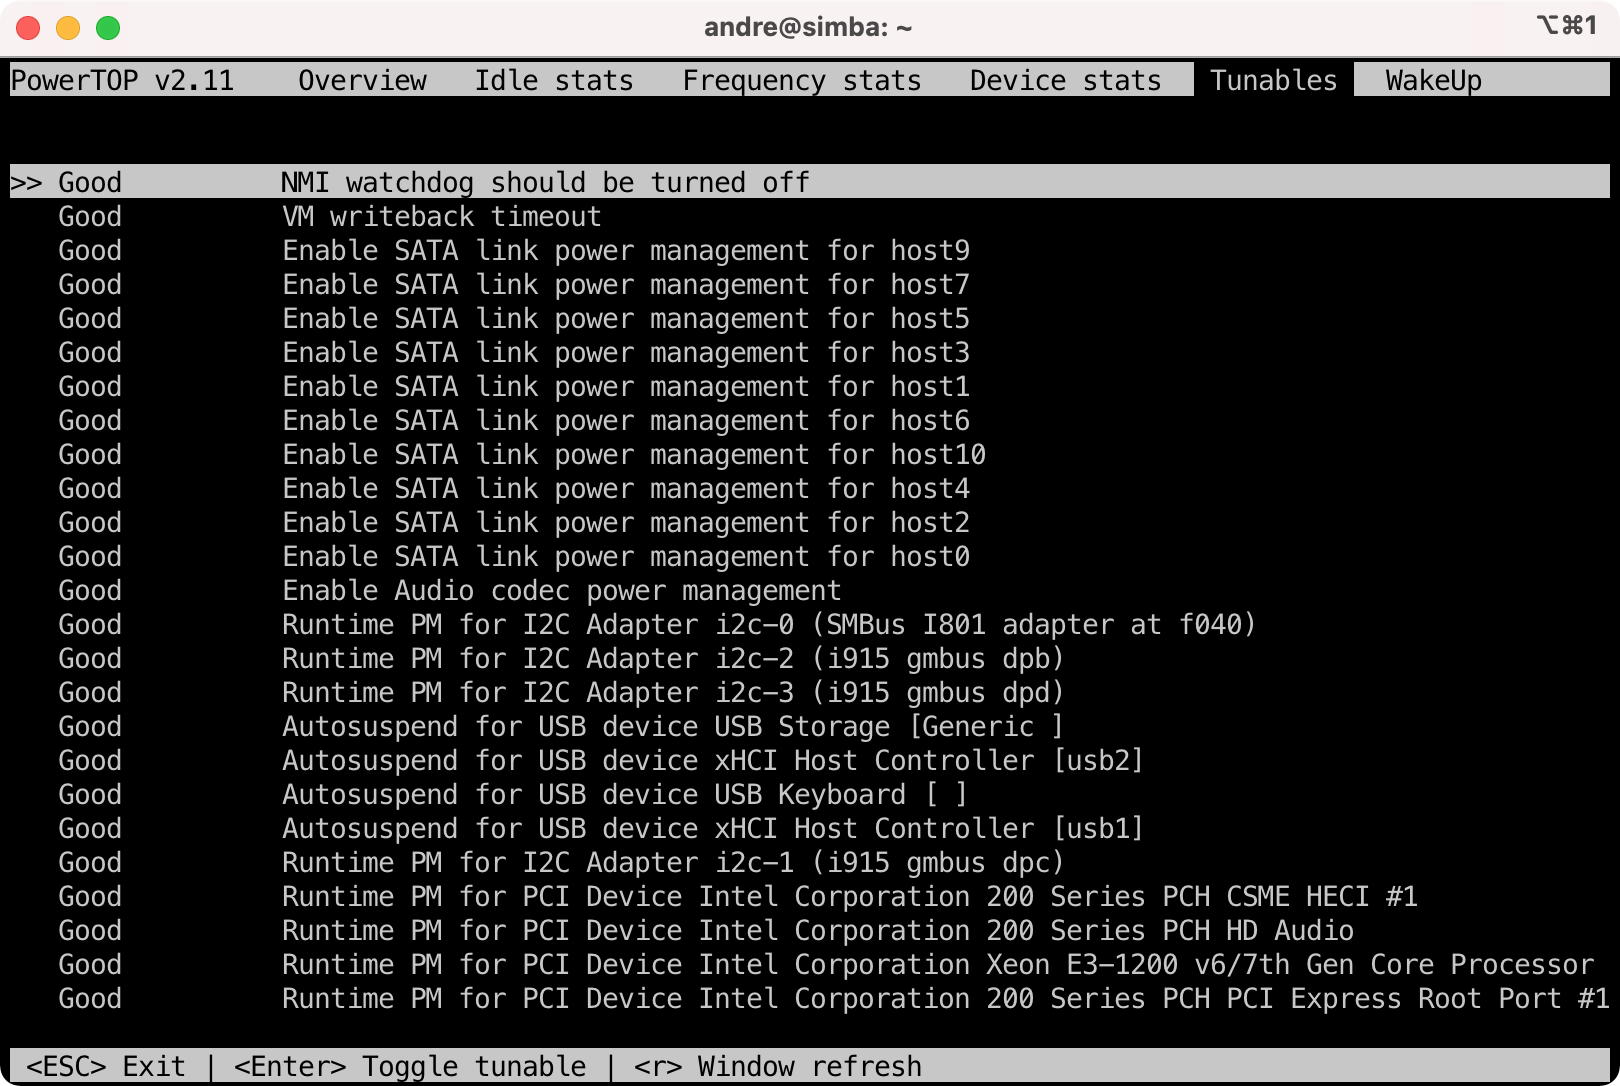
tabto switch tabs and the values to be tweaked can be found under theTunablestab. You can pressenterto allow powertop to tweak a setting.
$ sudo powertop
- Before:
- After:
Security monitoring
In this section I will be installing various tools used to monitor the server and detect potential intrusions.
Rootkit hunting with rkhunter
rkhunter is great and it not only checks for known rootkits but it also does various other things including checking if files were modified.
- Install rkhunter.
$ sudo apt install rkhunter
- Configure rkhunter.
$ sudo vi /etc/rkhunter.conf

# Send email notifications
MAIL-ON-WARNING="user@somewhere.com"
- Do an initial check.
$ sudo rkhunter --check --sk

... # All is ok except this warning
Checking for hidden files and directories                [ Warning ]

# Check the log file to see what is being picked up
$ sudo less /var/log/rkhunter.log
...
[19:55:13] Warning: Hidden directory found: /etc/.git
[19:55:13] Warning: Hidden file found: /etc/.etckeeper: ASCII text
[19:55:13] Warning: Hidden file found: /etc/.gitignore: ASCII text

# Note: If you configured the email reporting then you should have
# also received an email from rkhunter warning you.
- Whitelist the hidden files and directories found that is legit.
$ sudo vi /etc/rkhunter.conf

ALLOWHIDDENDIR=/etc/.git
ALLOWHIDDENFILE=/etc/.gitignore
ALLOWHIDDENFILE=/etc/.etckeeper

# Perform the check again
$ sudo rkhunter --check --sk
- Ensure rkhunter runs at least once a day. A cron file exists
/etc/cron.daily/rkhunterthat will be run daily. However the config file for this also need to be updated.
$ sudo vi /etc/default/rkhunter

CRON_DAILY_RUN="true"
REPORT_EMAIL="user@somewhere.com"
# This will ensure that rkhunter's database is updated when apt packages are installed or updated.
APT_AUTOGEN="true"

# Do a cron test run
$ sudo /etc/cron.daily/rkhunter
-
NOTE: It used to be that you would update rkhunter’s known signatures etc. using a command like
sudo rkhunter --update. However this will now fail because mirrors and the WEB_CMD has been disabled for good reason. It is better to update these through automatic updates and apt. The internet is full of examples showing how to edit the .conf file but with no real explanation as to what it is doing. - Update the database when you make system changes. Run this when you have made changes and would like rkhunter to know about these changes and not raise false positives. To be honest I would use this sparingly and rather receive false positive warning emails come through that I can then investigate. This ensure that I know from time to time that rkhunter is still working as it should.
$ sudo rkhunter --propupd
- I am happy with the initial setup and reporting. Time to update the database and etckeeper.
$ sudo rkhunter --propupd
$ sudo etckeeper commit "Configured rkhunter"
Log monitoring with logwatch
Logwatch will scan log files and send you a report. This is handy to pick up when things start going bad.
- Install logwatch.
$ sudo apt install logwatch

# You will also need the following directory or the cron job will fail
$ sudo mkdir /var/cache/logwatch

# NOTE: By now etckeeper should be doing auto commits
[main 3e5c81f] committing changes in /etc made by "apt install logwatch"
# Aswell as rkhunter gets updated
[ Rootkit Hunter version 1.4.6 ]
File updated: searched for 180 files, found 142
- To get a summary report in the terminal.
$ sudo logwatch | less
- To get an email report for the last 7 days.
$ sudo logwatch --mailto user@somewhere.com --output mail --format html --range 'between -7 days and today'
- Configure logwatch.
# Copy the base config file so we can override it inside of /etc/
$ sudo cp /usr/share/logwatch/default.conf/logwatch.conf /etc/logwatch/conf/
$ sudo vi /etc/logwatch/conf/logwatch.conf

# Configure to send an HTML email
Output = mail
Format = html
MailTo = user@somewhere.com

# Initially I want as much info to be reported on until the system is tweaked
# then it will go back to Low
Detail = High
- Logwatch should have been installed with a cron job to run daily at the file
/etc/cron.daily/00logwatch. You can test this runs as expected.
$ sudo /etc/cron.daily/00logwatch
- Commit changes to etckeeper.
sudo etckeeper commit "Configured logwatch"
Security audit and intrusion detection with Tiger
- Install tiger. Note this will also install the classic tripwire program.
$ sudo apt install tiger

# Tripwire Configuration
... create site key passphrase during installation? Yes
... create local key passphrase during installation? Yes
Rebuild Tripwire configuration file? Yes
Rebuild Tripwire policy file? Yes

# Generate a site and local key passphrase in your password manager and
# then supply it when asked
- Configure tiger.
$ sudo vi /etc/tiger/tigerrc

# Send email
Tiger_Mail_RCPT="user@somewhere.com"
- Tiger will run daily as a cron job as specified by the file
/etc/cron.d/tiger. Tripwire will also run daily under cron. - Run tiger.
$ sudo tiger
...
Security report is in `/var/log/tiger/security.report.server.211102-19:42'

$ sudo less /var/log/tiger/security.report.server.211102-19:42
- Reports are stored in the directory:
/var/log/tiger. - Commit changes to etckeeper
$ sudo etckeeper commit "Configured Tiger"
Automatic banning with fail2ban
Fail2ban will monitor log files and adjust firewall rules as needed to automatically ban network connections that look malicious.
- Install fail2ban.
$ sudo apt install fail2ban
- Configure fail2ban.
$ sudo cp /etc/fail2ban/jail.conf /etc/fail2ban/jail.local
$ sudo vi /etc/fail2ban/jail.local

# Ban for 1 hour
bantime  = 1h
# "maxretry" is the number of failures before a host get banned.
maxretry = 3

# You can use this value to not ban certain machines.
#ignoreip = 127.0.0.1/8 ::1

# Send to email account
destemail = user@somewhere.com

# ban & send an e-mail with whois report and relevant log lines
action = %(action_mwl)s

# Configure SSH
[sshd]
mode    = aggressive
port    = 8204 # Or whatever you used.
- Restart and enable.
$ sudo systemctl restart fail2ban.service
$ sudo systemctl enable fail2ban.service
- Time to test this. Use another computer / IP that will be banned.
someother$ ssh -p 8204 koos@server
someother$ ssh -p 8204 koos@server
someother$ ssh -p 8204 koos@server

# Ok at this stage the IP got banned
# Verify this on the server by checking the log
$ sudo grep 'Ban' /var/log/fail2ban.log

$ sudo fail2ban-client status sshd
Status for the jail: sshd
|- Filter
|  |- Currently failed:	1
|  |- Total failed:	4
|  `- File list:	/var/log/auth.log
`- Actions
   |- Currently banned:	1
   |- Total banned:	1
   `- Banned IP list:	192.168.x.x

# Also you should be receiving a nice detailed email about the ban
- Commit changes to etckeeper.
$ sudo etckeeper commit "Configured fail2ban"
Additional hardening
- Disable root account.
$ sudo passwd -l root
- Tuning network kernel parameters with
sysctl
$ sudo vi /etc/sysctl.conf

# prevent some spoofing attacks
net.ipv4.conf.default.rp_filter=1
net.ipv4.conf.all.rp_filter=1

# SYN flood protection
net.ipv4.tcp_syncookies=1
net.ipv4.tcp_synack_retries = 5

# Do not accept ICMP redirects (prevent MITM attacks)
net.ipv4.conf.all.accept_redirects = 0
net.ipv6.conf.all.accept_redirects = 0

# Do not send ICMP redirects (we are not a router)
net.ipv4.conf.all.send_redirects = 0
# Do not accept IP source route packets (we are not a router)
net.ipv4.conf.all.accept_source_route = 0
net.ipv6.conf.all.accept_source_route = 0

# Log Martian Packets
net.ipv4.conf.all.log_martians = 1

# Ignore bad ICMP errors
net.ipv4.icmp_ignore_bogus_error_responses=1

# Ignore all ICMP echos and pings
net.ipv4.icmp_echo_ignore_broadcasts = 1
net.ipv4.icmp_echo_ignore_all = 1

# Reboot 10 seconds after a kernel panic
kernel.panic=10

# Turn on address space layout randomization (ASLR)
kernel.randomize_va_space=2

# Hard link and symbolic link protection
fs.protected_hardlinks=1
fs.protected_symlinks=1

---
# To load the changes
$ sudo sysctl -p

# To see all the current values
$ sudo sysctl -a
- After doing the above you will no longer be able to ping the server on the network
local$ ping server
PING server (192.168.x.x): 56 data bytes
Request timeout for icmp_seq 0
Request timeout for icmp_seq 1
- Commit changes to etckeeper.
$ sudo etckeeper commit "Configuring sysctl"
In the next sessions
- Add existing RAID array and non raided disks back to the system.
- Setup Samba file sharing.
- Setup Time machine for Mac backups.