
Photo by Gerald Schömbs on Unsplash
Overview
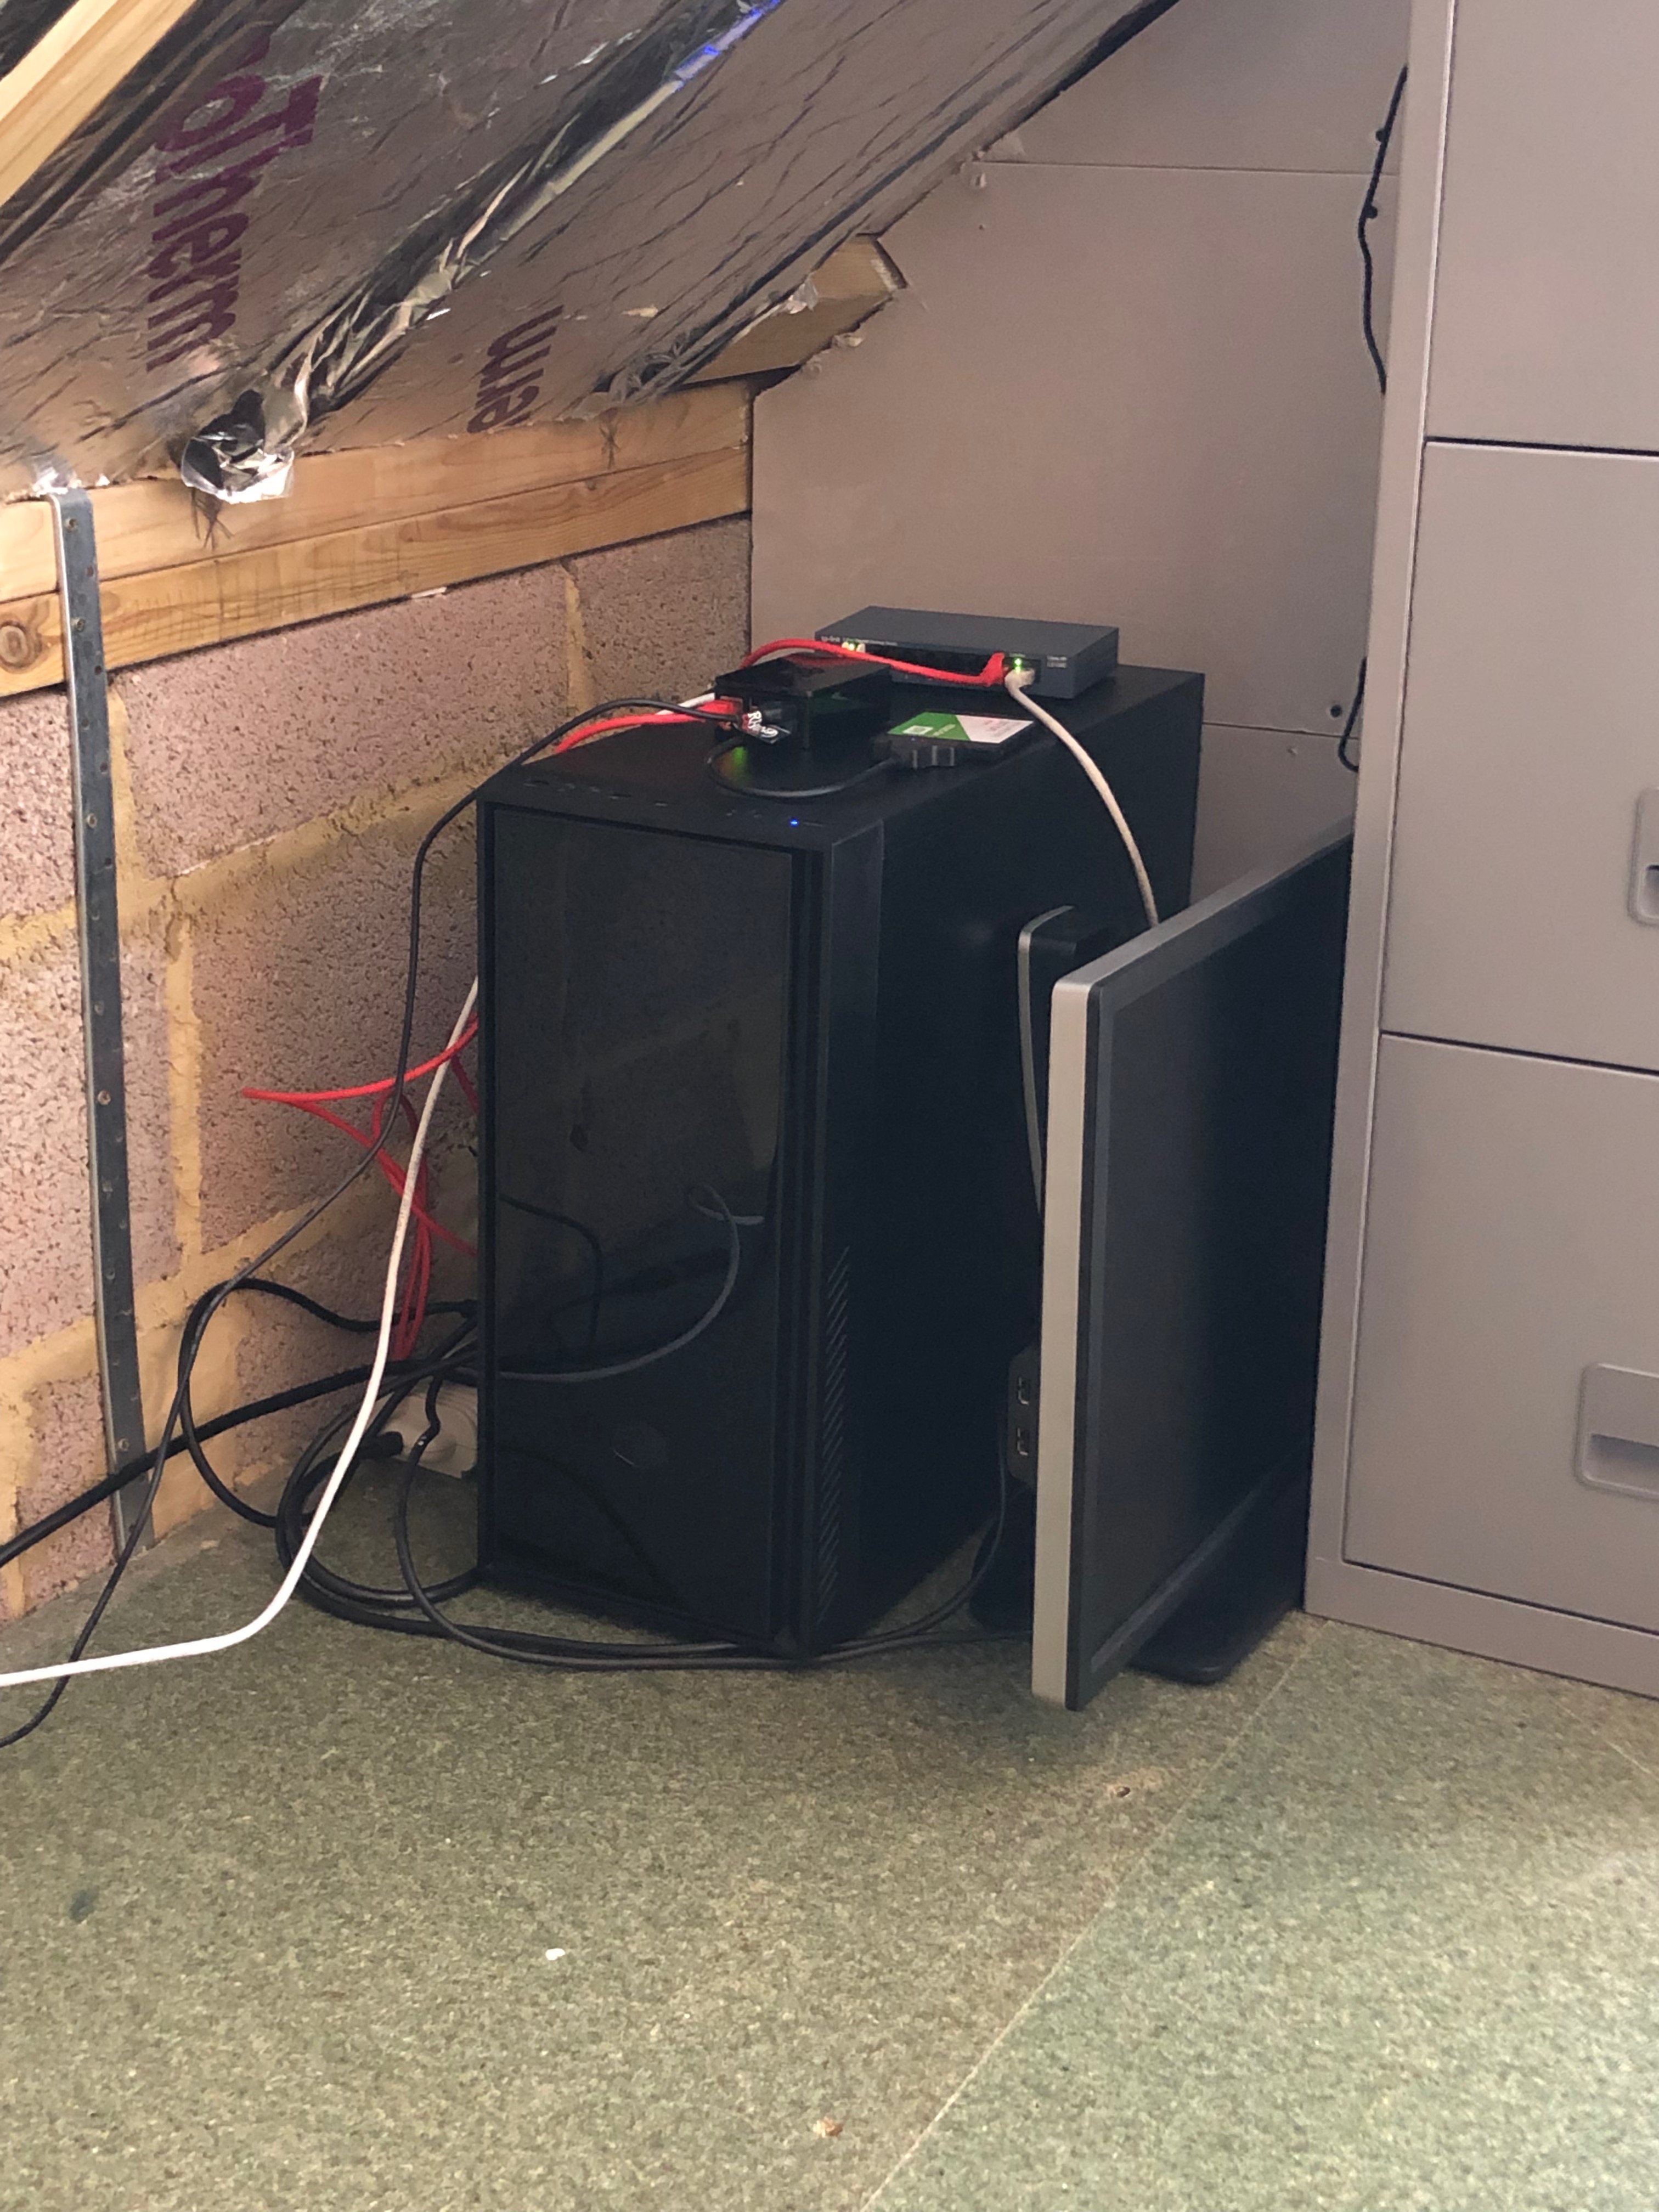
I run an Ubuntu server locally in my house that primarily serves as a NAS. In the past I have used a couple of [redacted] consumer NAS devices, but this ended up giving me a really bad experience and thus I would rather now run my own setup.
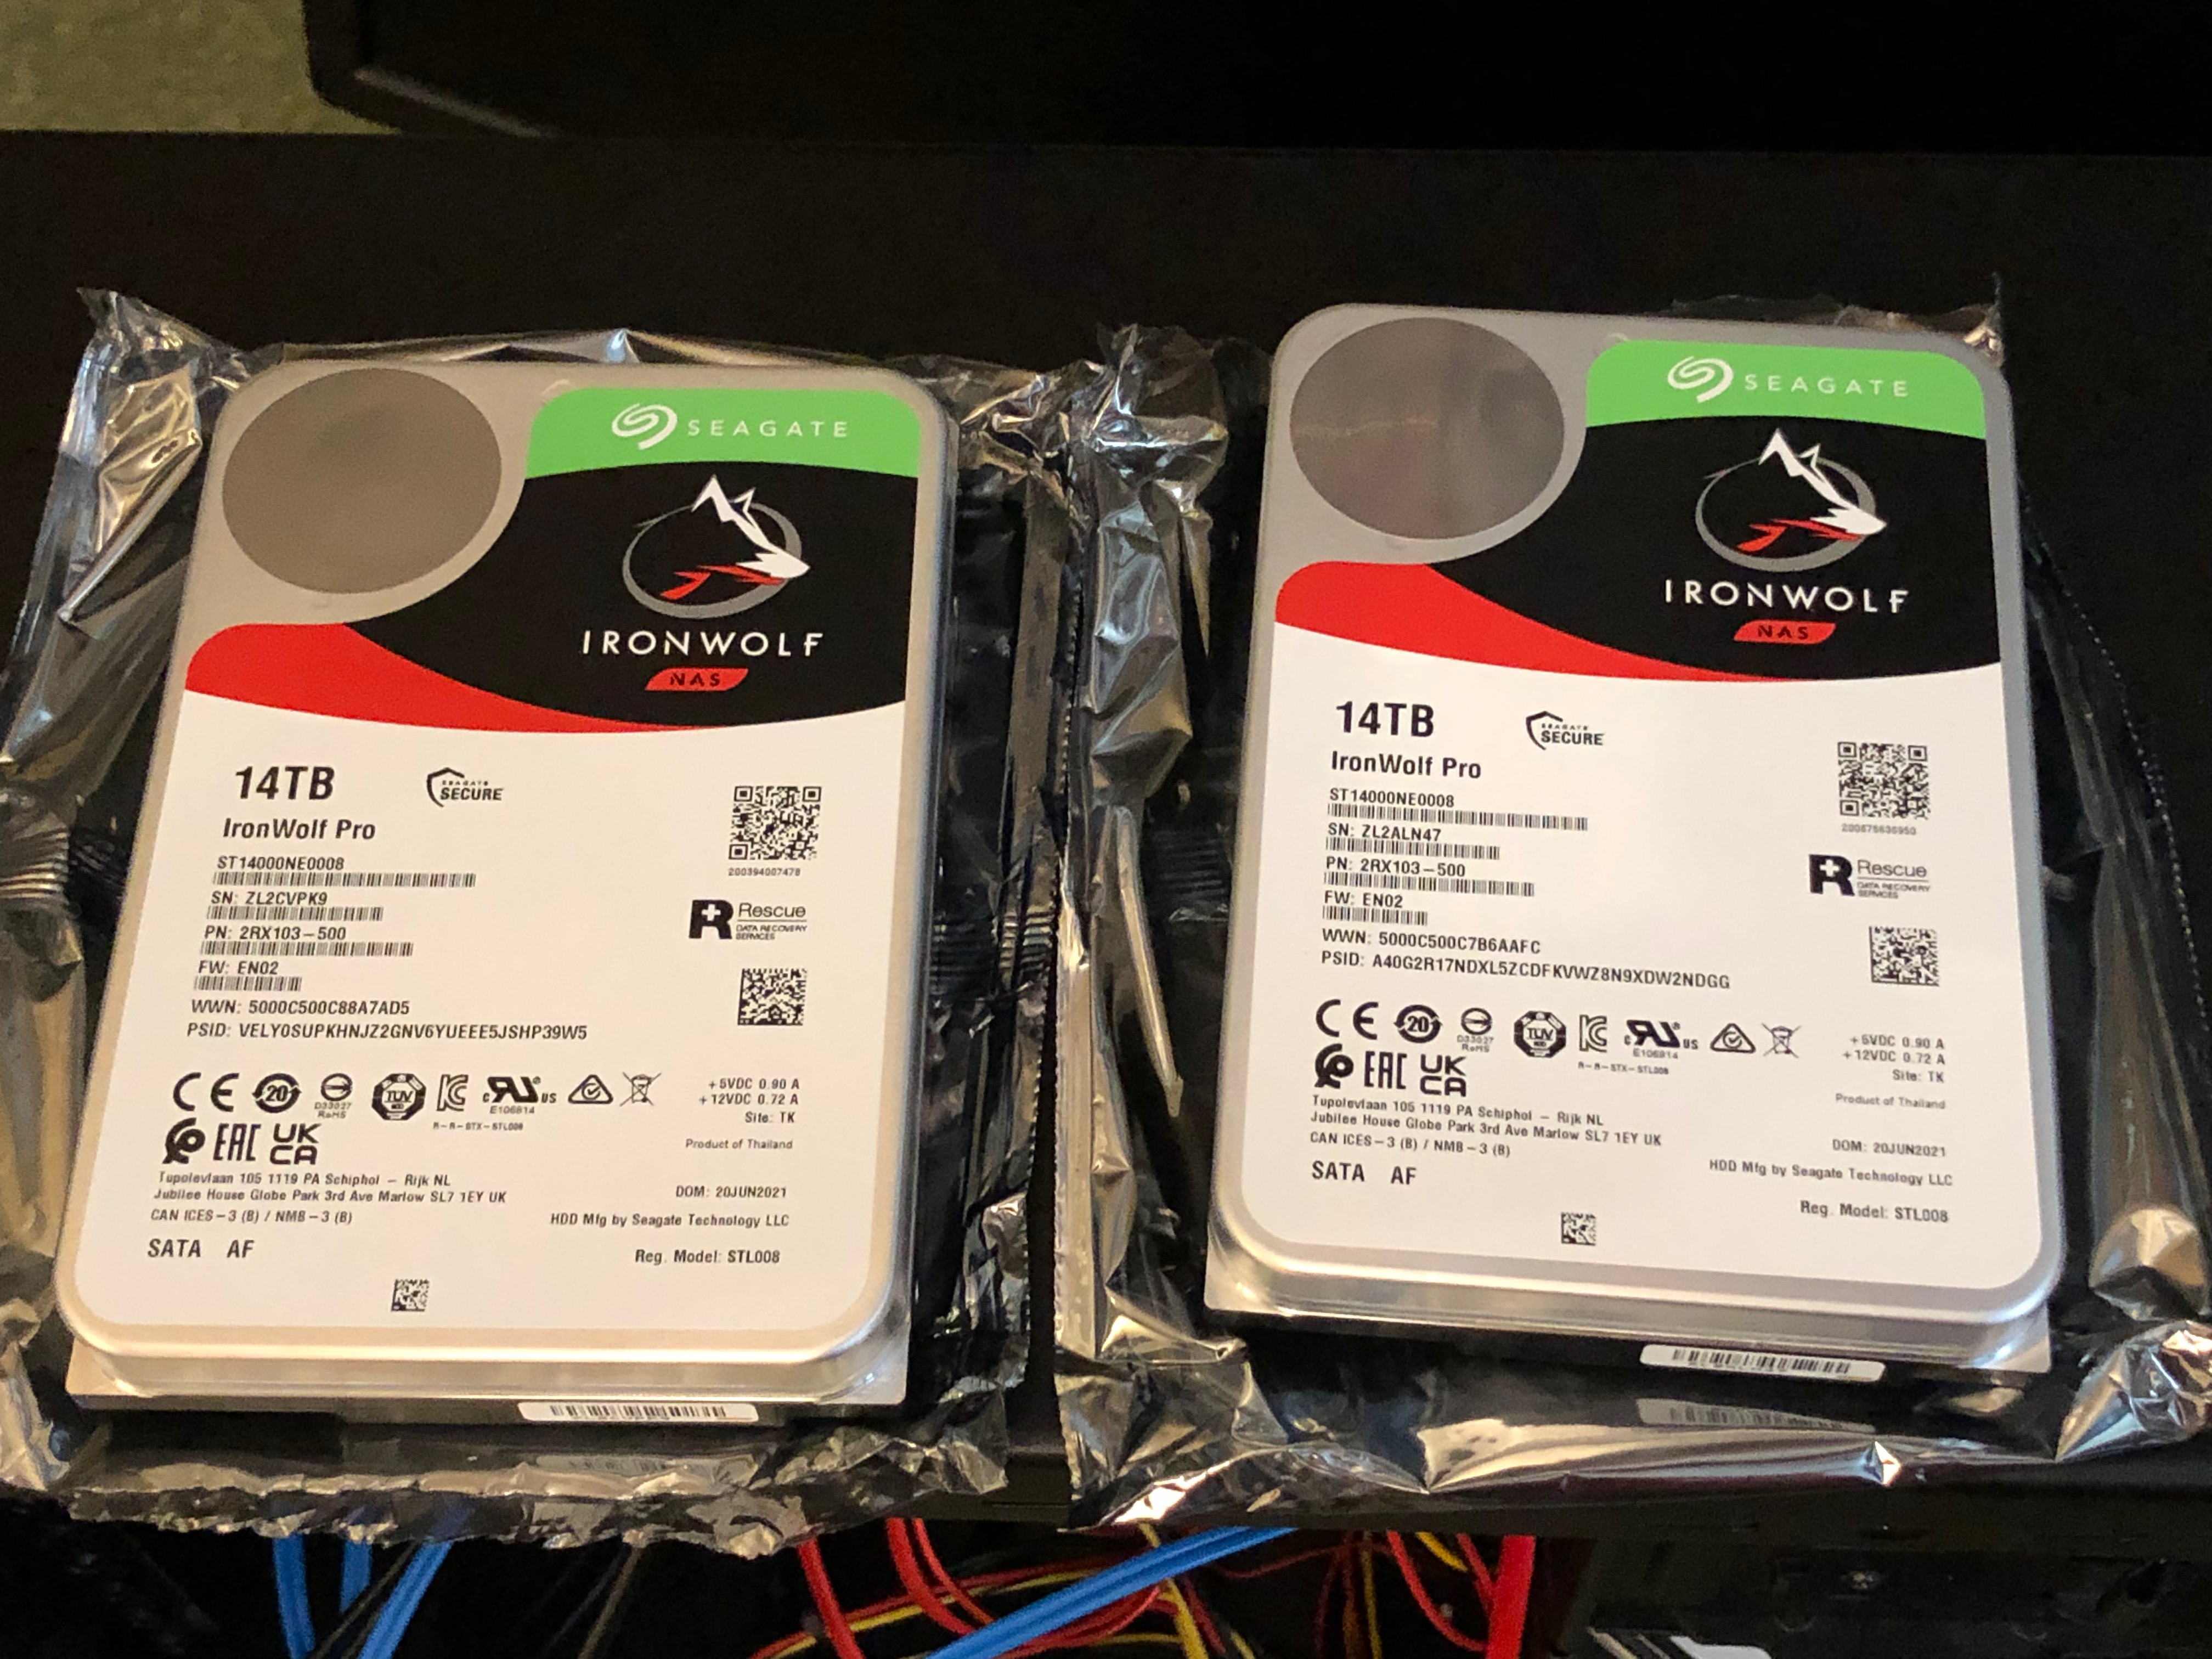
My NAS has been filling up of late and it is time to upgrade the storage to have 2x 14TB Seagate IronWolf Pro drives that I will be running in RAID 1 as a mirror.
The plan is:
- Install and test the new drives.
- Partition and setup as RAID 1.
- Overwrite the entire disk with random data.
- Setup full disk encryption and the Ext4 file system.
- Checksum the existing drives (about 7TB of data) while waiting for other tasks to finish.
- Copy all the data across and verify the checksums.
- Setup power management.
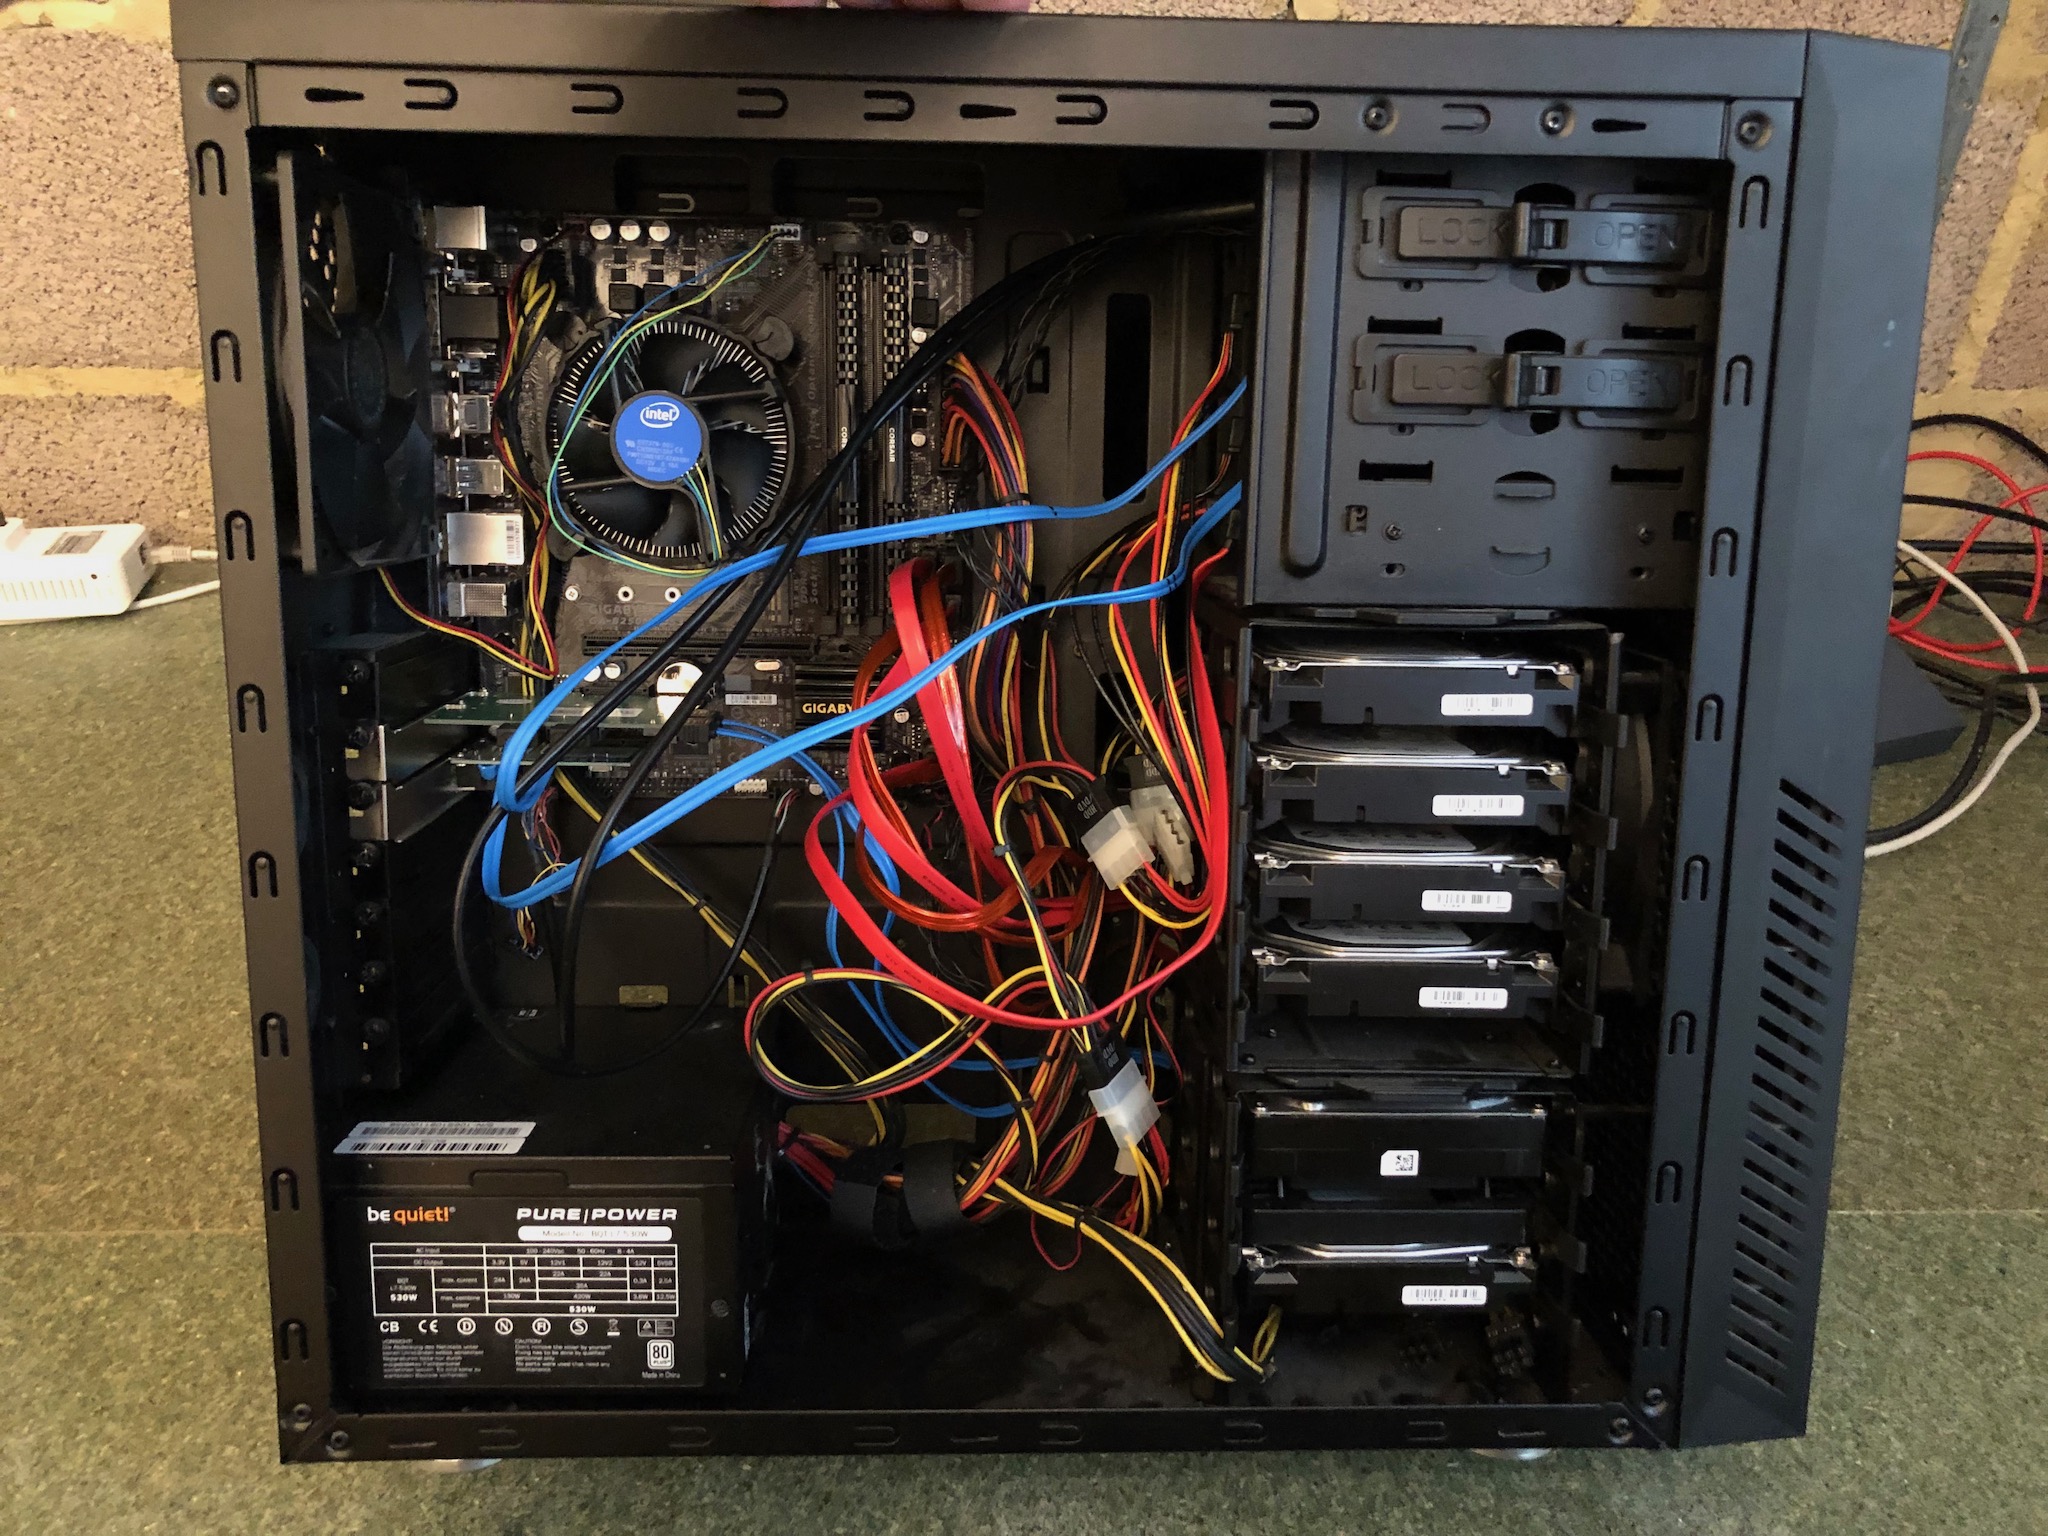
To give you context of my server. It is a normal PC running Ubuntu 18.04 LTS (for the moment). The OS runs off a 240GB SSD drive and is full disk encrypted. Which means I need to enter the passphrase at every boot. Inside of the PC are various other RAID 1 and single drives all full disk encrypted as well. Most of the important data is stored over 4TB (RAID 1) and 3TB (RAID 1) which I want to transfer over to the new 14TB drives.
Once the tasks are done, I will remove the 2x 4TB drives and store them somewhere for a few months until I know for sure the 2x 14TB drives have no issues. At that point I will reuse the drives for auxiliary data.
Backing up
- Start
screenso that I can return to the shell session at any time.
$ screen
... press enter
- Clone the entire SSD drive to a file on another drive.
$ sudo su
$ mkdir -p /media/tiger/sda_backups/
$ dd if=/dev/sda of=/media/tiger/sda_backups/sda_20211001.img
- Detach from the session so that I can go do other stuff while waiting.
Ctrl+a d
You’ve got mail!
Later in the process I will be setting up scripts to run long running tasks and they will need to email me when the tasks are done.
I have previously setup the server to send out email to me for events like when the CPU gets too hot etc.
For now I just need to verify that I can still receive email as expected. Who watches the watchmen?
$ echo "Howzit boet! Kyk net gou of die ding not lekker werk." | /usr/bin/mail -s "[SIMBA] Testing 123" someone@email.address
Setting up the new drives
I will be first setting up the new drives and backing up the old drives before clean installing Ubuntu 20.04 LTS. Why not do this first? Well I need to confirm that the drives actually work etc. and I know what a black hole installing and setting up Linux can be and don’t want to waste time on that and then have issues returning faulty drives if needed.
Installing the new drives
- First switch off the Linux computer.
$ sudo shutdown -h now
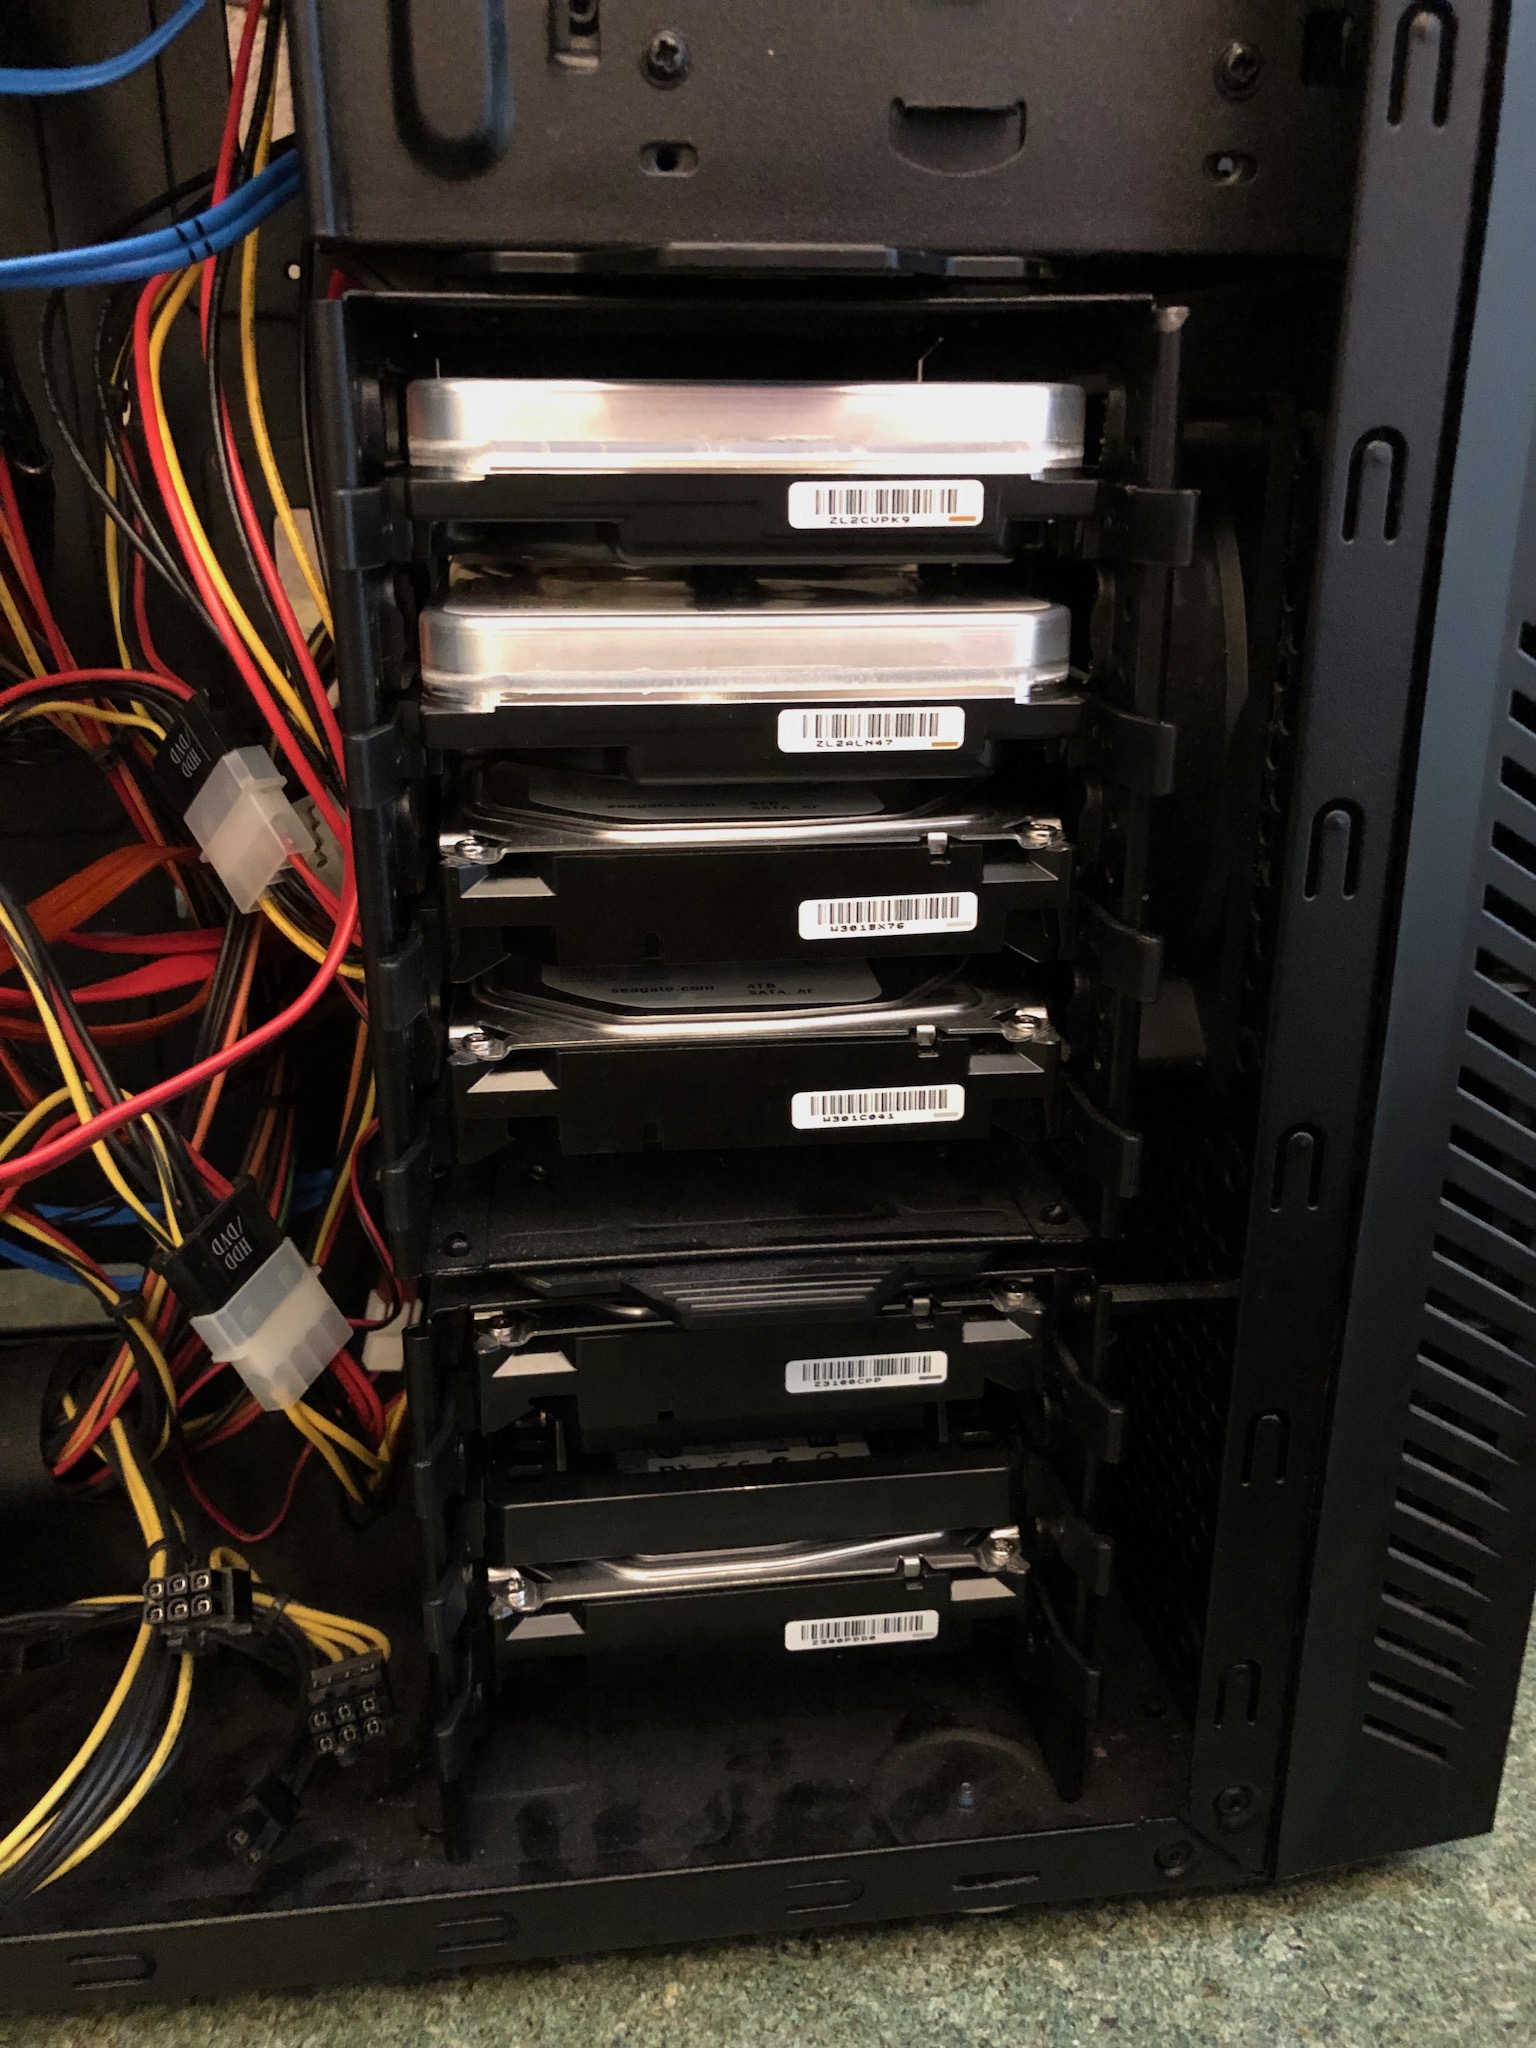
- Disconnect everything and open the PC. The setup is from bottom to top: 1TB Samsung, 240GB SSD (the OS drive), 3TB Seagate, 2x 3TB Seagate (Hammerhead), 2x 4TB Seagate (Greatwhite), in the 5.25" bays are 2x 2TB Western Digital (Timemachine).
- The new shiny 14TB Seagate IronWolf Pro drives.
- After a bit of drive reshuffling the setup is now (bottom to top): 2x 3TB Seagate (Hammerhead) with the 240GB SSD (OS drive) sandwiched in between, 2x 4TB Seagate (Hammerhead), 2x 14TB Seagate, 2x 2TB Western Digital (Timemachine).
Run SMART test to check the disks are ok
- Check that the new disks are showing up as expected.
$ lsblk
...
sdb                    8:16   0  12.8T  0 disk
sdc                    8:32   0  12.8T  0 disk
- Check that SMART is all ok.
# First check the drive supports SMART
$ sudo smartctl -i /dev/sdb
...
SMART support is: Available - device has SMART capability.
SMART support is: Enabled

# Do the same for /dev/sdc
$ sudo smartctl -H /dev/sdb
smartctl 6.6 2016-05-31 r4324 [x86_64-linux-4.15.0-159-generic] (local build)
Copyright (C) 2002-16, Bruce Allen, Christian Franke, www.smartmontools.org

=== START OF READ SMART DATA SECTION ===
SMART overall-health self-assessment test result: PASSED

# Do the same for /dev/sdc
- Get an estimate of how long a test will take.
$ sudo smartctl -c /dev/sdb
...
Short self-test routine
recommended polling time: 	 (   1) minutes.
Extended self-test routine
recommended polling time: 	 (1252) minutes.
Conveyance self-test routine
recommended polling time: 	 (   2) minutes.
- Looks like it will take about 20 hours to run the long test.
- Run a SMART short test followed by a long test in background mode. Initially I tried doing the test’s in foreground (-C) but kept getting errors about the test being interrupted.
$ screen
$ sudo smartctl -t short /dev/sdb
...
=== START OF OFFLINE IMMEDIATE AND SELF-TEST SECTION ===
Sending command: "Execute SMART Short self-test routine immediately in off-line mode".
Drive command "Execute SMART Short self-test routine immediately in off-line mode" successful.
Testing has begun.
Please wait 1 minutes for test to complete.
Test will complete after Sat Oct  2 14:22:50 2021

# I waited till after the suggested time and viewed the results
$ sudo smartctl -l selftest /dev/sdb
...
Num  Test_Description    Status                  Remaining  LifeTime(hours)  LBA_of_first_error
# 1  Short offline       Completed without error       00%         3         -

# Note you can also use the following to get lots of info: sudo smartctl -a /dev/sdb
# Time for the long test
$ sudo smartctl -t long /dev/sdb
...
=== START OF OFFLINE IMMEDIATE AND SELF-TEST SECTION ===
Sending command: "Execute SMART Extended self-test routine immediately in off-line mode".
Drive command "Execute SMART Extended self-test routine immediately in off-line mode" successful.
Testing has begun.
Please wait 1252 minutes for test to complete.
Test will complete after Sun Oct  3 11:17:42 2021

# Repeat the above for /dev/sdc
# Interestingly enough, the test is estimated to be quicker on this drive
Please wait 1237 minutes for test to complete.
Test will complete after Sun Oct  3 11:04:12 2021
- In the meantime while I am waiting for other long running tasks like this I will be generating checksums of the data to be copied. See the section on generating checksums.
- A day later I check the results of the test
$ screen -ls
There are screens on:
	14810.checksum-hh	(03/10/21 11:17:26)	(Detached)
	14722.checksum-gw	(03/10/21 11:14:28)	(Detached)
	3206.pts-0.simba	(02/10/21 11:34:09)	(Detached)
$ screen -r 3206.pts-0.simba

$ sudo smartctl -l selftest /dev/sdb
...
=== START OF READ SMART DATA SECTION ===
SMART Self-test log structure revision number 1
Num  Test_Description    Status                  Remaining  LifeTime(hours)  LBA_of_first_error
# 1  Extended offline    Completed without error       00%        21         -

# Repeat for /dev/sdc
Setup RAID 1 and full disk encryption
Now this is the part where if you are not being careful then you will be crying over data lost very soon. TRIPLE CHECK every single command and make sure it is the correct drives being used. In fact I would suggest you be super paranoid and unplug every drive in the system that you don’t want to screw up.
I will be using partitions for the raid devices instead of the full disk. The reason for this is that I will reserve 200MB of unused space in the event that in the future we need to replace a disk that is slightly smaller than the working disk (because of different brands etc.)
- First get a list of all the drives (yet again) and triple make sure you know which ones to use.
$ lsblk
...
sdb                    8:16   0  12.8T  0 disk
sdc                    8:32   0  12.8T  0 disk
sdd                    8:48   0   3.7T  0 disk
└─sdd1                 8:49   0   3.7T  0 part
  └─md0                9:0    0   3.7T  0 raid1
    └─greatwhite     253:5    0   3.7T  0 crypt /media/greatwhite
sde                    8:64   0   3.7T  0 disk
└─sde1                 8:65   0   3.7T  0 part
  └─md0                9:0    0   3.7T  0 raid1
    └─greatwhite     253:5    0   3.7T  0 crypt /media/greatwhite
...
- In my case I only want to touch /dev/sdb and /dev/sdc. Anything else and I will be super sad 🐼.
- Wipe any existing file system information.
$ sudo wipefs --all --backup /dev/sdb
$ sudo wipefs --all --backup /dev/sdc
- Just to future proof myself from myself. I delete the command history.
$ history
...
1384  sudo wipefs --all --backup /dev/sdb
1390  sudo wipefs --all --backup /dev/sdc
...

$ history -d 1384
$ history -d 1389  # Note the line numbers change when you delete a line (duh!)
- Change the partition type and size. See previous comment about reserving 200MB. Will need to do some math first: 14000519643136 (bytes) – 200000000 (MB to bytes) = 14000319643136 (bytes)
$ sudo cfdisk /dev/sdb

** Select label type: gpt (press enter)

Disk: /dev/sdb
                     Size: 12.8 TiB, 14000519643136 bytes, 27344764928 sectors
                    Label: gpt, identifier: 2CE64109-8EDF-6D45-8E68-45EFA6E7DFDD

    Device                   Start                End            Sectors        Size Type
>>  Free space                2048        27344764927        27344762880       12.8T
~~~~

** Select [ New ] and press enter
** Enter the new desired size. In my case 14000319643136

Device                     Start              End         Sectors      Size Type
>>  /dev/sdb1                   2048      27344375807     27344373760     12.8T Linux filesystem
    Free space           27344375808      27344764927          389120      190M

** Select [ Type ] and press enter
** Scroll down in the list and select Linux RAID (press enter)
- This is what it should look like before writing the changes to disk.
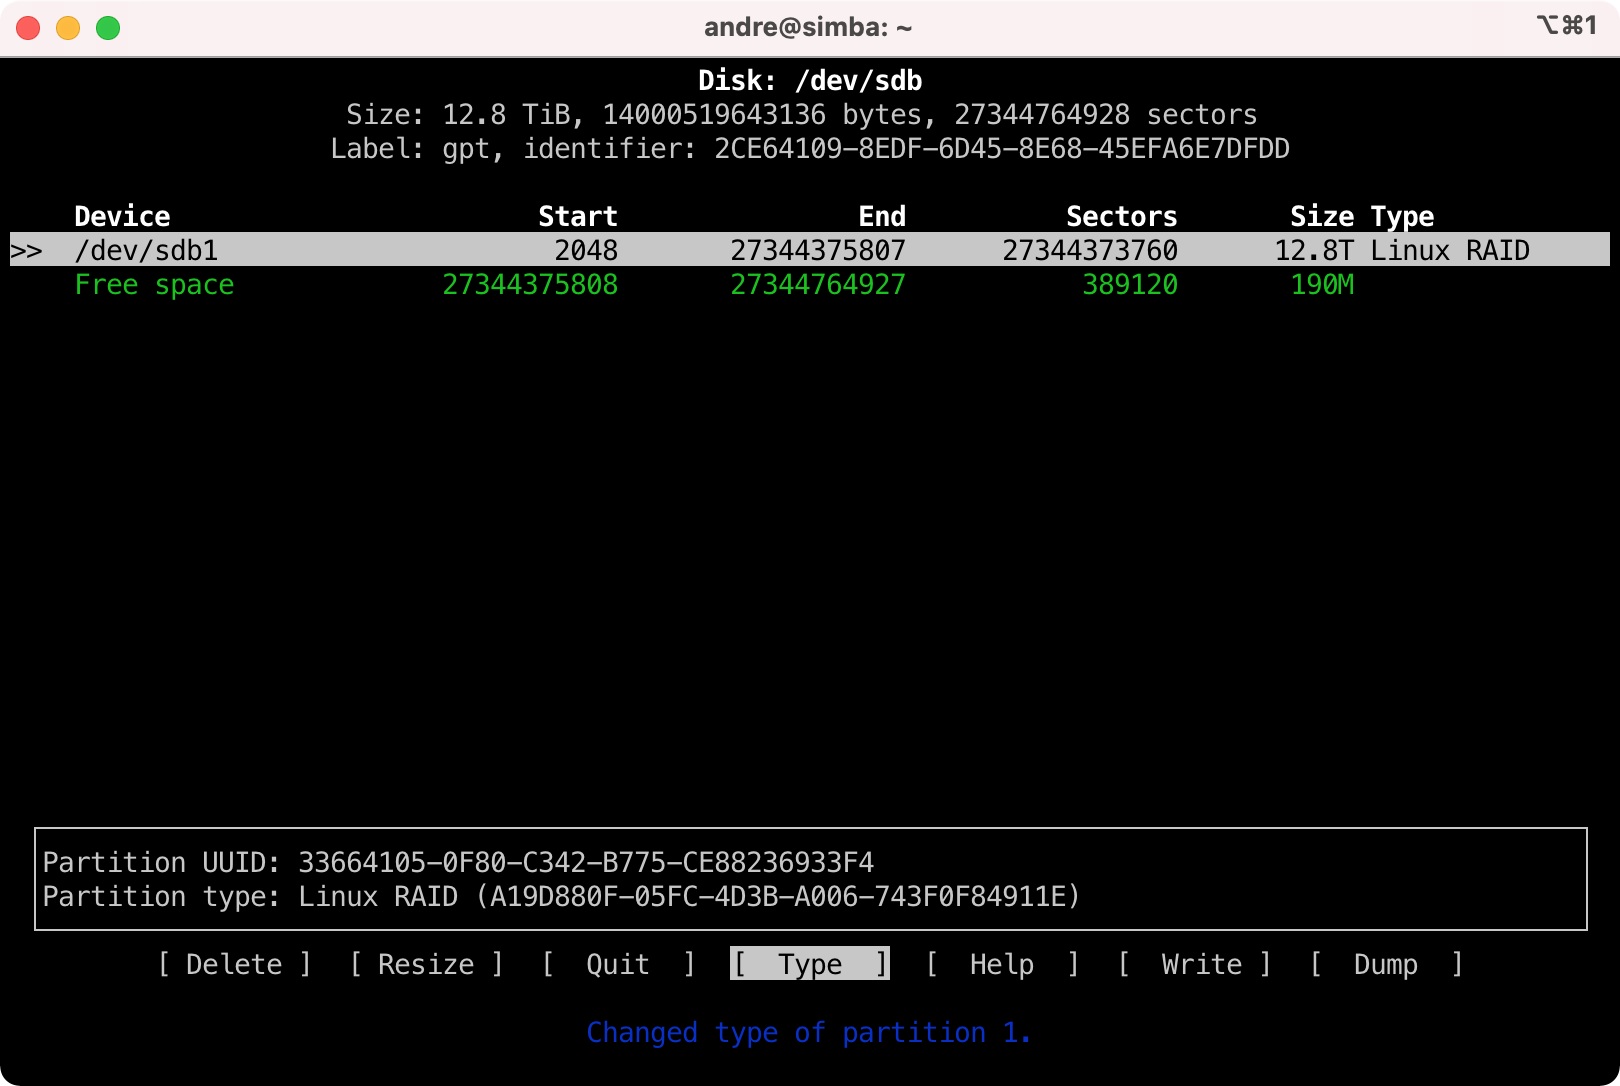
- Select [ Write ] and press enter. Confirm by entering "yes". Repeat the same for /dev/sdc.
- Verify the partitions have been created.
$ lsblk
...
sdb                    8:16   0  12.8T  0 disk
└─sdb1                 8:17   0  12.8T  0 part
sdc                    8:32   0  12.8T  0 disk
└─sdc1                 8:33   0  12.8T  0 part
...
Create the RAID 1 (mirror)
- Get the list of existing RAID devices.
$ cat /proc/mdstat

Personalities : [raid1] [linear] [multipath] [raid0] [raid6] [raid5] [raid4] [raid10]
md2 : active raid1 sdf1[0] sdg1[1]
      1953285120 blocks super 1.2 [2/2] [UU]
      bitmap: 0/15 pages [0KB], 65536KB chunk

md0 : active raid1 sdd1[1] sde1[0]
      3906788352 blocks super 1.2 [2/2] [UU]
      bitmap: 0/30 pages [0KB], 65536KB chunk

md1 : active raid1 sdh1[1] sdi1[0]
      2930037760 blocks super 1.2 [2/2] [UU]
      bitmap: 4/22 pages [16KB], 65536KB chunk
- I will be using /dev/md5 for the moment and will change it later to swap it for md0. NOTE: If you reboot, then it will become /dev/md127. See the following section on how I changed it.
- Create the RAID device.
$ sudo mdadm --create --verbose /dev/md5 --level=mirror --raid-devices=2 /dev/sdb1 /dev/sdc1
...
Continue creating array? yes
mdadm: Defaulting to version 1.2 metadata
mdadm: array /dev/md5 started.

$ cat /proc/mdstat

Personalities : [raid1] [linear] [multipath] [raid0] [raid6] [raid5] [raid4] [raid10]
md5 : active raid1 sdc1[1] sdb1[0]
      13672054784 blocks super 1.2 [2/2] [UU]
      [>....................]  resync =  0.0% (7685568/13672054784) finish=1136.3min speed=200404K/sec
      bitmap: 102/102 pages [408KB], 65536KB chunk
- Looks like it will take >16 hours. Time to go do something else in the meantime.
- The next day I checked on the progress and saw the RAID is ready.
$ cat /proc/mdstat

Personalities : [raid1] [linear] [multipath] [raid0] [raid6] [raid5] [raid4] [raid10]
md5 : active raid1 sdc1[1] sdb1[0]
      13672054784 blocks super 1.2 [2/2] [UU]
      bitmap: 0/102 pages [0KB], 65536KB chunk
- Swapping the new RAID to become /dev/md0. You can also do this to hardcode the mdN designation to survive reboots.
# First backup the existing mdadm.conf
$ sudo cp /etc/mdadm/mdadm.conf /etc/mdadm/mdadm.conf.bak

# Append to mdadm.conf (this will make editing easier)
$ sudo -s -H		 # become root
$ mdadm --detail --scan >> /etc/mdadm/mdadm.conf
$ exit					 # exit root shell

# Check the diff
$ vimdiff /etc/mdadm/mdadm.conf /etc/mdadm/mdadm.conf.bak

# Now to edit the file
$ sudo -s -H
$ vi /etc/mdadm/mdadm.conf

# This is what my new file looks like md0 became md7 and the new 14TB drives become md0
# DO NOT change the name (e.g. name=simba:X) because it won't work then

  # Megalodon 14TB
  ARRAY /dev/md0 metadata=1.2 name=simba:5 UUID=4b2397d7:5cb88116:eee8b5a1:1c72b091
  # Hammerhead 3TB
  ARRAY /dev/md1 metadata=1.2 name=simba:1 UUID=11a0d9f1:49b7ccf4:313c4161:871a3c6b
  # Timemachine 2TB
  ARRAY /dev/md2 metadata=1.2 name=simba:3 UUID=e659b734:4dc6956e:7b6e6df7:3d3da262
  # Greatwhite 4TB (will be stored offsite)
  ARRAY /dev/md7 metadata=1.2 name=simba:0 UUID=de63af76:8148120c:cd7cf3e6:75a6d28e

# You must update-initramfs!
$ update-initramfs -u -k all
- Reboot and verify.
$ sudo shutdown -r now
...
<back online>
$ cat /proc/mdstat
...
md7 : active raid1 sdd1[1] sde1[0]
      3906788352 blocks super 1.2 [2/2] [UU]
      bitmap: 0/30 pages [0KB], 65536KB chunk

md0 : active raid1 sdb1[0] sdc1[1]
      13672054784 blocks super 1.2 [2/2] [UU]
      bitmap: 0/102 pages [0KB], 65536KB chunk
...
Encrypting the disks
NOTE: I decided to not use LVM to further partition the RAID, but instead use it as a single full disk encrypted device.
- First we need to write random data to the entire disk to give it more entropy.
- But really first we tripple check again that the correct device is
/dev/md0
$ lsblk
...
sdb                    8:16   0  12.8T  0 disk
└─sdb1                 8:17   0  12.8T  0 part
  └─md0                9:0    0  12.8T  0 raid1
sdc                    8:32   0  12.8T  0 disk
└─sdc1                 8:33   0  12.8T  0 part
  └─md0                9:0    0  12.8T  0 raid1
- I will be using AES-256 which I found is faster than just using a straight dd + /dev/urandom. NOTE: However it will be much much more secure to just use dd with if=/dev/urandom.
- Created the script file
task-enc.shDO NOT RUN THIS as is without modifying it for your own purposes. This will override /dev/md0!
#/!bin/bash

echo "Writing random data to /dev/md0"
openssl enc -aes-256-ctr -pass pass:"$(dd if=/dev/urandom bs=128 count=1 2>/dev/null | base64)" -nosalt < /dev/zero | pv -pterb | dd bs=4096 of=/dev/md0

EMAILTO="someone@email.address"
EMAILBODY="Finished writing random data"
echo $EMAILBODY | /usr/bin/mail -s "[SIMBA] Writing random data" $EMAILTO

echo ""
echo "Done!"
# Start screen because this is going to be a long task
$ screen -S enc
$ sudo -s -H
$ ./task-enc.sh

Writing random data to /dev/md0
*** WARNING : deprecated key derivation used.
Using -iter or -pbkdf2 would be better.
4.94GiB 0:00:16 [ 245MiB/s] [                     <=>                ]
...
# A day later, it finished
dd: error writing '/dev/md0': No space left on device                 <=>                          ]
12.7TiB 21:02:49 [ 176MiB/s] [                                       <=>                           ]
error writing output file
3418013697+0 records in
3418013696+0 records out
14000184098816 bytes (14 TB, 13 TiB) copied, 75787.4 s, 185 MB/s
- Delete the file
task-enc.shbecause I do not ever want to accidentally run this again. - Setup the RAID device to use LUKS for encryption. First, I create the passphrase to be used in my password manager. Secondly, I copy+paste the passphrase from the password manager and for the confirmation I type it manually. This ensures that in the future what I see in the password manager is what was actually used!
# First, I create the passphrase to be used in my password manager

$ sudo cryptsetup --cipher aes-xts-plain64 --key-size 512 --verify-passphrase luksFormat /dev/md0

WARNING!
========
This will overwrite data on /dev/md0 irrevocably.

Are you sure? (Type uppercase yes): YES
Enter passphrase for /dev/md0:
Verify passphrase:
- Open the encrypted disk (as /dev/mapper/megalodon) and check status.
$ sudo cryptsetup luksOpen /dev/md0 megalodon
Enter passphrase for /dev/md0:

$ ls -la /dev/mapper/
...
lrwxrwxrwx  1 root root       7 Oct  5 12:18 megalodon -> ../dm-6

$ sudo cryptsetup -v status megalodon
/dev/mapper/megalodon is active.
  type:    LUKS1
  cipher:  aes-xts-plain64
  keysize: 512 bits
  key location: dm-crypt
  device:  /dev/md0
  sector size:  512
  offset:  4096 sectors
  size:    27344105472 sectors
  mode:    read/write
Command successful.
- Create the EXT4 file system.
$ sudo mkfs.ext4 /dev/mapper/megalodon

mke2fs 1.44.1 (24-Mar-2018)
Creating filesystem with 3418013184 4k blocks and 427253760 inodes
Filesystem UUID: aa9cf15b-22c1-4509-b35b-b1e23f77ba63
Superblock backups stored on blocks:
	32768, 98304, 163840, 229376, 294912, 819200, 884736, 1605632, 2654208,
	4096000, 7962624, 11239424, 20480000, 23887872, 71663616, 78675968,
	102400000, 214990848, 512000000, 550731776, 644972544, 1934917632,
	2560000000

Allocating group tables: done
Writing inode tables: done
Creating journal (262144 blocks): done
Writing superblocks and filesystem accounting information: done
- Mount the file system.
$ sudo mkdir /media/megalodon
$ sudo mount /dev/mapper/megalodon /media/megalodon
$ df -H | grep megalodon
/dev/mapper/megalodon        14T   42M   14T   1% /media/megalodon

# Verify we can write to the file system
$ cd /media/megalodon
$ sudo touch test.txt
- Unmount and secure the drive again.
$ sudo umount /media/megalodon && sudo cryptsetup luksClose megalodon
Auto-mount when the main SSD is unlocked
My motivation for having the RAID full disk encrypted is such that when the NAS is powered down (like going on holiday or is stolen) that the data is encrypted at rest.
I am less concerned about having the data decrypted only when needed.
Since the SSD that contains the OS is also full disk encrypted I will use this SSD to store the key file that can then auto decrypt and mount the drive whenever the NAS is started up.
- Create a key file that will be used to decrypt the RAID
# I already have the /root/secrets directory so will skip the next 2 commands
$ sudo mkdir /root/secrets
$ sudo chmod 0600 /root/secrets

$ sudo dd if=/dev/urandom of=/root/secrets/keyfile-megalodon bs=1024 count=4
$ sudo chmod 0400 /root/secrets/keyfile-megalodon
$ sudo ls -la /root/secrets/
-r-------- 1 root root    4096 Oct  5 12:41 keyfile-megalodon
- Copy this new key file into your password manager!
- Add the key file to be used with the RAID.
$ sudo cryptsetup luksAddKey /dev/md0 /root/secrets/keyfile-megalodon
Enter any existing passphrase:
- Verify the key file can unlock the RAID.
$ sudo cryptsetup --key-file /root/secrets/keyfile-megalodon luksOpen /dev/md0 megalodon
$ ls -la /dev/mapper/ | grep megalodon
lrwxrwxrwx  1 root root       7 Oct  5 12:49 megalodon -> ../dm-6

$ sudo cryptsetup luksClose megalodon
- Backup the header.
$ sudo cryptsetup luksHeaderBackup --header-backup-file /root/secrets/header-megalodon /dev/md0
$ sudo chmod 0400 /root/secrets/header-megalodon

# Check that all files in /root/secrets can only be read by the root user
$ sudo ls -la /root/secrets
-r-------- 1 root root ...
- Copy this backup header file into your password manager!
- Edit crypttab so that the drive can be auto decrypted on boot.
# First you need the UUID of the /dev/md0 drive
$ sudo lsblk -o +name,mountpoint,uuid
...sdb
...└─sdb1       4b2397d7-5cb8-8116-eee8-b5a11c72b091
...  └─md0      e75d3baa-fc9d-4993-a0f0-e9b81b490354 <-- THIS ONE
...sdc
...└─sdc1       4b2397d7-5cb8-8116-eee8-b5a11c72b091
...  └─md0      e75d3baa-fc9d-4993-a0f0-e9b81b490354 <-- THIS ONE

$ sudo vi /etc/crypttab

# /dev/md0
megalodon UUID=e75d3baa-fc9d-4993-a0f0-e9b81b490354 /root/secrets/keyfile-megalodon luks,discard
- Edit fstab so that the file system can be auto mounted on boot.
$ sudo vi /etc/fstab

# RAID (14TB)
/dev/mapper/megalodon    /media/megalodon    ext4    defaults    0    2
- Verify that crypttab and fstab works as expected.
$ sudo cryptdisks_start megalodon
 * Starting crypto disk...                                                                           * megalodon (starting)..
 * megalodon (started)...

$ ls -la /dev/mapper | grep megalodon
lrwxrwxrwx  1 root root       7 Oct  5 13:16 megalodon -> ../dm-6

$ sudo mount -a
$ df -H | grep megalodon
/dev/mapper/megalodon        14T   42M   14T   1% /media/megalodon
- IMPORTANT: Ensure that initramfs is updated.
$ sudo update-initramfs -u -k all
- Reboot and check everything works as expected.
sudo shutdown -r now. After the reboot (and unlocking the main SSD by passphrase) I checked the contents of /media/megalodon/test.txt and it had the text I expected.
Generating checksums of the existing data
NOTE: I did this section while waiting for the SMART test to complete.
I have been using checksums for donkey years to ensure that data transfer as expected over to new drives etc. They are also a handy way to verify in the future if data ever got corrupted.
I will be using my create-hashes.sh script to generate the checksums. This uses the trusty hashdeep application and performs SHA256 hashing on the files. You can find a copy of the script here: https://github.com/andrejacobs/scripts/blob/main/NAS/create-hashes.sh
Generating checksums can takes hours if not days to complete, so I want to fire and forget about this until I receive an email when the job is done. For this I created a simple (and probably very flawed) script named: task-hash.sh
#/!bin/bash

./create-hashes.sh

EMAILTO="someone@email.address"
EMAILBODY="Finished generating checksums for "$(pwd)
echo $EMAILBODY | /usr/bin/mail -s "[SIMBA] Checksum task" $EMAILTO

echo ""
echo "Done!"
- Place a copy of
create-hashes.shandtask-hash.shin the directories that will be checksummed.
$ sudo cp task-hash.sh /media/greatwhite/
$ sudo cp create-hashes.sh /media/greatwhite/
-
Fire and forget! I will be running the tasks as root because of file permissions. Before doing this I did do a simple test first to ensure I still do receive the emails when root is running the tasks.
Don’t forget to run this using screen or tmux!
$ screen -S checksum-gw
$ sudo su
$ cd /media/greatwhite
$ ./task-hash.sh

# Detach from screen
Ctrl+a, d

# Start a new checksum session on another RAID to be checked later
$ screen -S checksum-hh
$ sudo su
$ cd /media/hammerhead
$ ./task-hash.sh

# Detach from screen
Ctrl+a, d
- Running
htopto see the CPU load
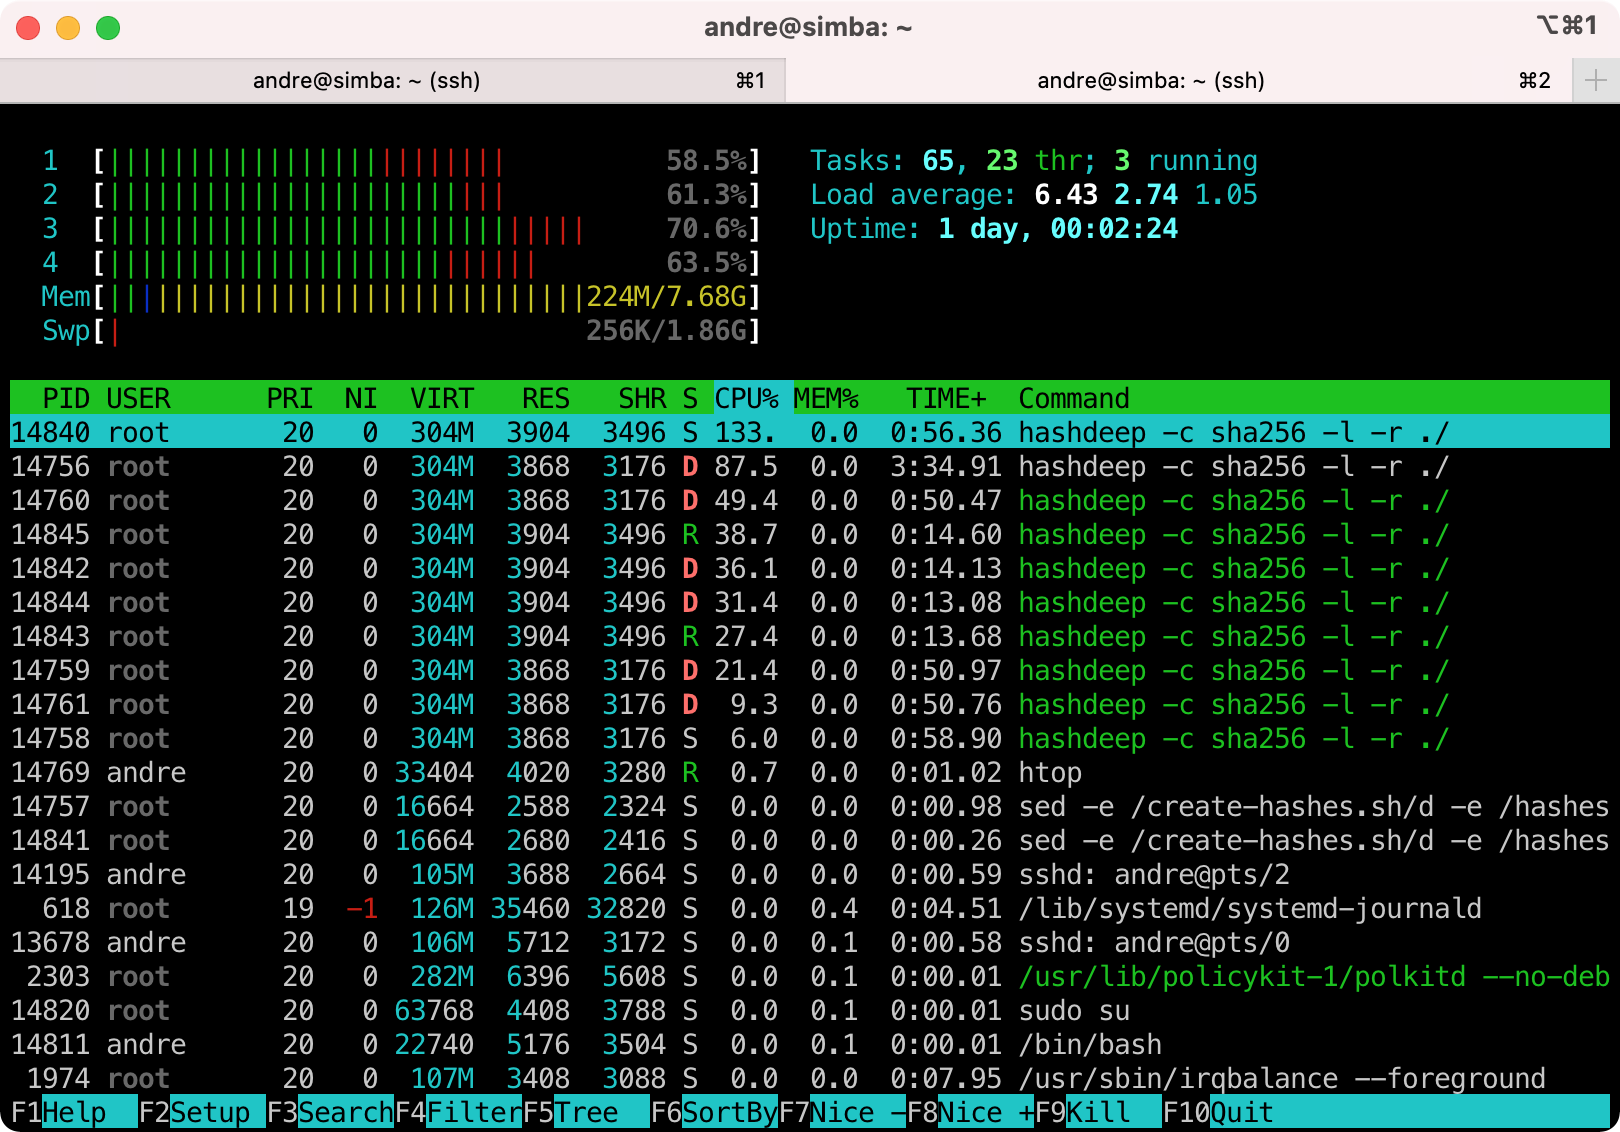
- Checking the CPU temperature
$ sensors | grep -oP "Core\s+\d:\s+\+?(\K\d+)"
54
57
- Checking the drive temperatures
$ sudo hddtemp /dev/sdd
/dev/sdd: ST4000VN000-1H4168: 36°C
Transferring the data to the new RAID
- I created a script named
task-megasync.shthat will do the rsync copy and send me an email when done.
#/!bin/bash

mkdir -p /media/megalodon/backup/greatwhite
mkdir -p /media/megalodon/backup/hammerhead

rsync -av /media/greatwhite /media/megalodon/backup/greatwhite
rsync -av /media/hammerhead /media/megalodon/backup/hammerhead

EMAILTO="someone@email.address"
EMAILBODY="Finished syncing all the data!"
echo $EMAILBODY | /usr/bin/mail -s "[SIMBA] Sync completed" $EMAILTO

echo ""
echo "Done!"
- Transferred the data.
$ screen -S copy
$ sudo -s -H
$ ./task-megasync.sh

# Took about a day to sync 7TB
- Check the file system and drives are healthy.
# Check file system
$ sudo umount /dev/mapper/megalodon
$ sudo fsck /dev/mapper/megalodon

fsck from util-linux 2.31.1
e2fsck 1.44.1 (24-Mar-2018)
/dev/mapper/megalodon: clean, 1823819/427253760 files, 1471043344/3418013184 blocks

# Check drive SMART
$ sudo smartctl -H /dev/sdb
...
=== START OF READ SMART DATA SECTION ===
SMART overall-health self-assessment test result: PASSED
# Repeat for /dev/sdc
- Verify the data by checking the checksums. For this I created another task-X type shell script that runs the
verify-hashes.shthat was copied over from the existing drives. - After a few hours I checked the file
hashes_did_not_match.txtthat was created from verifying both drives that was copied and it contained no info, which means all the data was copied over correctly.
Side bonus
Over the years a lot of data has been duplicated all over the place. I can make a list of all the duplicate files using standard unix tools since I already have checksums of all the files that have been copied.
First I combined the .sha256 text files into one big one using just cat *.sha256 > hashes-combined.sha256.
Then to make a list of all the duplicate files:
$ cut -d, -f2,3 hashes-combined.sha256 | sort | uniq -w65 -dD > duplicates.txt
Saving power
I want the disks to spin down and use as little energy as possible after being idle for 30 minutes.
- Identify the disks by id
$ ls /dev/disk/by-id/ata*
/dev/disk/by-id/ata-ST14000NE0008-2RX103_ZL2ALN47
...
/dev/disk/by-id/ata-ST14000NE0008-2RX103_ZL2CVPK9
- Edit
/etc/hdparm.conf
$ sudo cp /etc/hdparm.conf /etc/hdparm.conf.bak
$ sudo vi /etc/hdparm.conf

# Add drives as needed

# Megalodon 1
/dev/disk/by-id/ata-ST14000NE0008-2RX103_ZL2ALN47 {
    # 30 minutes
    spindown_time = 241
    # advanced power management with spin down
    apm = 127
}

# Megalodon 2
/dev/disk/by-id/ata-ST14000NE0008-2RX103_ZL2CVPK9 {
    # 30 minutes
    spindown_time = 241
    # advanced power management with spin down
    apm = 127
}
- Reboot and enjoy! (This saved me about 10 Watts when the system is idle. Currently the NAS PC + Network Switch + Raspberry Pi 3 for Home Automation is consuming 36 Watts when idle).
1 comment on “Setting up 2x 14TB Seagate IronWolf Pro drives (RAID 1) on my Ubuntu Linux NAS”
Comments are closed.