
Featured image by Egon Elbre
Nothing beats learning like working on an actual project. To that degree I started working on my own command line application ajtweet to learn more about building CLI apps and Go in general.
This post goes over the process of how I managed to use the Twitter v2 APIs from Postman as well as from a simple Go application. You can also check out the example code here.
Register to get access to Twitter APIs
- You need to have a valid twitter user account and then use this guide for signing up.
- You will need to create the API key and secret, user Access Token and Secret, App Access Token in order to access the services. I will do this in the next section.
Creating new keys, secrets and tokens
- Go to the Twitter developer dashboard.
- Create a new project. You will need to supply a name, the use case and a description for Twitter to understand what you are building.
- Next you will need to create an app. Once I created a project the dashboard took me to the App setup process.
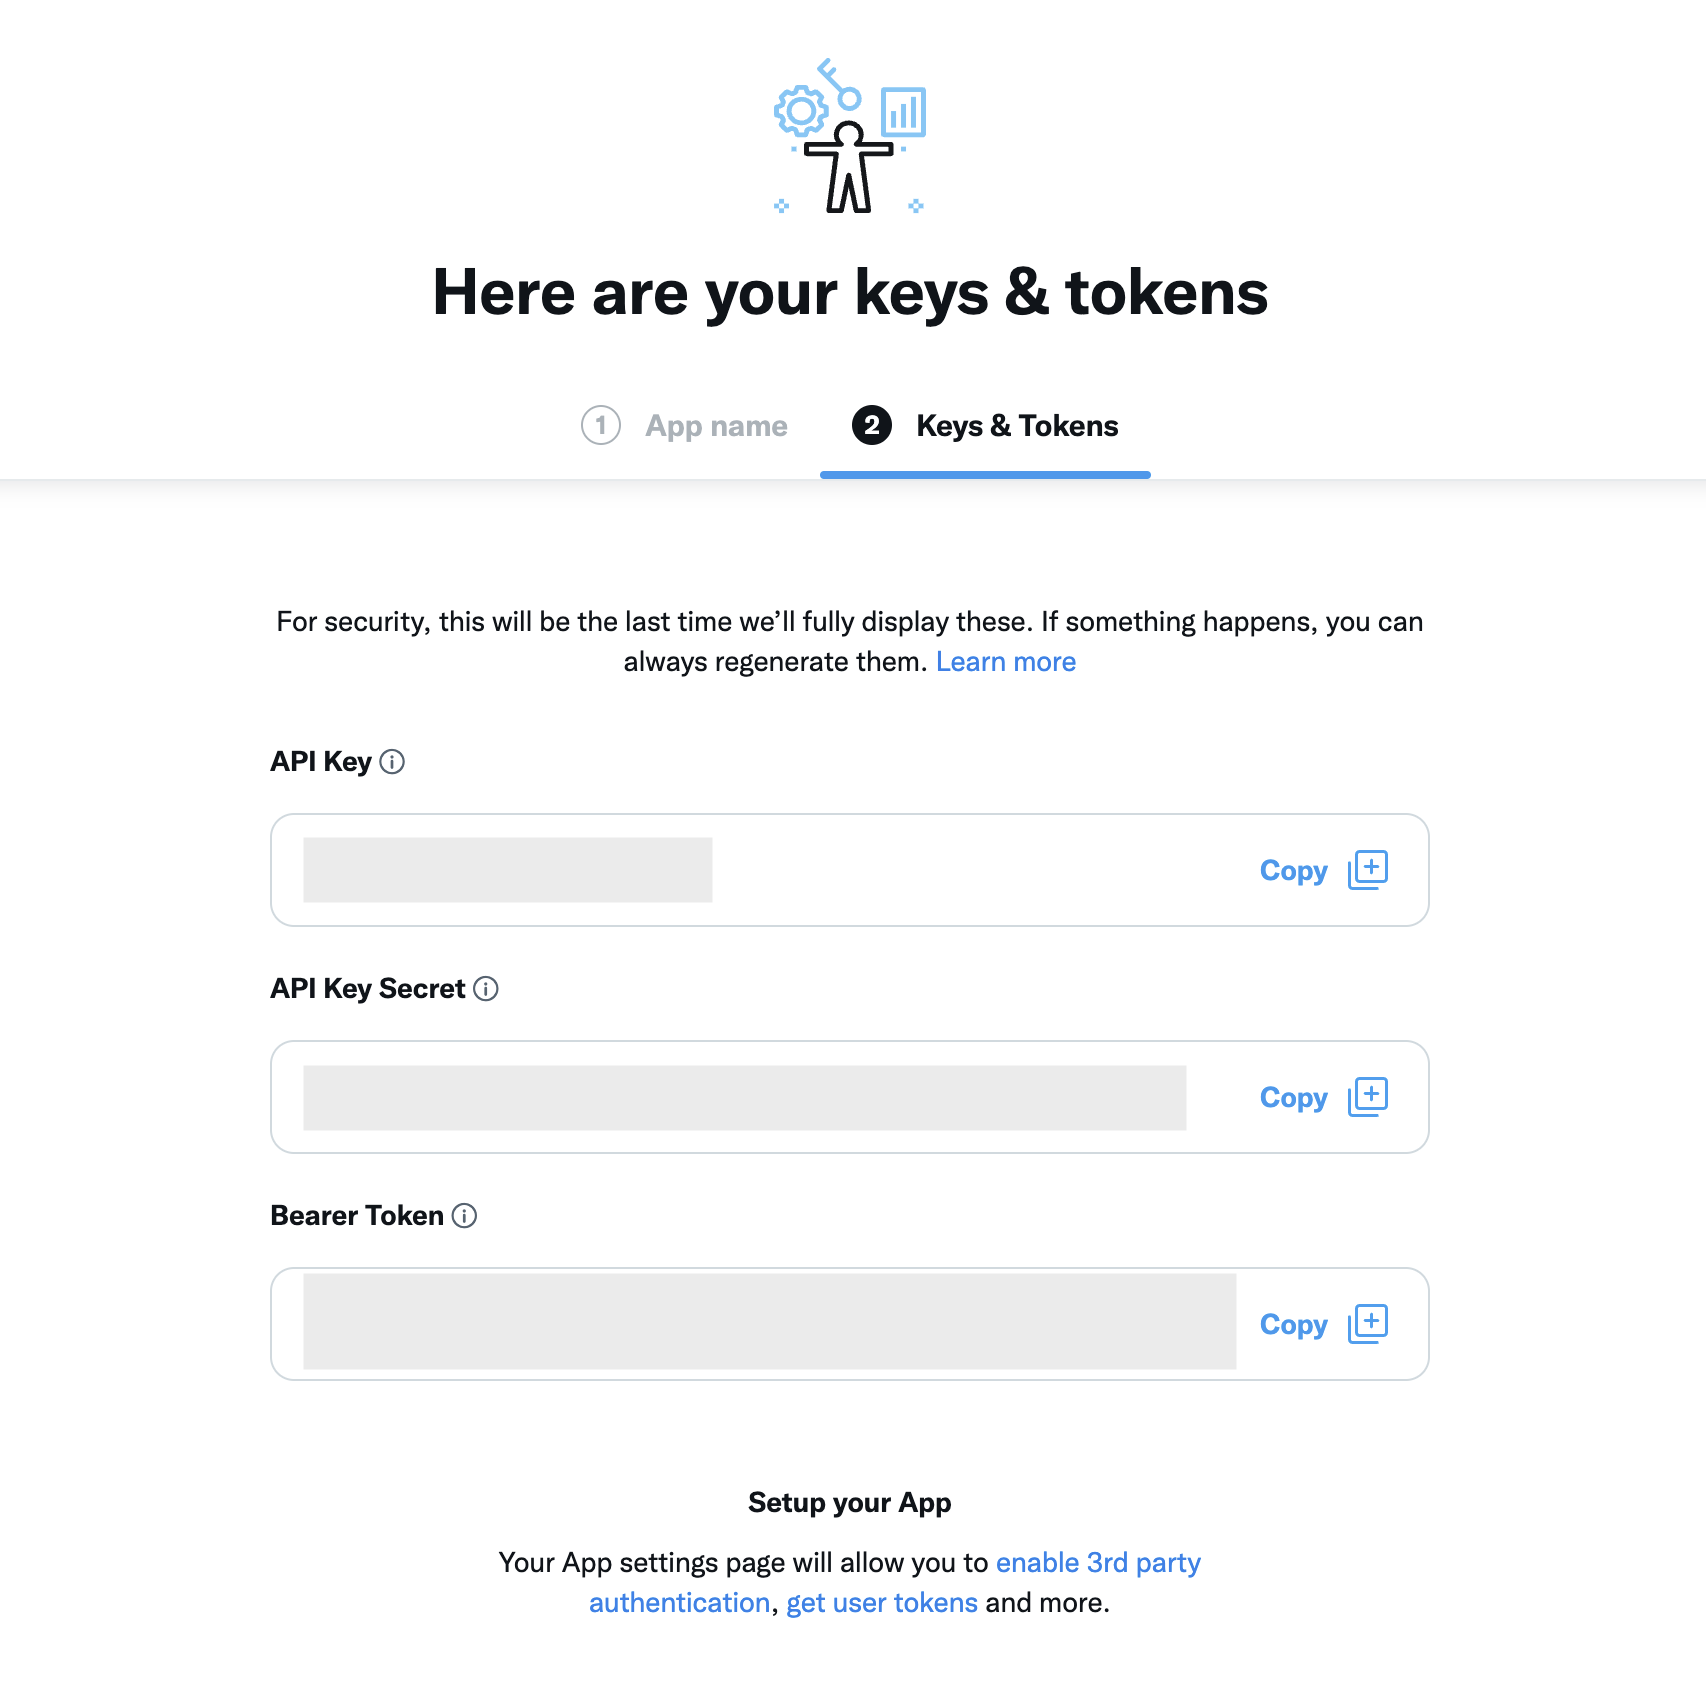
- You will then be given the API Key, API Key Secret and a Bearer Token. Ensure you store these in your password manager.
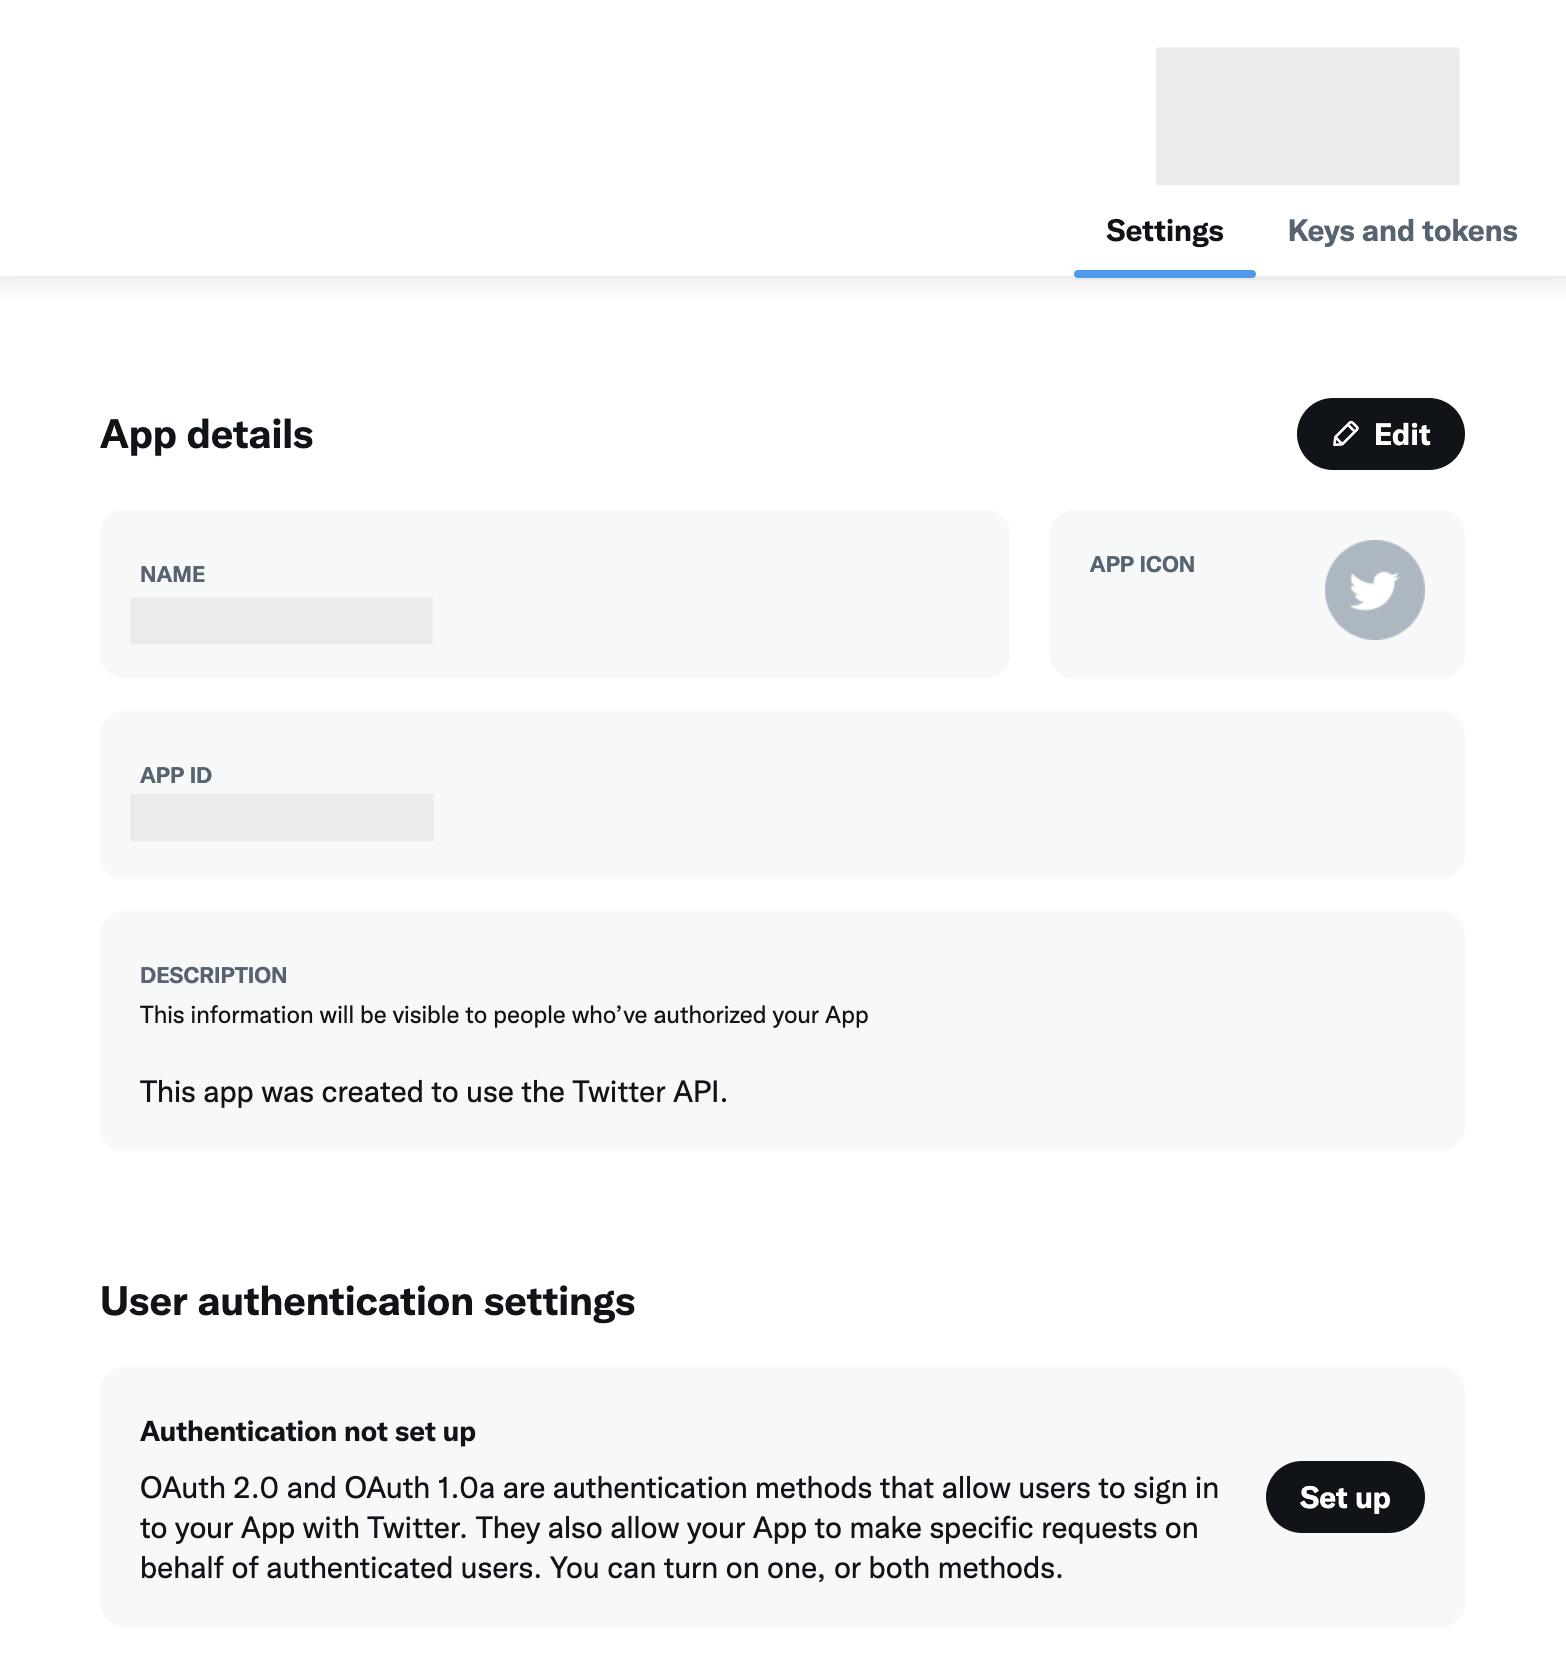
- Next you will also need to setup User authentication choosing either OAuth 2.0, OAuth 1.0a or both. Select the app and then the Settings tab. At the bottom there is a section to setup User authentication settings.
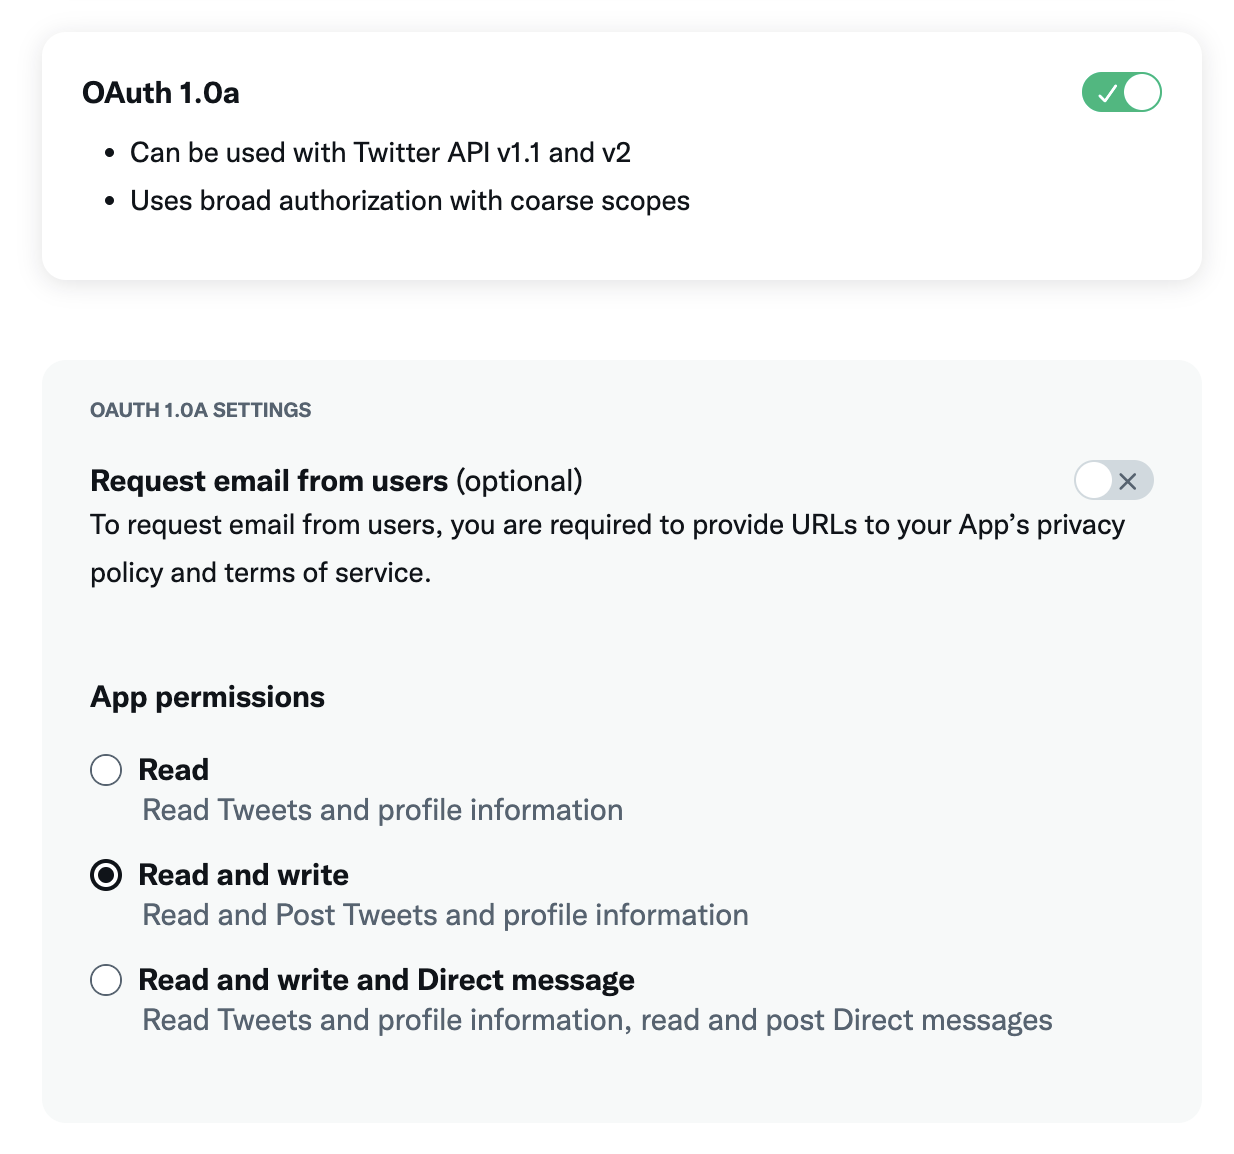
- For now I will just be setting up OAuth 1.0a with access to Read and Write tweets.
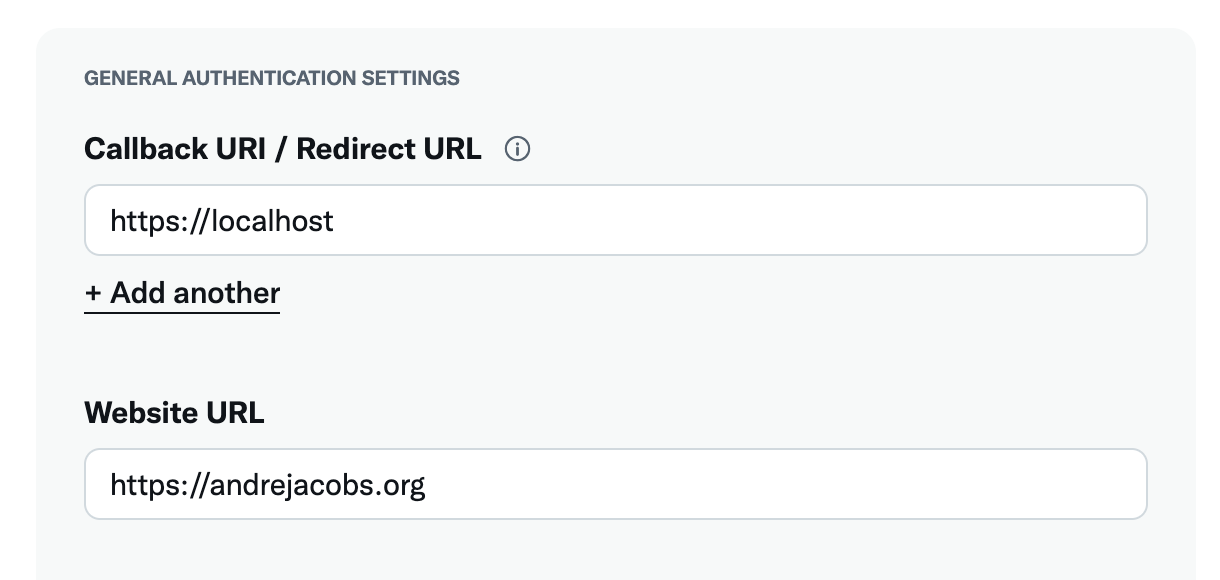
- Fill in the Callback URI and Website URL. Since I will only be using the app and tokens as myself, I just set the Callback URI to https://localhost.
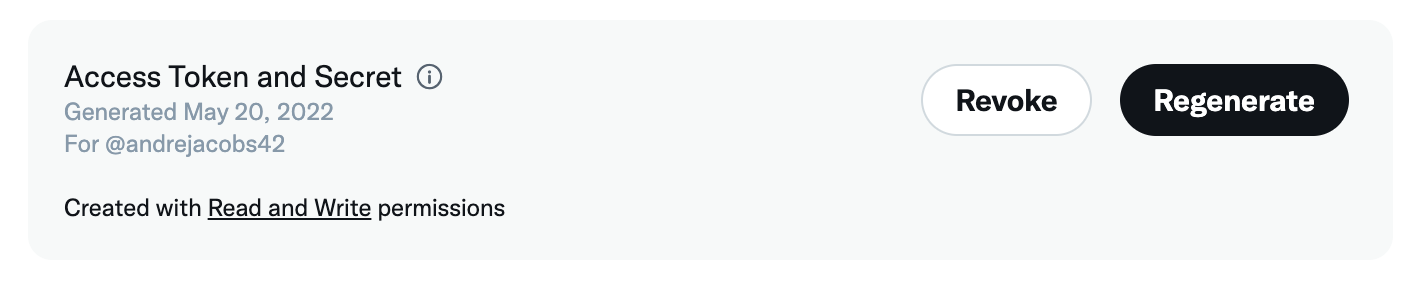
- Save and select the Keys and tokens section of the App settings.
- Generate or Regenerate the Access token and Secret for your developer account. Note that it states “Read and Write” permissions. If you do not setup the OAuth 1.0 and or OAuth 2.0 settings for the application, then it will only generate Read only tokens.
Making the first request
I will be following this guide on how to make the first request.
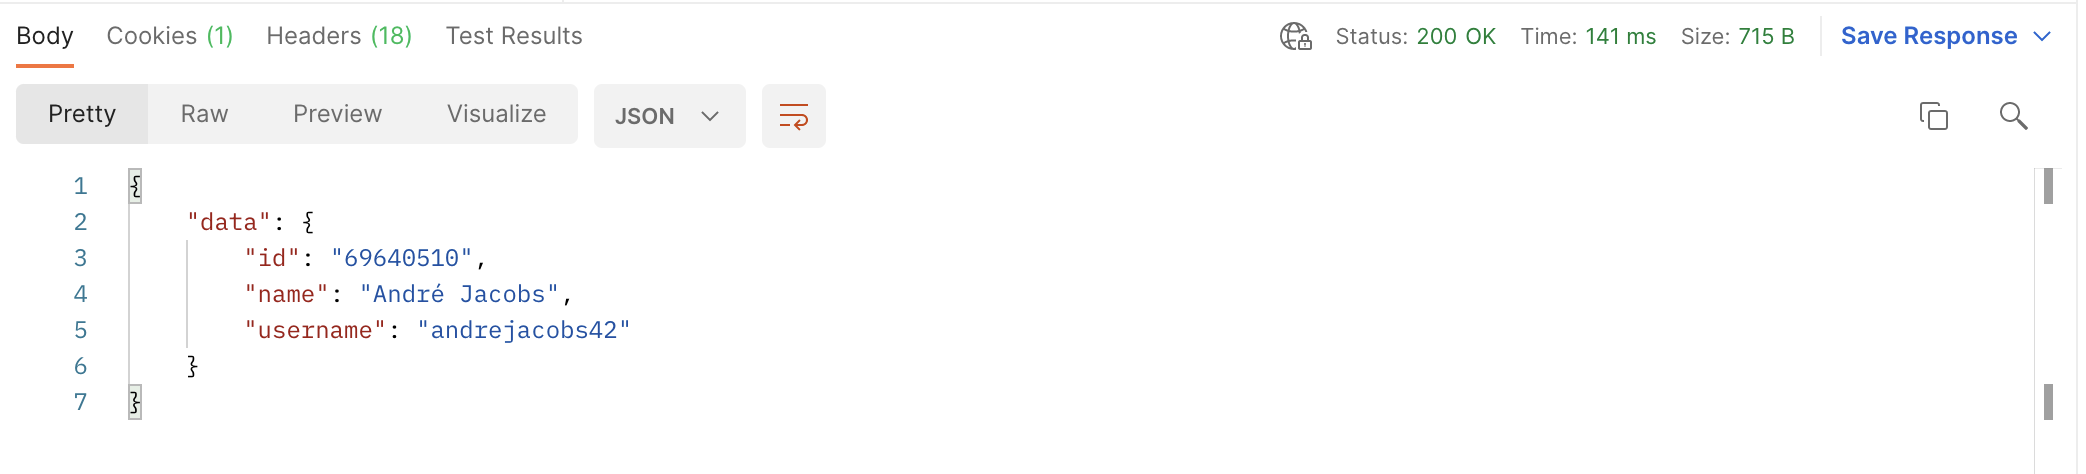
The quickest test is to do a user lookup using curl from the terminal.
# First do a fail test, e.g. not providing the credentials
$ curl "https://api.twitter.com/2/users/by/username/andrejacobs42" -H "Authorization: Bearer $TW_ACCESS_TOKEN"
{
  "title": "Unauthorized",
  "type": "about:blank",
  "status": 401,
  "detail": "Unauthorized"
}

# Next set the TW_ACCESS_TOKEN environment variable to the Bearer Token you received earlier
$ export TW_ACCESS_TOKEN=My top secret token here
$ curl "https://api.twitter.com/2/users/by/username/andrejacobs42" -H "Authorization: Bearer $TW_ACCESS_TOKEN"
{"data":{"id":"69640510","name":"André Jacobs","username":"andrejacobs42"}}

# Try and lookup someone famous
$ curl "https://api.twitter.com/2/users/by/username/elonmusk" -H "Authorization: Bearer $TW_ACCESS_TOKEN"
{"data":{"id":"44196397","name":"Elon Musk","username":"elonmusk"}}
-
NOTE: The Bearer token is also referred to as the
App Access Tokenand can be used in the APIs that supportOAuth 2.0 App-Only(mentioned in the Twitter docs).
Posting a Tweet
First I will be setting up and using Postman to send a tweet followed by writing an app in Go to do the same thing.
Posting a Tweet using Postman
- Download and install Postman.
- I will be following this guide from Twitter on how to setup and use Postman with Twitter’s APIs. NOTE: My version of the Postman desktop app on Mac looks different than their documentation. So by the time you read it, it probably looks different again 😑
- Import the Twitter API v2 collection into Postman. Inside of the desktop app.
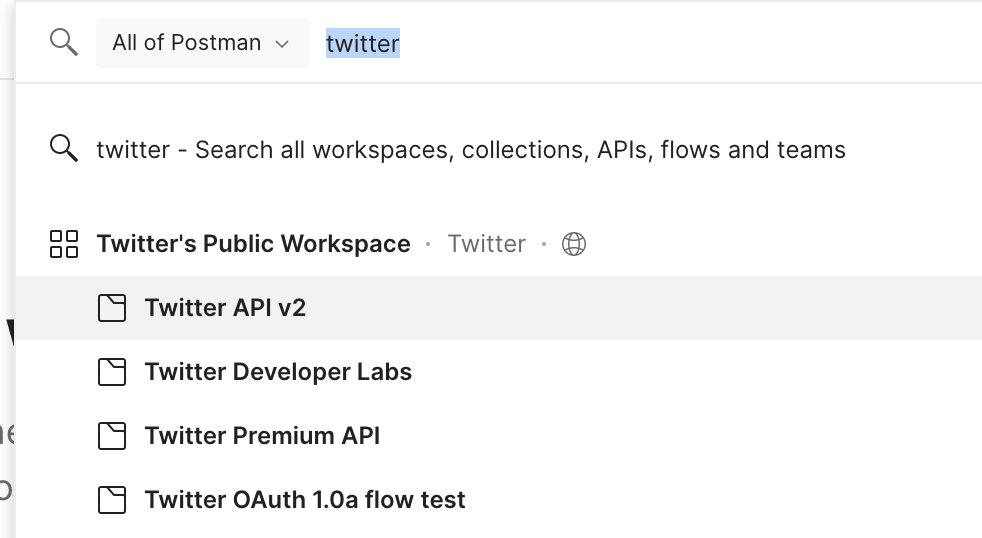
- Search for “Twitter” in the top search bar.
- Select “Twitter API v2”.
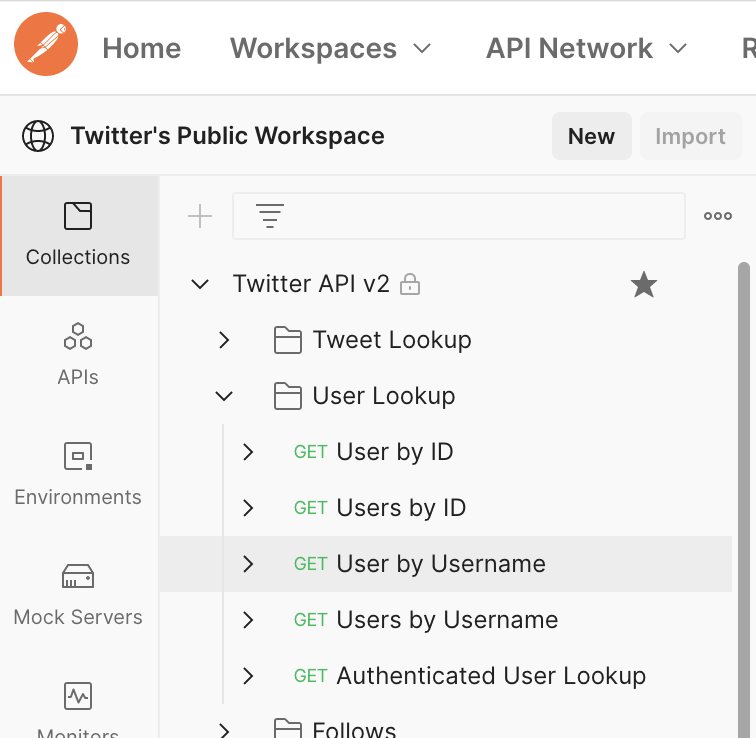
- Open up the folders and search for the call you want to make. First I am going to repeat the username lookup. Notice that I also marked the workspace as a favourite so I can easilly find it again later.
- Unfortunately you won’t be able to send any requests until you have forked the workspace. Click on the kebab (3 dot) menu and choose fork. Fill in the details and fork it.

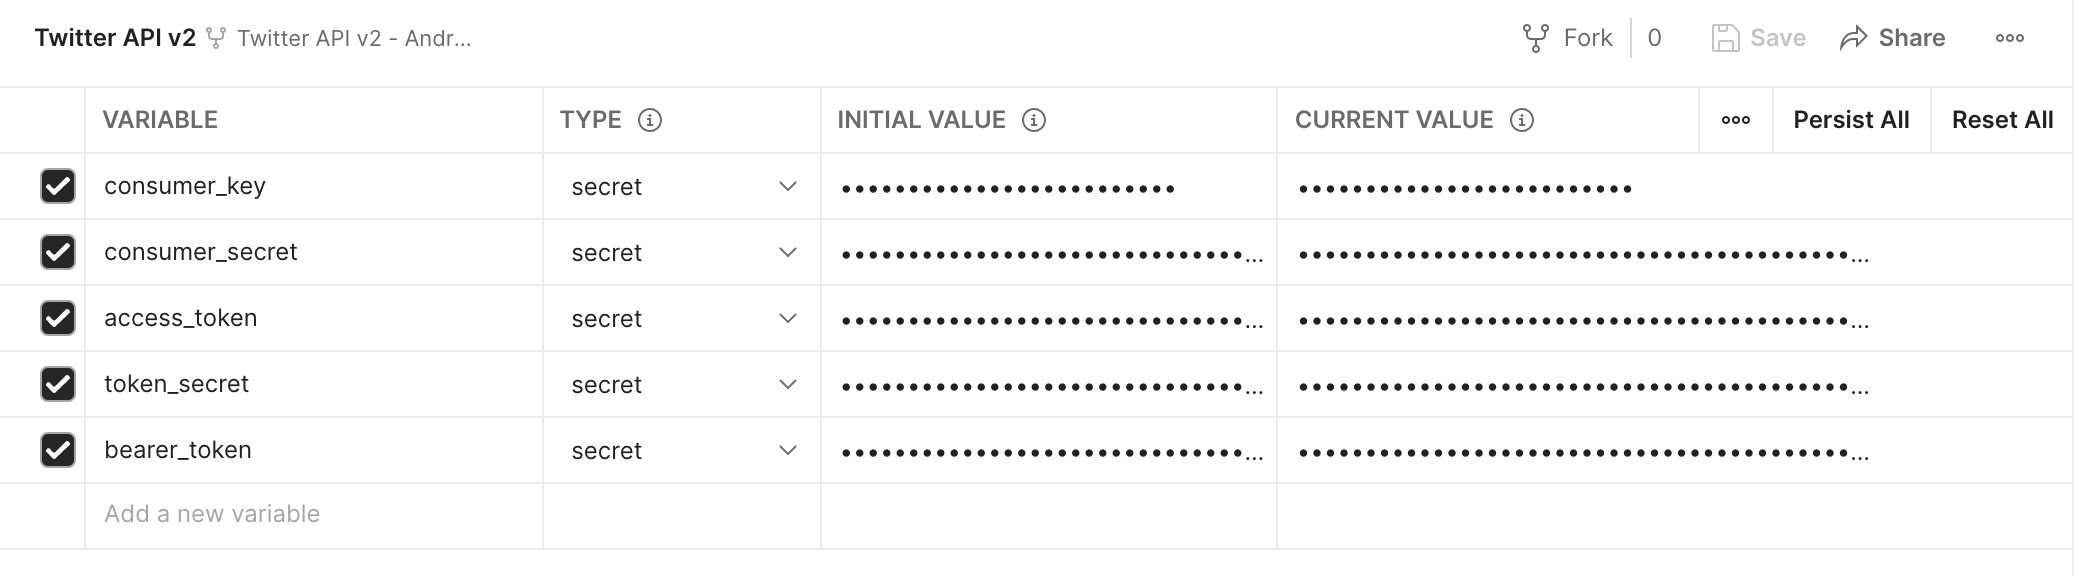
- You will need to setup the keys, secrets and tokens etc. to be used by Postman. To do so you will need to setup an environment first. The easiest way is to fork the environment “Twitter API v2” from the Twitter’s Public postman workspace.
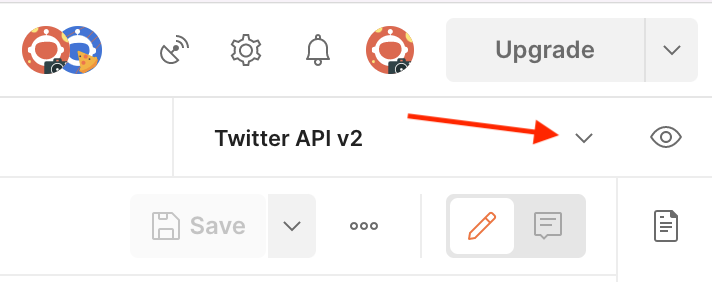
- Go back to the Twitter Public workspace.
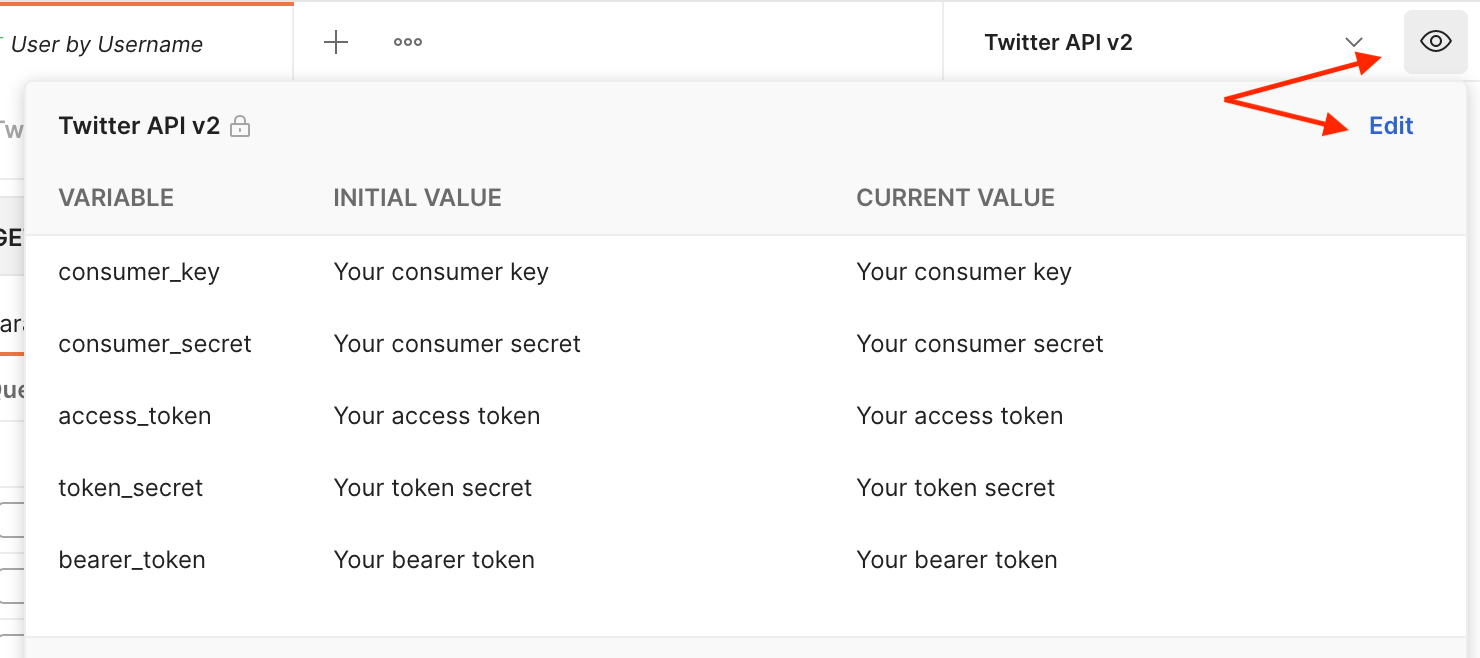
- Select the “Twitter API v2” from the Environment dropdown and then click on the Eye icon next to it. Then select Edit.
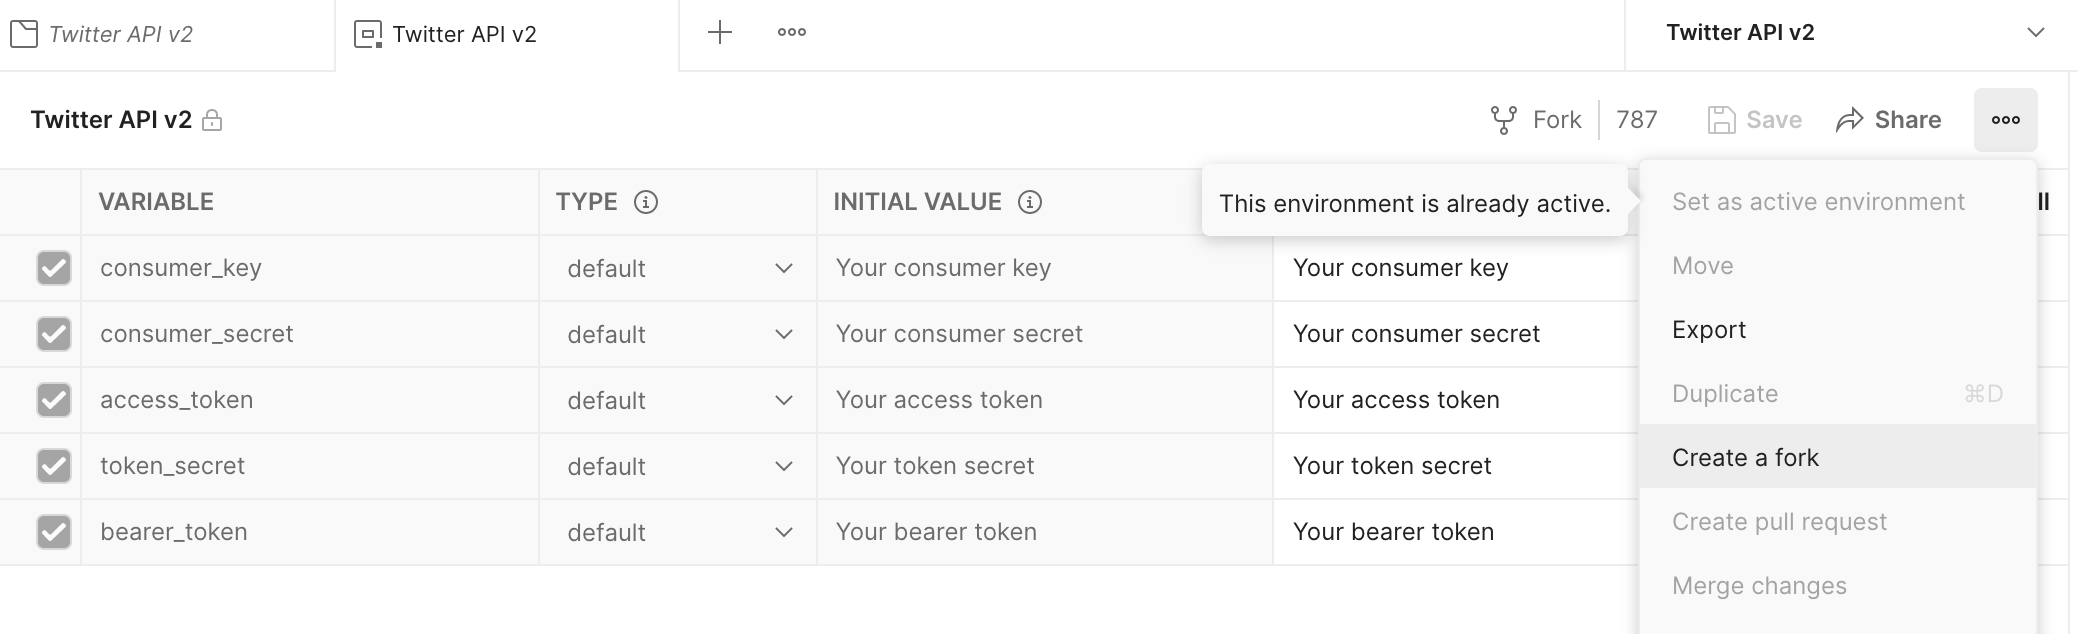
- From there you can select the kebab menu and choose to create a fork.
- Ensure you are using your Workspace forked from the Twitter one and also select the environment you forked. Then edit the environment so you can set the values required.
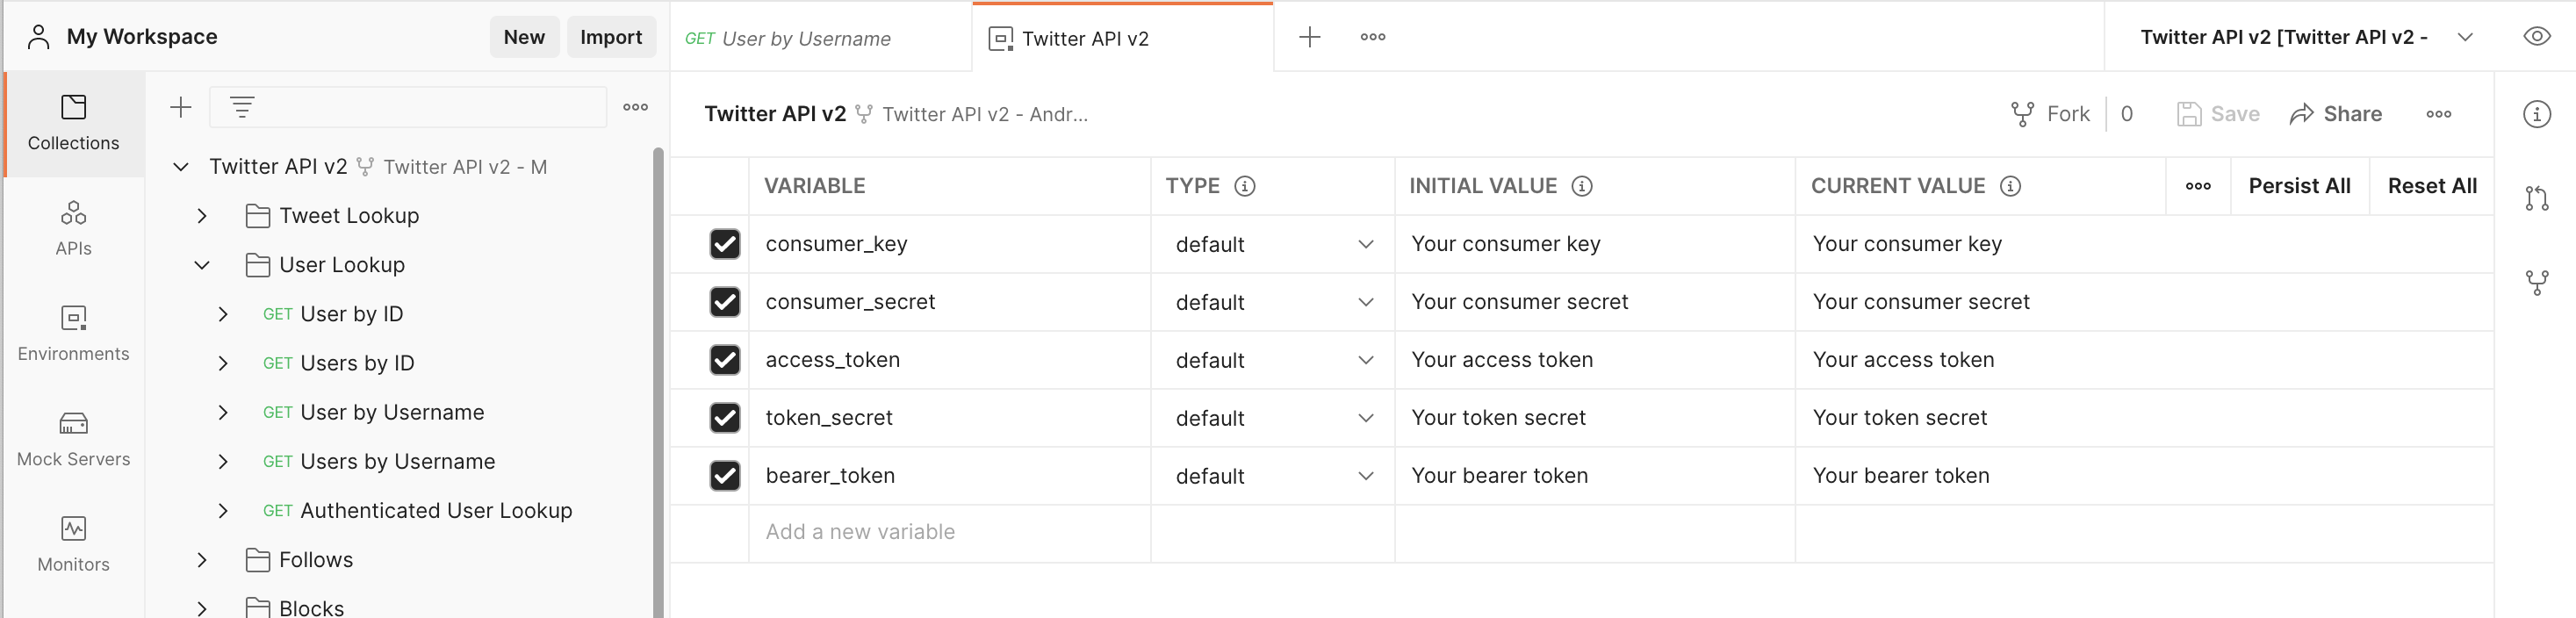
- Since the User lookup API can be used using the
OAuth 2.0 App-Onlymethod, I will set only thebearer_token‘s initial and current value to the Bearer token I received from the developer dashboard. NOTE: I also set the type to secret so that it doesn’t appear on screen.

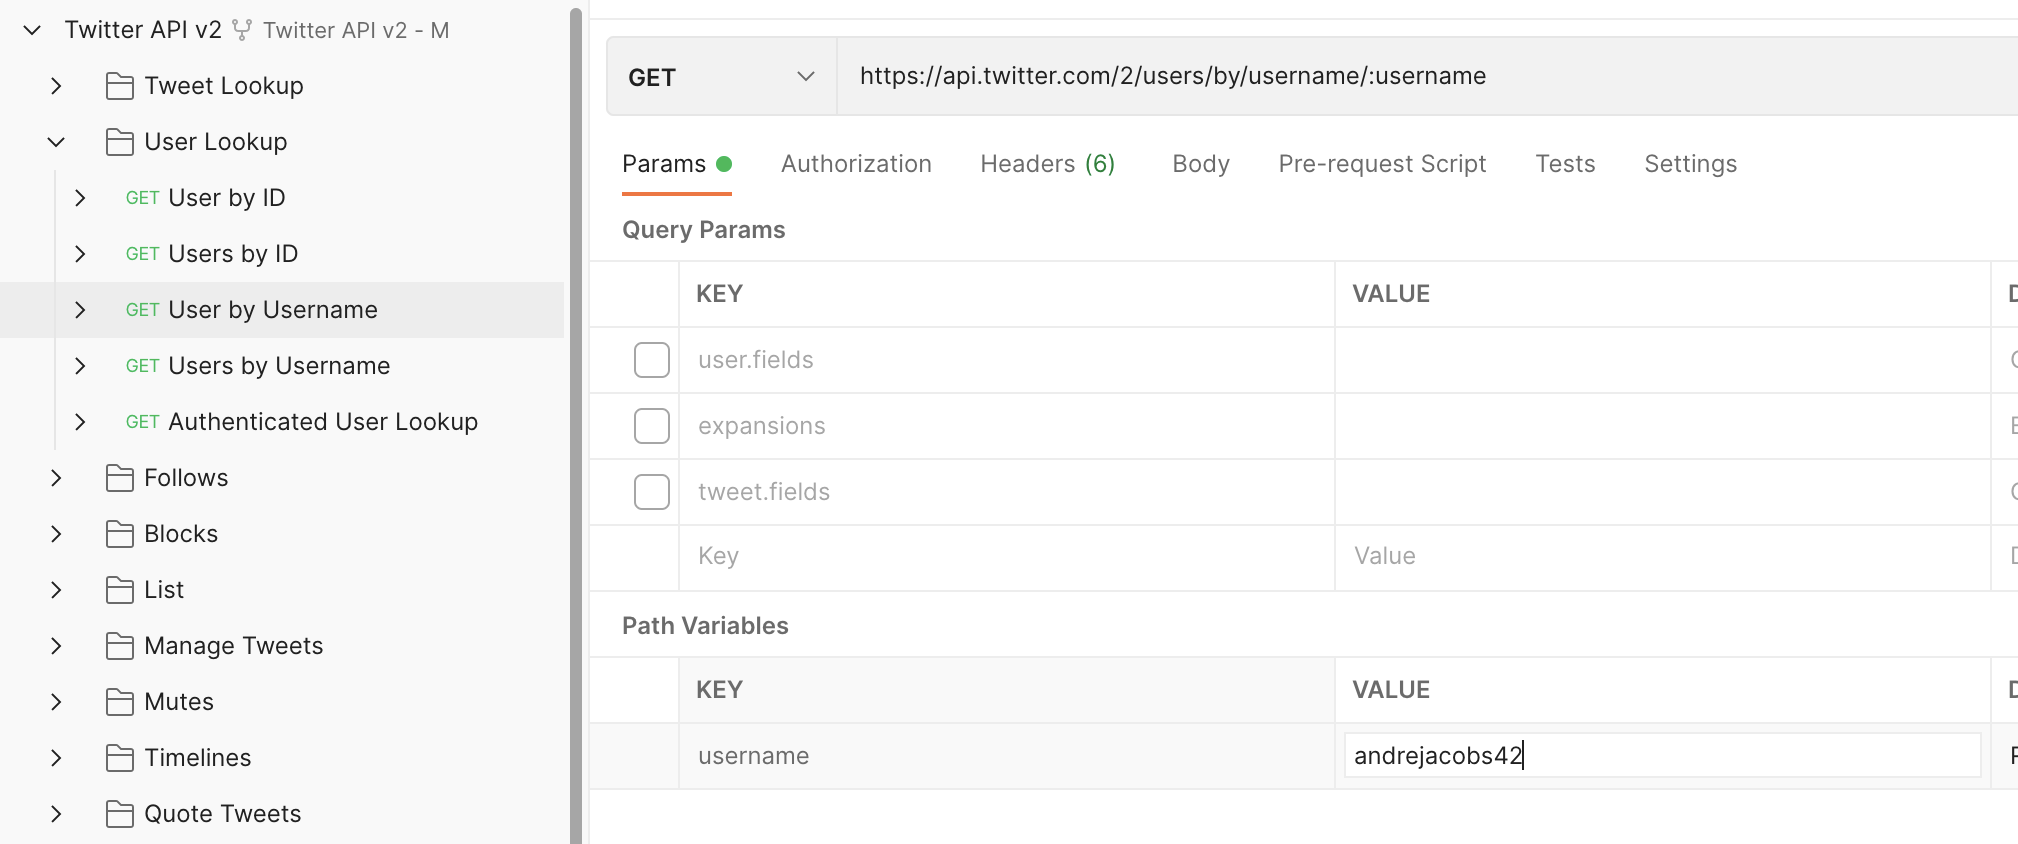
- Save the changes and then select the “User Lookup / User by Username” request from the workspace. Fill in the username to lookup in the Path Variables section.
- Select the Authorization tab and change the Type to Bearer Token. For the token field enter “{{bearer_token}}”. Changing the selected environment will alter where this value is received from, the default being from the collection. Environment variables override Collection ones.
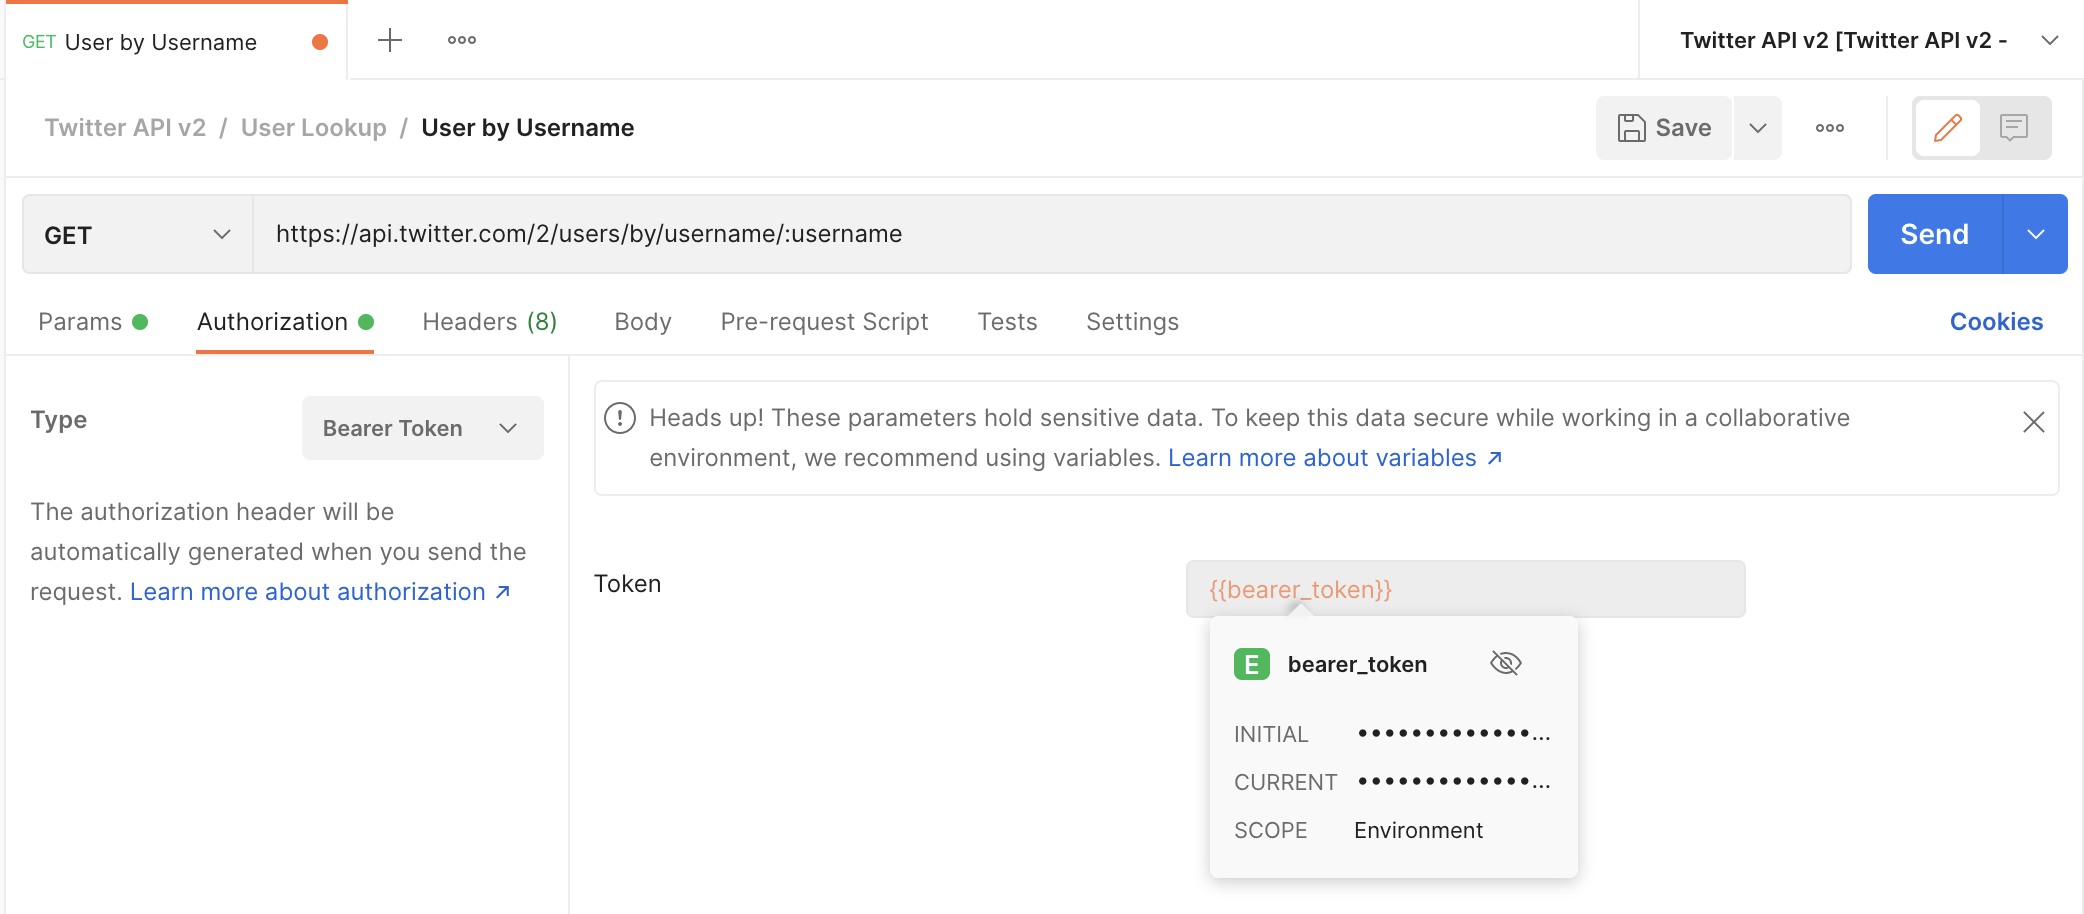
- Click on Send and you should get a valid response back if the autorization worked.
- Now we can try sending an actual tweet.
- Following this guide I will be using the
OAuth 1.0a User Contextmethod for authentication.- You will need: API Key, API Secret Key (that your received while setting up an app).
- You will also need: OAuth 1.0a user Access Token, and OAuth 1.0a user Access Token Secret.
- See the first section on how I generated these tokens and secrets.
- Go back to editing the Postman Environment variables and set the consumer_key (API Key), consumer_secret (API Secret), access_token (User token), token_secret (User token secret).
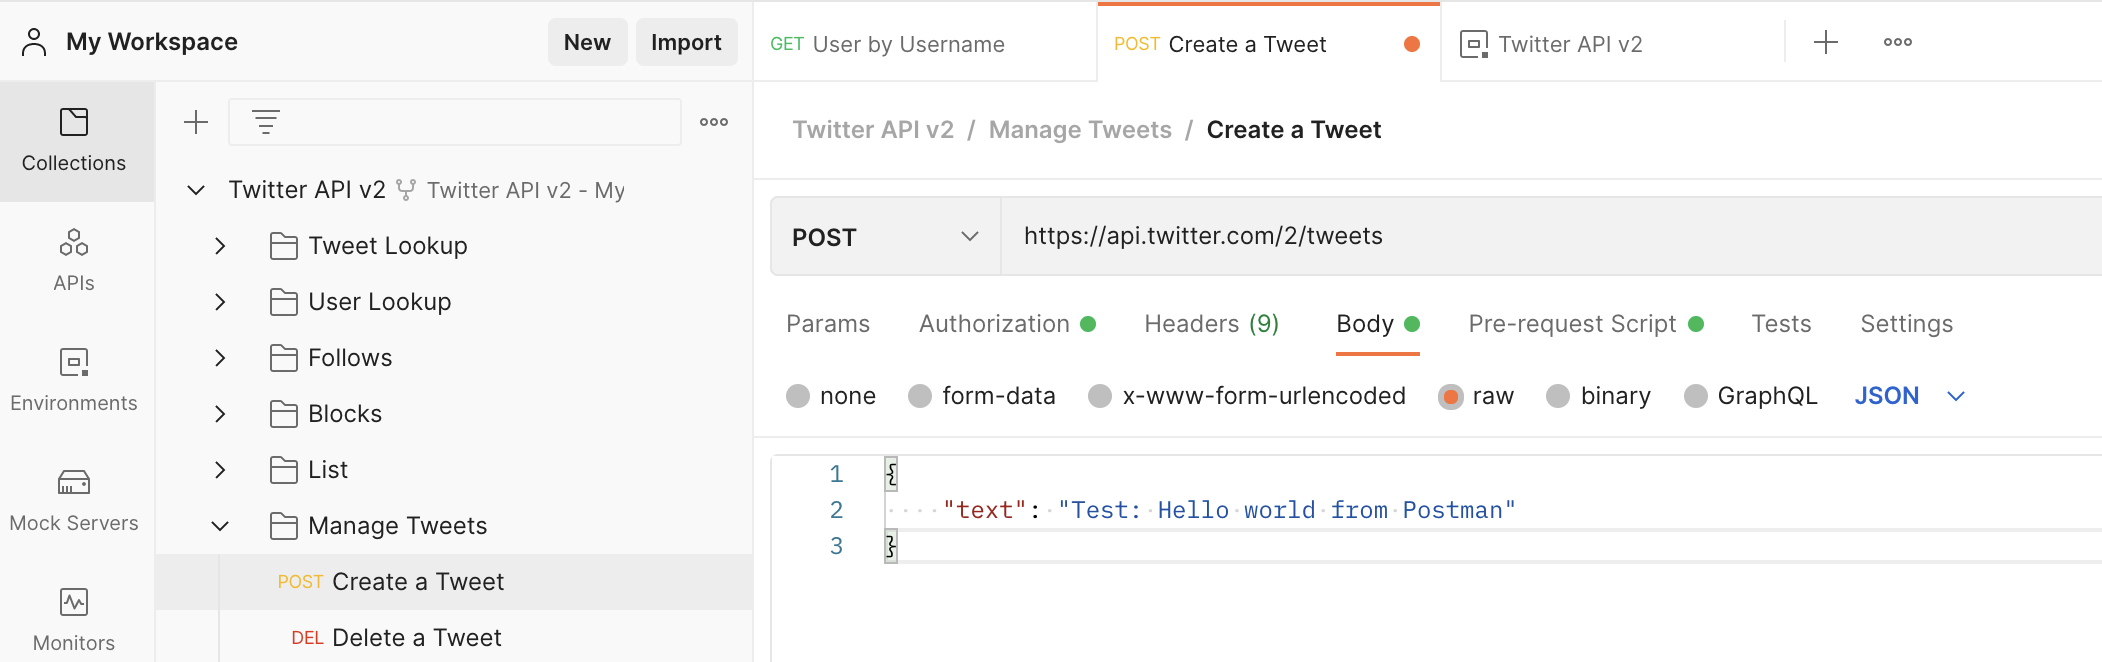
- Select the “Manage Tweets / Create a Tweet” request from the collection.
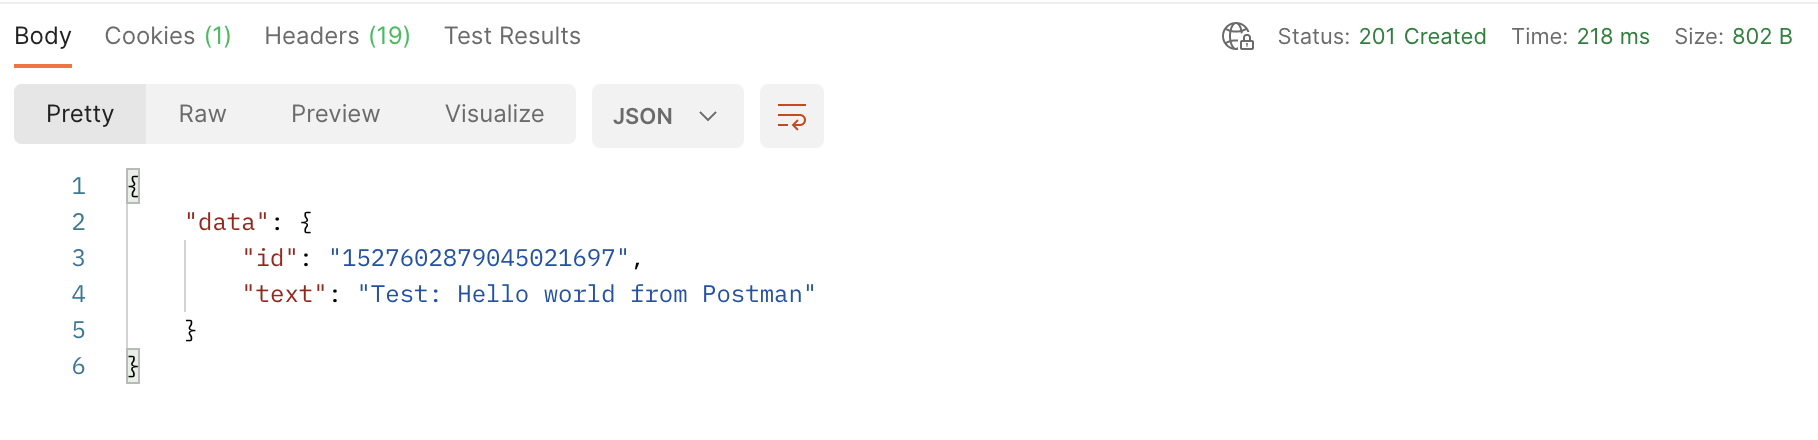
- Select the Body tab and change the “text” value to the comment you want to post on Twitter.
- Send and you should get a response back that gives you the ID of the tweet.
- Go onto Twitter and check the tweet was posted as expected.

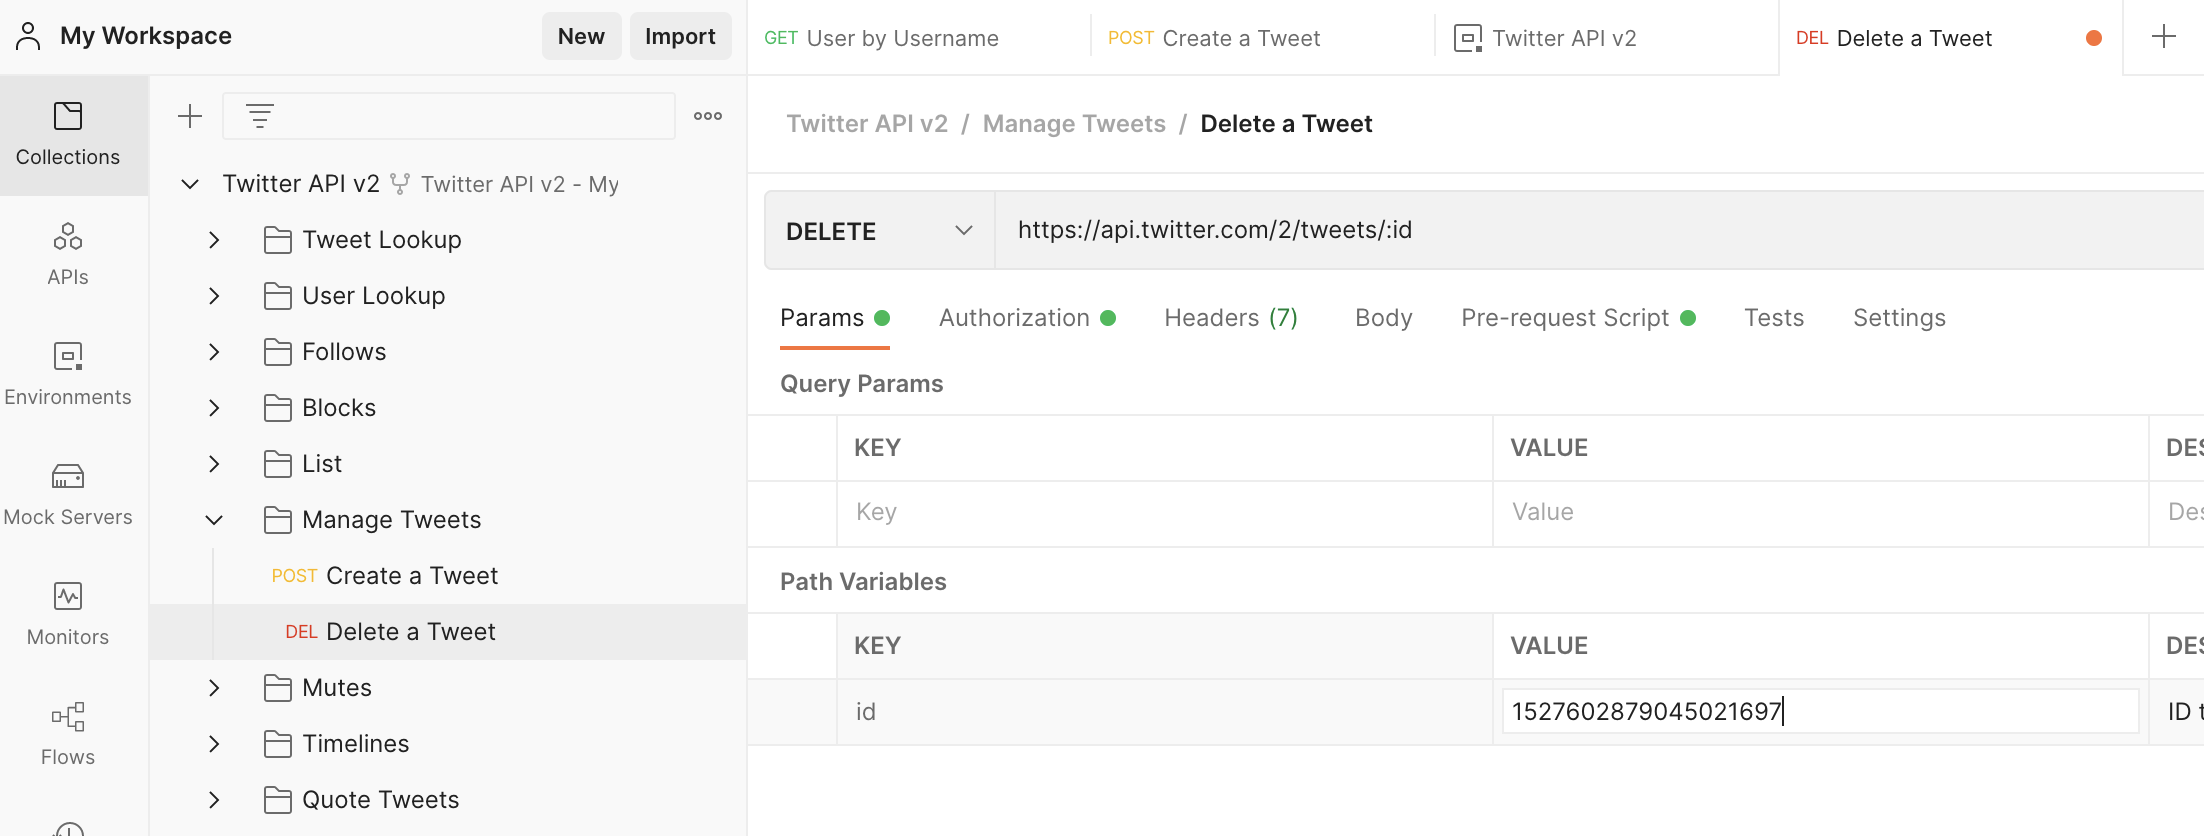
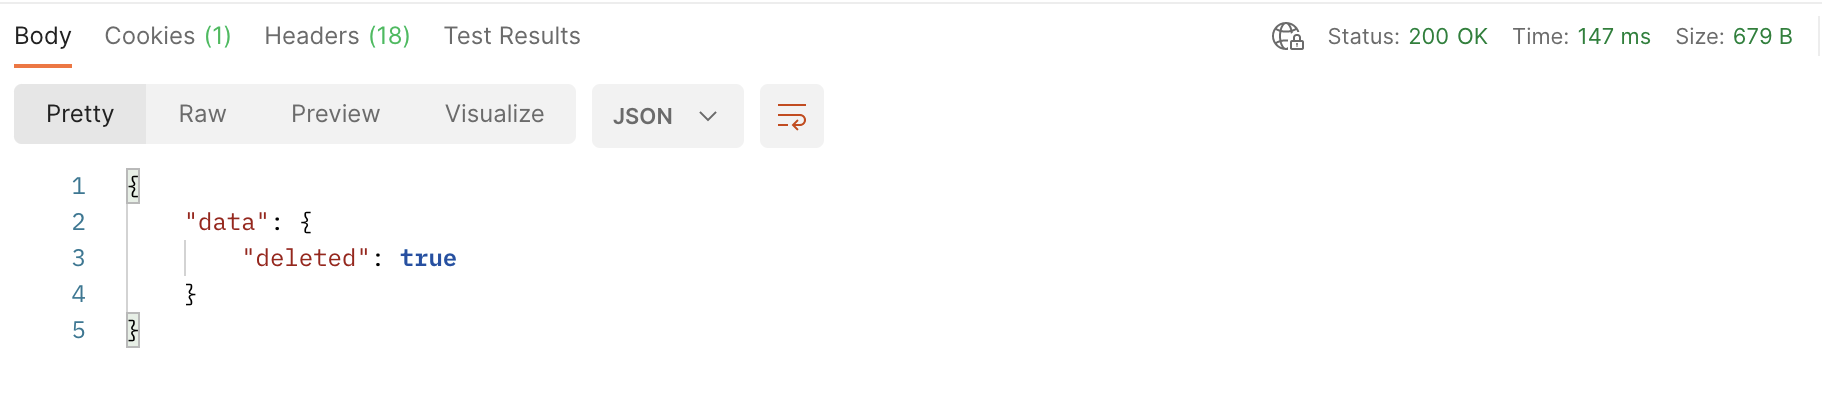
- Next I will delete that tweet using the ID that was given to me in the response JSON.
- Select the “Delete a Tweet” request and for the Path Variable “id” set the value to the id of the tweet you want to delete. Hit send.
Posting a Tweet using Golang
TL;DR; You can find the example code here.
I will be using the gotwi package for sending a tweet using the OAuth 1.0a method. I did try another package and ended up get a response from the API saying I needed elevated privileges, so now I will be using the more simpler gotwi package.
- Create the new directory and Go module.
$ mkdir twitter
$ cd twitter
$ go mod init twitter

$ touch main.go
- Add the dependency.
$ go get -u github.com/michimani/gotwi@latest
- Edit main.go
package main

// Source code based on the example:
// https://github.com/michimani/gotwi/blob/main/_examples/2_post_delete_tweet/main.go

import (
	"context"
	"fmt"
	"os"

	"github.com/michimani/gotwi"
	"github.com/michimani/gotwi/tweet/managetweet"
	"github.com/michimani/gotwi/tweet/managetweet/types"
)

func main() {

	// Check expected secrets are set in the environment variables
	accessToken := os.Getenv("TW_ACCESS_TOKEN")
	accessSecret := os.Getenv("TW_ACCESS_SECRET")

	if accessToken == "" || accessSecret == "" {
		fmt.Fprintln(os.Stderr, "Please set the TW_ACCESS_TOKEN and TW_ACCESS_SECRET environment variables.")
		os.Exit(1)
	}

	// Check the comment to tweet has been supplied
	if len(os.Args) != 2 {
		fmt.Fprintln(os.Stderr, "Please pass the comment to tweet as the only argument.")
		os.Exit(1)
	}

	client, err := newOAuth1Client(accessToken, accessSecret)
	if err != nil {
		fmt.Fprintln(os.Stderr, err)
		os.Exit(1)
	}

	tweetId, err := tweet(client, os.Args[1])
	if err != nil {
		fmt.Fprintln(os.Stderr, err)
		os.Exit(2)
	}

	fmt.Println("tweet id", tweetId)
}

func newOAuth1Client(accessToken, accessSecret string) (*gotwi.Client, error) {
	in := &gotwi.NewClientInput{
		AuthenticationMethod: gotwi.AuthenMethodOAuth1UserContext,
		OAuthToken:           accessToken,
		OAuthTokenSecret:     accessSecret,
	}

	return gotwi.NewClient(in)
}

func tweet(c *gotwi.Client, text string) (string, error) {
	p := &types.CreateInput{
		Text: gotwi.String(text),
	}

	res, err := managetweet.Create(context.Background(), c, p)
	if err != nil {
		return "", err
	}

	return gotwi.StringValue(res.Data.ID), nil
}
- Create a file named
.envthat will store the environment variables to be used. NOTE: Make sure you don’t commit this file into source control.
#!/bin/bash
# usage: source .env
export GOTWI_API_KEY=your_consumer_api_key
export GOTWI_API_KEY_SECRET=your_consumer_api_secret

# OAuth 1.0a User token
export TW_ACCESS_TOKEN=your_oauth_user_token
export TW_ACCESS_SECRET=your_oauth_user_secret
- Run the app
# First without the environment variables
$ go run . "Test: Hello world from golang"
Please set the TW_ACCESS_TOKEN and TW_ACCESS_SECRET environment variables.
exit status 1

# With the environment variables
$ source .env
$ go run . "Test: Hello world from golang"
tweet id 1527644512285343745

# If the secrets are incorrect you should get something like this
The Twitter API returned a Response with a status other than 2XX series. httpStatus="401 Unauthorized" httpStatusCode=401
exit status 2
- Verify on Twitter it was sent. Whoohoo! 😄
